HTML <form> target Attribute

HTML form Tag Reference HTML <form> tag

Example

Display the response received in a new window or tab:

<form action="demo_form.asp" method="get" target="_blank">
  First name: <input type="text" name="fname"><br>
  Last name: <input type="text" name="lname"><br>
  <input type="submit" value="Submit">
</form>

Try it Yourself »

Definition and Usage

The target attribute specifies a name or a keyword that indicates where to display the response that is received after submitting the form.

The target attribute defines a name of, or keyword for, a browsing context (e.g. tab, window, or inline frame).


Differences Between HTML 4.01 and HTML5

The target attribute is supported in HTML5.

The target attribute was deprecated in HTML 4.01.

Note: Frames and framesets are not supported in HTML5, so the _parent, _top and framename values are now mostly used with iframes.


Syntax

<form target="_blank|_self|_parent|_top|framename">

Attribute Values

ValueDescription
_blankThe response is displayed in a new window or tab
_selfThe response is displayed in the same frame (this is default)
_parentThe response is displayed in the parent frame
_topThe response is displayed in the full body of the window
framenameThe response is displayed in a named iframe


source - http://www.w3schools.com/tags/att_form_target.asp


*response를 보여주지 않을 경우

<form action="xxx" method="POST" target="empty">

<input></input>

</form>

<iframe name="empty" width="0" height="0" style="border: 0;"></iframe>


form 데이터를 새 창을 열어서 보내야 할 경우가 있다. 요즘은 ajax로 많이들 처리하지만, 사실 ID와 Password를 체크할 때 새 창을 열어서 많이들 검증했다.

이 때는 get 방식으로 파라미터를 보낼 수가 없다. post로 보내야 한다는 말이다. password를 주소 표시줄에 노출시키면 안 되니까.

이 때 간단한 방법이 있다. form에 target을 지정해 주고 자바스크립트로 이름 가진 창을 열어 주면 된다.

<script type=”text/javascript”>
var win;
function create(){
win = open(”,‘w’,‘width=300,height=200′);
}
</script>

일단 위는 새 창을 여는 자바 스크립트 함수다. 중요한 것은, ‘w’라고 써 준 것인데, 이게 새 창의 이름이 된다.

그리고 width=300,height=200은 새 창의 크기를 지정해 준 것인데, 사이에 공백이 들어가면 안 된다. width=300, height=200 이렇게 하면 안 된다는 말이다. (노랑색이 공백을 표시한 부분이다. 저 노랑색 만큼의 공백도 안 된다!)

그리고 form은 이렇게 만든다.

<form method=”post” action=”actionServlet” target=”w” onsubmit=”create();“>
(<input/>은 생략)
</form>

 그러면 훌륭하게 새 창이 열리면서 작동한다.

설마 action=”actionServlet”을 그대로 옮긴 사람은 없을 거라 생각한다. 저기는 알아서 창으로 띄울문서의 경로를 적어 줘야 한다. 왕초보를 위해 적었다.


출처 - http://mytory.net/archives/16


Ajax를 이용하여 파일업로드를 하는 소스들을 보면 form태그의 target속성을 이용하는 경우가 많다.

<form action="fileUpload.php" method="post" enctype="multipart/form-data" target="fileUpload"> <input type="file" name="upload[]" /> <input type="file" name="upload[]" /> <input type="submit" value="파일 전송" /> </form> <iframe name="fileUpload" src="fileUpload.php"></iframe>

target를 지정하지 않는다면 페이지 이동이 이루어지지만 target를 사용한다면, iframe의 페이지가 이동된다.
이 결과를 토대로 파일 업로드를 처리하게 된다.(XML문서를 띄어주던지 하는 방식으로...)

주의해야할점은 iframe에서 id속성이 아니라 name

속성을 사용한다는 것이다.


출처 - http://qnrdlqkrwhdgns.canxan.com/jpboard/post/290


'Development > HTML' 카테고리의 다른 글

html - iframe 안에서 밖으로 자바스크립트 통신하기  (0) 2013.07.27
html5 - hashchange 이벤트  (0) 2013.06.25
html - label과 placeholder 차이  (1) 2012.12.13
HTML5 - Geolocation  (0) 2012.12.01
html - 조건부 주석  (0) 2012.09.11
Posted by linuxism
,


form에서 사용되는 각종 양식(input, select, textarea) 역시 자바스크립트를 이용하여 제어할 수 있다.

자바스크립트에서는 form에서 사용되는 양식들을 forms 객체에서 정의할 수 있다.

forms 객체는 links, images 등과 같은 배열 형태로 document 객체의 하단에 존재하는 객체이다.
forms 객체를 제어하는 일은 자바스크립트에서 매우 중요한 일이다.

일반적으로 인트라넷과 같이 고급 기능을 요구하는 경우에 많이 사용된다.


forms[] 배열

폼의 구성 요소와 마찬가지로 폼 자체도 배열로 참조되어질 수 있다. 배열의 순서는 구성 요소의 순서와 마찬가지로 HTML 내에서 기술된 순서대로 0번부터 참조되어지며, 그 형식은 document.forms[0]과 같은 방식으로 참조된다. 물론 배열로 참조된 폼 내의 구성 요소 참조시에도 elements[] 배열을 사용할 수 있다. 즉, HTML내에서 기술된 두 번째 폼에서 세 번째 구성 요소를 참조하고자 한다면 document.forms[1].elements[2]와 같이 하면 참조가 가능하다.


form에서 사용되는 각 양식들의 이름(name)을 정의해 준다면, 이들을 모두 자바스크립트에서 쉽게 접근할 수 있다. 만약, 이름을 정의해 주지 않는다면 아래와 같이 참조할 수 있다.

...... 
<form> →document.forms[0]
<input type=text value='Text1'> →document.forms[0].elements[0]
<input type=text value='Text2'> →document.forms[0].elements[1]
<input type=submit>
</form>
<form> →document.forms[1] 
<input type=text value='Text1'> →document.forms[1].elements[0]
<input type=text value='Text2'> →document.forms[1].elements[1]
<input type=submit>
</form>
......


form 태그에도 아래와 같이 이름을 정의해 줄 수 있다. 이름을 정의해 주는 작업은 실제 자바스크립트 프로그래밍에서 가독률 및 개발 생산성을 향상시킬 수 있는 좋은 습관이다.

...... 
<form name=form1> →document.form1
<input type=text value='Text1' name=text1> →document.form1.text1
<input type=text value='Text2' name=text2> →document.form1.text2
<input type=submit name=submitform> →document.form1.submitform
</form>
<form name=form2> →document.form2 
<input type=text value='Text1' name=text1> →document.form2.text1
<input type=text value='Text2' name=text2> →document.form2.text2
<input type=submit name=submitform> →document.form2.submitform
</form>
......


요약

<form> ... </fom>은 사용자로부터 일정한 형식의 입력을 받는데 사용되는 HTML 태그이다.

이 태그로 만든 입력 형식은 JavaScript에서 document.forms란 객체를 이용하여 접근할 수 있다.

웹 문서에 여러 개의 입력 형식이 있는 경우 JavaScript에서는 다음과 같은 방법으로 특정 입력 형식에 접근할 수 있다.


인덱스를 이용하는 방법

i번째 입력 형식은 document.forms[i-1]을 이용하여 접근할 수 있다.

예를 들어 첫번째 입력 형식은 document.forms[0]으로 접근할 수 있고 두번째 입력 형식은 document.forms[1]로 접근할 수 있다.


입력 형식의 이름을 이용하는 방법

<form> 태그는 name이란 속성을 취할 수 있다. 여러 개의 입력 형식이 존재할 경우 각각을 구분하는 name이란 속성의 값을 이용할 수 있다.  
예를 들어 웹 문서에 다음과 같이 세 개의 입력 형식이 있다고 하자.

<form name="first"> ... </form>
<form name="second"> ... </form>

<form name="last"> ... </form>


first란 이름이 부여된 입력 형식은 document.first로 접근할 수 있다.
second란 이름이 부여된 입력 형식은 document.second로 접근할 수 있다. 
third란 이름이 부여된 입력 형식은 document.third로 접근할 수 있다.

이 방법은 입력 형식을 이루고 있는 각 성분에 접근하는데에도 사용된다.


꼭 알아야 할 자바스크립트


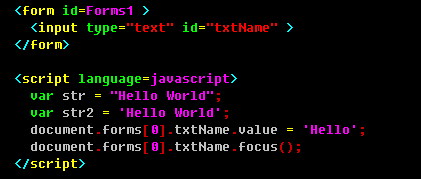
위와 같은 HTML이 있다고 하자. 자바스크립트는 script 태그 안에 위치한다. 
자바스크립트의 변수 선언은 var로 할 수 있으며, str과 str2의 선언에서 볼 수 있는 것처럼 문자열에는 " 또는 '을 모두 사용할 수 있다. HTML에서 속성이름="값"과 같은 형식으로 사용하기 때문에 자바스크립트에서 문자열을 사용할 때는 '을 선호한다.

FORM 태그에 있는 요소들을 접근할 때는 document.forms[0]과 같은 형식을 사용한다.

하나의 페이지에 FORM 태그가 둘 이상 있는 경우에는 document.forms[0], document.forms[1]과 같은 형식으로 사용할 수 있다. 

<form id=Forms1> 태그와 같이 ID가 지정된 경우에는 document.forms.Forms1, document.forms["Forms1"], document.forms.namedItem( "Forms1" )과 같은 형식으로 사용할 수 있다.
document.forms[0].txtName.value는 첫 번째 폼에 있는 txtName 요소의 값을 가져오거나 설정하는 데 사용한다.

focus() 함수는 해당 텍스트 박스에 커서의 포커스를 이동시킨다. 여러분이 검색 사이트를 방문했을 때 키워드만 입력해서 검색할 수 있는 것도 focus() 함수 때문이다.


스크립트 축약하기


매번 document.forms[0].컨트롤ID 형태로 사용하는 것은 번거롭기 때문에 다음과 같은 형태를 더 빈번하게 사용한다.

<script language=javascript>
        var theForm = document.forms[0];
        theForm.txtName.value = 'Hello';
        theForm.txtName.focus();
</script>

이 코드는 이전의 코드와 완전히 동일한 역할을 한다.

[출처] document.forms 객체|작성자 아키라


출처 - http://blog.naver.com/PostView.nhn?blogId=akira54055&logNo=60035061694


'Development > JavaScript' 카테고리의 다른 글

javascript - RequireJS  (0) 2013.10.02
javascript - 크롬에서 동적으로 로드된 js 파일 디버깅 방법  (0) 2013.07.28
socket.io readme  (0) 2012.12.28
comet  (0) 2012.12.28
자바스크립트 이벤트 핸들링  (0) 2012.12.27
Posted by linuxism
,

php - PDT 설치

Development/PHP 2013. 5. 13. 11:29


Installing PDT is relatively easy.

Contents

 [hide]

Install a JVM

Regardless of your operating system, you will need to install a Java virtual machine.

  • If using Windows, you may already have one installed, but upgrading won't hurt.
  • If using Linux, read this -- GCJ will NOT work.

Consider an IBM JDK or a Sun JDK. See below for minimum requirements. Note that if you are on a 64-bit platform and are using a 64-bit JRE, you need to use a 64-bit Eclipse build.


Eclipse 4.2 / Juno / PDT 3.1.1

PDT/Installation 3.1.1

Eclipse 3.7 / Indigo / PDT 3.0

From Update Site

Prerequisites

  • Installed and running Eclipse Classic 3.7

The minimum package is Eclipse Platform Runtime Binary. It is available at here
Any packages in Eclipse Downloads page are available also.

Installation Flow

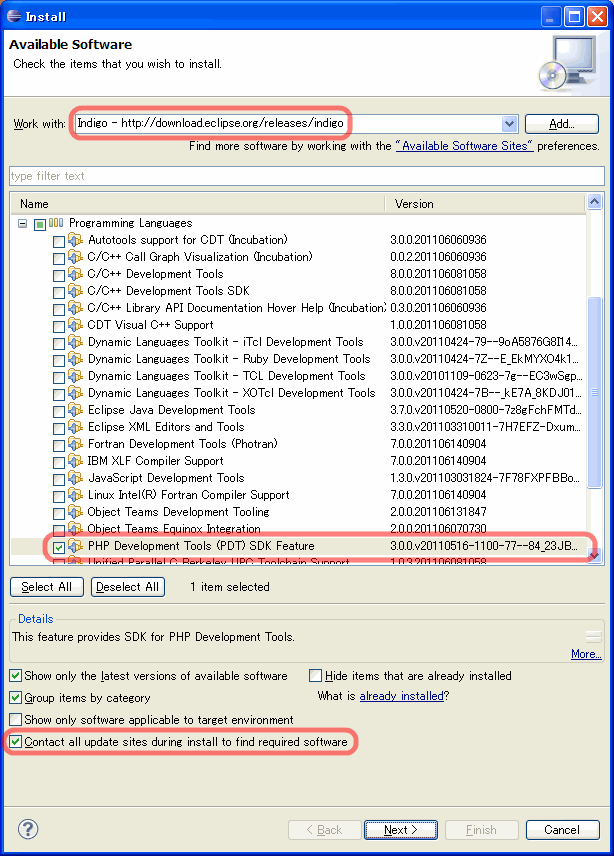
  • Open Help -> Install New Software.
  • Select the Indigo update site.
  • When the list of existing features is populated - select 'PHP Development Tools'.
  • Make sure 'Contact all update sites...' is checked.

Image:Indigo_Install.png

  • Proceed with the installation by pressing 'Next', then press 'Next' again in the next screen.
  • Accept the EULA when asked:
  • Finish the installation. Restart Eclipse.
  • After restarting switch to the PHP perspective, and you are done:

Additional Installation

If you need Mylyn features,

  • Help -> Install New Software
  • Select Indigo
  • Expand 'Collaboration'
  • Check following features (some other features will be installed automatically because of dependencies)
    • Mylyn Context Connector: Eclipse IDE
    • Mylyn Tasks Connector: Bugzilla
    • Mylyn WikiText
  • Proceed installation

If you need RSE(Remote System Explorer) features,

  • Help -> Install New Software
  • Select Indigo
  • Expand 'Mobile and Device Development'
  • Check following feature (some other features will be installed automatically because of dependencies)
    • Remote System Explorer End-User Runtime
  • Proceed installation

If you need Eclipse Marketplace feature,

  • Help -> Install New Software
  • Select Indigo
  • Expand 'General Purpose Tools'
  • Check following feature (some other features will be installed automatically because of dependencies)
    • Marketplace Client
  • Proceed installation

If You Are

  • Using Windows Vista/7
    • Do not pair 32bit Eclipse and 64bit JRE/JDK or vice versa. Use 32bit Eclipse on 32bit JRE/JDK, or 64bit Eclipse on 64bit JRE/JDK.
    • Do not install Eclipse under 'Program Files' or 'Program Files(x86)' folder.
  • Using Linux distro
    • Make sure SWT requirements if you have troubles with Content Assist or Internal Web Browser.
      • CSS styles appear in Content Assist Information.
      • Internal Web Browser is unavailable (cannot be opened or such).


Eclipse 3.6 / Helios / PDT 2.2

Note: PDT 2.2 is scheduled for release in June 2010. This will install a recent development snapshot, not the final 2.2.0 release.

From Update Site

Prerequisites

  • Installed and running Eclipse Classic 3.6

Installation Flow

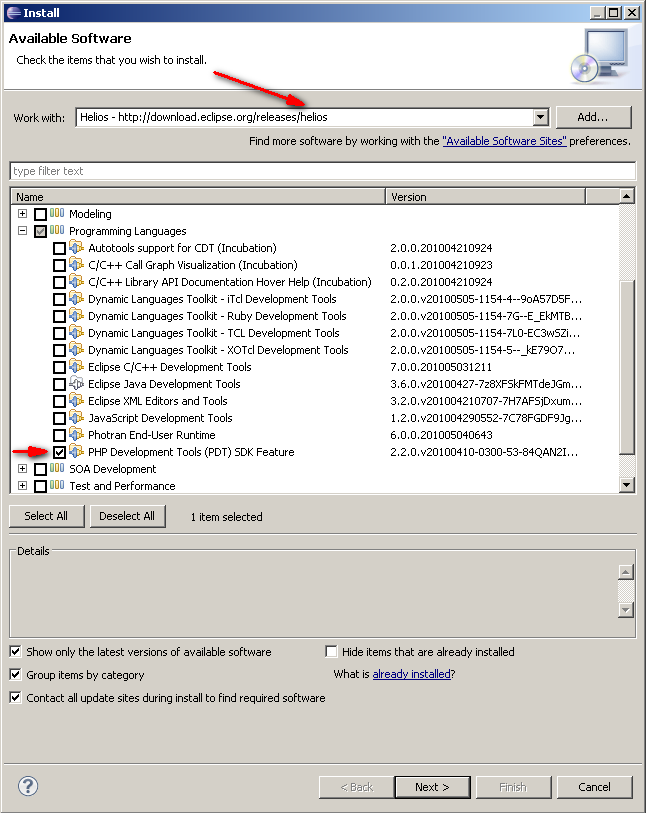
  • Open Help->Install New Software.
  • Select the Helios update site and choose Eclipse PDT . When the list of existing features is populated - select 'Runtime' feature:

Image:Helios_site.PNG

  • Proceed with the installation by pressing 'Next', then press 'Next' again in the next screen.
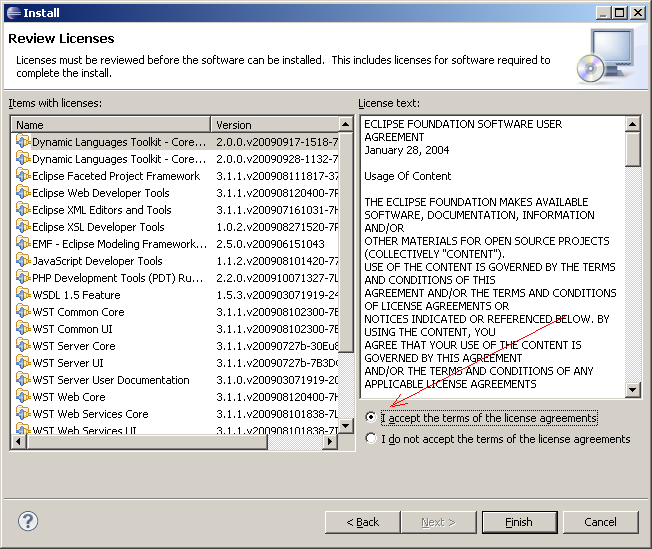
  • Accept the EULA when asked:

Image:PDT_2_2_Accept_EULA.png

  • Finish the installation. Restart Eclipse.
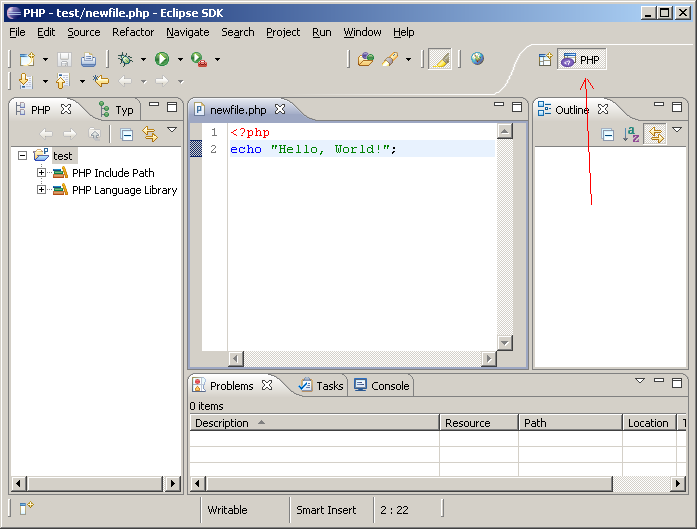
  • After restarting switch to the PHP perspective, and you are done:

Image:PDT_2_2_Switch_Perspective.png

From Zips

  • Download the latest PDT 2.2 Runtime + all its listed build dependencies, including Eclipse.
  • Unpack Eclipse, then unpack everything else into your eclipse/dropins/ folder.
  • Run the Eclipse executable file.

Eclipse 3.5 / Galileo / PDT 2.1

From All-In-One Package

  • Unpack the archive file you've downloaded into the directory in which you want to install PDT.
  • Run the Eclipse executable file. Start having fun in PHP world.

From Update Site (or Update Site Zip)

  • Get Eclipse:
  • Start the Install Manager.
  • If you downloaded a PDT Update zip:
Help > Install New Software... 
  [x] Contact all update sites during install to find required software
  Add... > Archive... > Browse for the PDT Update zip
  Select the PDT or PDT SDK Feature
  Install...
  • You can also install PDT from the Galileo Update site:
Help > Install New Software... 
  Select the Galileo Update site
  Select the PDT or PDT SDK Feature
  Install...
  • Install. Restart Eclipse. Enjoy.

Eclipse 3.4 / Ganymede / PDT 2.0

From All-In-One Package

  • Download the latest All-In-One package that is compatible with your OS.
  • This archive file includes the Eclipse environment, PDT and all the required dependencies you need to start developing using PDT.
  • Unpack the archive file you've downloaded into the directory in which you want to install PDT.
  • Run the Eclipse executable file. Start having fun in PHP world.

From Update Site

  • Get Eclipse:
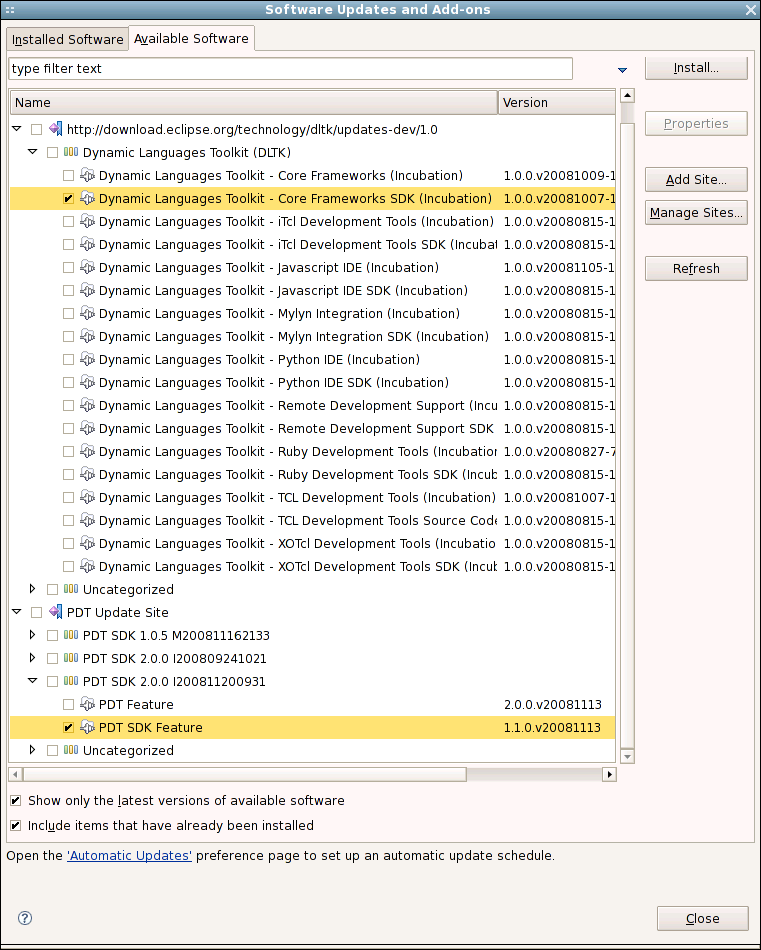
  • Start the Install Manager. You will require three update sites to perform an install of PDT 2.0.
Help > Software Updates... > Available Software > Manage Sites...
  Add... > add the DLTK 1.0 interim site: download.eclipse.org/technology/dltk/updates-dev/1.0M4-PDT-2.0/
  Add... > add the PDT 2.0 interim site: download.eclipse.org/tools/pdt/updates/2.0/
  Enable the Ganymede Update site (if not already enabled): download.eclipse.org/releases/ganymede/
  Expand the DLTK site and select the Dynamic Languages Toolkit - Core Frameworks or Dynamic Languages Toolkit - Core Frameworks SDK Feature 
  Select the PDT or PDT SDK Feature
  Install...

Image:Pdt-install-p2.png

  • Install. Restart Eclipse. Enjoy.

From Zips

  • Download the latest PDT 2.0 build + all its listed dependencies, including Eclipse.
  • Unpack Eclipse, then unpack everything else into your eclipse/dropins/ folder.
  • Run the Eclipse executable file.

Helpful Links

Eclipse 3.4 / Ganymede / PDT 1.0.5+

NOTE: PDT 1.0.5+ requires Eclipse 3.4. For PDT with Eclipse 3.3, use PDT 1.0.3.
  • Get Eclipse:
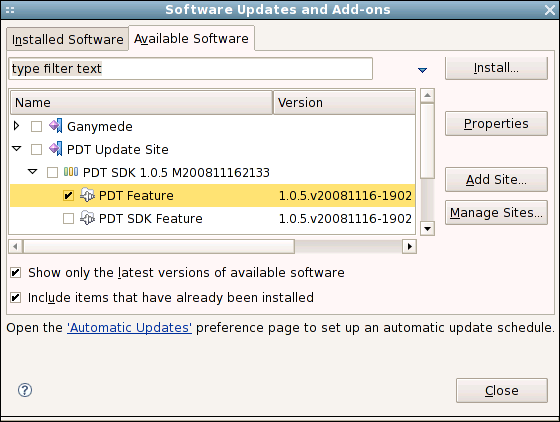
  • Start the Install Manager. You will require two update sites to perform an install of PDT 1.0.5+.
Help > Software Updates... > Available Software > Manage Sites...
  Add... > add the PDT 1.0.5+ interim site: download.eclipse.org/tools/pdt/updates/interim/
  Enable the Ganymede Update site (if not already enabled): download.eclipse.org/releases/ganymede/
  Select the PDT or PDT SDK Feature
  Install...

Image:Pdt105-install-p2.png

  • Install. Restart. Enjoy.

Eclipse 3.3 / Europa / PDT 1.0.3

  • Get Eclipse:
  • If one exists for your platform (operating system, windowing system, architecture), the simplest way to install PDT is via an All-In-One bundle.
  • If installing on Linux, you can look for a package from your distro maintainter/repositories, but this is not supported by eclipse.org. If you encounter problems with such a bundle, please contact your distro maintainer.
  • Otherwise, download an Eclipse SDK or Runtime Binary or the Europa JEE Bundle, then unpack it.
Help > Software Updates > Find and Install... > 
  (*) Search for new features > Next > 
  [x] Europa Discovery Site > 
  New Remote Site > add the new site: http://download.eclipse.org/tools/pdt/updates/ >
  Finish
  • Expand the Europa Discovery site to resolve dependencies. Collapsed sites will not be searched.
  • Select the PDT feature(s) you want to install.
  • Click the Select Required button to resolve missing dependencies.
  • Install*. Restart. Enjoy.

Eclipse 3.2 / Callisto / PDT 0.7

  • Get Eclipse:
  • If installing on Linux, you can look for a package from your distro maintainter/repositories, but this is not supported by eclipse.org. If you encounter problems with such a bundle, please contact your distro maintainer.
  • Otherwise, download an Eclipse SDK or Runtime Binary, then unpack it and start it up.
Help > Software Updates > Find and Install... > 
  (*) Search for new features > Next > 
  New Remote Site > add the new site: http://download.eclipse.org/callisto/releases/ >
  New Remote Site > add the new site: http://download.eclipse.org/tools/pdt/updates/ >
  Finish
  • Select the projects &/or components you want to install.
  • Expand the Callisto Updates site to resolve dependencies. Collapsed sites will not be searched.
  • Select the PDT feature(s) you want to install.
  • Click the Select Required button to resolve missing dependencies.
  • If it does not work, you will have to manually select dependencies.
  • If that doesn't work, start over, but add more update sites. Can't find a given dependency? Try here or here.
  • Install*. Restart. Enjoy.

Debugger

The PDT project does not contain server side implementation for PHP debugging and will welcome any open source or commercial implementation of the debug protocol.

PHP Executable Debugger

  • Install via update site: In the main menu, select Help | Install New Software..., add the site http://downloads.zend.com/pdt and follow the instructions.
  • Zend Executable Debugger - A free Eclipse plugin that adds PHP executable debug capabilities to the Eclipse environment.

PHP Web Server Debugger

Known Problems

  • If after installing PDT you do not see the PDT perspective, views/editors/file associations do not work, or your get "An error occurred" messages, try restarting Eclipse with the -clean flag.
  • You may find that your chosen mirror fails due to bug 203794. Until that bug is fixed, try another mirror, or try an FTP site instead of an HTTP site.
  • You may encounter problems on linux with non-existant cups servers in /etc/cups/client.conf (bug 242677). Try running with ./eclipse -Dorg.eclipse.swt.internal.gtk.disablePrinting.
  • You may encounter this error message: Problem occurred: 'Selection Job titile' has encountered a problem. If so, you need to install DLTK 1.0.I200807181303 (or newer). Unpack the zip into your dropins folder (see From Zips above). See also bug 242947.
  • Another variation reported to work: PDT 2.0.0 N20080823 + DLTK Core 0.95.0.v20080716 + DLTK RDS 0.95.0.v20080623
  • If updating from a nightly build to a newer nightly, you will need to uninstall and then reinstall PDT. See bug 241341.

See Also


출처 - http://wiki.eclipse.org/PDT/Installation


'Development > PHP' 카테고리의 다른 글

php - iphone, android detect  (0) 2013.05.16
php - syslog  (0) 2013.05.15
php - mail() 함수 사용시 한글 깨짐 문제  (0) 2013.04.06
php - 점(.) 연산자  (3) 2013.04.06
php - mail  (0) 2013.04.06
Posted by linuxism
,