Introduction

Yesterday I took a quit look to the binary communication protocol: Hessian.

With Hessian your admins will not have any troubles with port-activation for your (‘desktop’) application, if they have to access remote services (DB etc.).

The Java implemenation from Caucho is released under the Apache License 2.0. Hessian is well integrated into Spring and seems to perform well for version 3.2 (one year old!). An ORM tool which supports Hessian out of the box is Cayenne.

Example

Now to our hello world example. It is a maven project and you can get it from here (public domain of course …).

If you don’t want to use maven you should get the following jars:
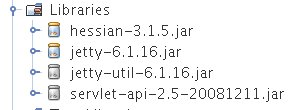
hessian-libs

But maybe you have the same problems with downloading a none-corrupted hessian.jar from Caucho (Why that?) – then you will be forced to install maven or NetBeans.

The usage is simple: In NetBeans you can directly open maven projects with the maven plugin. Then start the jetty-server: go into the MyServlet class and press SHIFT+F6. You should see in the output window:
… INFO:  Logging to STDERR via org.mortbay.log.StdErrLog
… INFO:  jetty-6.1.16
… INFO:  Started SocketConnector@0.0.0.0:8080

Then go to the Client class and press SHIFT+F6. You should see a new window coming up:

hessian-client

Change the text and press ENTER will push the text to the server and get the response text at the bottom of the window updated:
hessian-client-result

Now let us understand what is necessary:

  1. An interface which has to be available on the server and on the client side:
    public interface CommunicationService {
        String communicate(String str);
    }
  2. An implementation of this interface on the server side:
    public class MyServlet extends HessianServlet implements CommunicationService {
        public String communicate(String str) {
            return "Hello World! " + str;
        }
        ...
    }

    (Here only the ‘implements CommunicationService’ is important)

  3. Now the server code:
    public static void main(String[] args) throws Exception {
            Server server = new Server(8080);
            Context context = new Context(server, "/", Context.SESSIONS);
            context.addServlet(MyServlet.class, "/communication-service");
            server.start();
    }
  4. And the client code:
    String url = "http://localhost:8080/communication-service";
    HessianProxyFactory factory = new HessianProxyFactory();
    final CommunicationService basic = (CommunicationService) factory.create(CommunicationService.class, url);
    ...
    resultLabel.setText("Server said : " + basic.communicate(field.getText()));
  5. Thats it!

Looks really like RPC of Java but it is language independent – there are implementations for ruby, phyton … and it seems to be more performant than language independent solutions like XML-RPC. Are there other advantages or disadvantages?


출처 - http://karussell.wordpress.com/2009/04/10/hessian-web-service-protocol-hello-world-example/


위 포스트에서 3번 서버 설정 부분에서 문제 발생 시 아래와 같이 설정한다.


This is the Jetty 8 equivalent to your code. It's still just as simple as it was before, however the API has changed slightly.

If this isn't working for you, then you probably have a classpath issue - Jetty 8 is separated into a lot of independent jar files, and you will need a number of them. At the very least you need:

  • jetty-continuation
  • jetty-http
  • jetty-io
  • jetty-security
  • jetty-server
  • jetty-servlet
  • jetty-util
  • servlet-api

If you have those jars, then this code should work fine:

package test;

import java.io.IOException;
import javax.servlet.http.HttpServlet;
import javax.servlet.http.HttpServletRequest;
import javax.servlet.http.HttpServletResponse;
import org.eclipse.jetty.server.Server;
import org.eclipse.jetty.servlet.ServletContextHandler;

public class Jetty8Server {
    public static class MyServlet extends HttpServlet {
        protected void service(HttpServletRequest request, HttpServletResponse response) throws IOException {
            response.setContentType("text/plain");
            response.getWriter().write(getClass().getName() + " - OK");
        }
    }
    public static void main(String[] args) throws Exception {
        Server server = new Server(8080);
        ServletContextHandler handler = new ServletContextHandler(ServletContextHandler.SESSIONS);
        handler.setContextPath("/"); // technically not required, as "/" is the default
        handler.addServlet(MyServlet.class, "/communication-service");
        server.setHandler(handler);
        server.start();
    }
}


출처 - http://stackoverflow.com/questions/9278912/migration-from-jetty-6-to-jetty-8


Posted by linuxism
,

Aug 3, 2012 4:09 AM

How to do HTTP binding for Openfire plugin

This question has been Answered.

I'm using Openfire as the chat server for my company. And now I need to create a plugin for Openfire.

As I can see from other plugins, they can have HTTP binding to themself through port 7070. For example: http://example.com:7070/redfire where redfireis the name of the plugin.

The name of my plugin is toplug, so I want to be able to access the JSP pages of my plugin through:http://example.com:7070/toplug/index.jsp where 'index.jsp' is some example page.

But when I try to access my JSP pages through port 7070, the Jetty server (on which Openfire runs) always reports error 404 'page not found'. I guess this is because the binding to my folder which contains JSP pages hasn't been set. How to do this binding thing please?

Correct Answer by Dele Olajide  on Aug 3, 2012 6:54 AM
Dele Olajide

You do not need a plugin to access the web service for the http bing port. Just put your web pages in a folder under


OPENFIRE_HOME/openfire/resources/spank


and access with


http://your_server:7070/your_folder/your_page.html


Note that Openfire does not compile JSP pages unless you replace jasper-xxxx.jar files in the lib folder


If you still want to create a jetty web context (application) from your plugin, see source code of Redfire plugin


import org.eclipse.jetty.server.handler.ContextHandlerCollection;
import org.eclipse.jetty.webapp.WebAppContext;
 
.....
 
public void initializePlugin(PluginManager manager, File pluginDirectory)
  {
      ContextHandlerCollection contexts = HttpBindManager.getInstance().getContexts();
      context = new WebAppContext(contexts, pluginDirectory.getPath(), "/" + NAME);
      context.setWelcomeFiles(new String[]{"index.html"})
See the answer in context
  • Dele OlajideKeyContributor896 posts since 
    Apr 10, 2006

    You do not need a plugin to access the web service for the http bing port. Just put your web pages in a folder under


    OPENFIRE_HOME/openfire/resources/spank


    and access with


    http://your_server:7070/your_folder/your_page.html


    Note that Openfire does not compile JSP pages unless you replace jasper-xxxx.jar files in the lib folder


    If you still want to create a jetty web context (application) from your plugin, see source code of Redfire plugin


    import org.eclipse.jetty.server.handler.ContextHandlerCollection;
    import org.eclipse.jetty.webapp.WebAppContext;
     
    .....
     
    public void initializePlugin(PluginManager manager, File pluginDirectory)
      {
          ContextHandlerCollection contexts = HttpBindManager.getInstance().getContexts();
          context = new WebAppContext(contexts, pluginDirectory.getPath(), "/" + NAME);
          context.setWelcomeFiles(new String[]{"index.html"})


'OpenSource > Openfire' 카테고리의 다른 글

smack - chat state notification  (0) 2014.11.04
openfire - hessian RMI example in plugin  (0) 2013.08.09
file transfer - proxy ip를 잘 못 설정 하는 경우  (0) 2013.04.02
Openfire Properties  (0) 2013.03.12
Posted by linuxism
,


Spring에서 Bean의 생성과 Bean들의 관계설정 같은 제어를 담당하는 IoC 오브젝트를 BeanFactory라고 한다.
보통 BeanFactory를 확장한 ApplicationContext를 사용하는데 ApplicationContext는 IoC방식을 따라 만들어진 일종의 BeanFactory라고 생각하면 된다.

BeanFactory의 종류 중 하나 AnnotationConfigApplicationContext
@Configure Annotation을 이용한 Java Code를 설정정보로 사용하려면 AnnotationConfigApplicationContext 를 이용한다.

public class DaoFactory {

   public UserDAO userDAO() {

       return new UserDAO(connectionMaker());

   }

   public ConnectionMaker connectionMaker() {

       return new DConnectionMaker(); // DB 커넥션 오브젝트를 리턴해준다.

   }

}

위와 같은 Factory Class가 있다.
이 Class를 설정정보로 이용하려면 아래와 같은 규칙을 따르면 된다.
- Class 선언 위에 @Configuration 이라는 Annotation을 추가한다.
- 객체(Bean)를 생성해 주는 메소드에는 @Bean이라는 Annotation을 추가한다.

package applicationcontext.factory;


import org.springframework.context.annotation.Bean;

import org.springframework.context.annotation.Configuration;


import applicationcontext.connectionmaker.ConnectionMaker;

import applicationcontext.connectionmaker.DConnectionMaker;

import applicationcontext.dao.UserDAO;


@Configuration

public class DaoFactory {

   @Bean

    public UserDAO userDAO() {

        return new UserDAO(connectionMaker()); // Bean 생성

    }

   @Bean

    public ConnectionMaker connectionMaker() {

        return new DConnectionMaker(); // Bean 생성

    }

}

 
이제 위 DaoFacory 클래스를 AnnotationConfigApplicationContext 클래스를 이용해 읽어들이고 UserDAO Bean을 가져오는 코드를 만들어 보겠다.

package applicationcontext.test;


import org.springframework.context.ApplicationContext;

import org.springframework.context.annotation.AnnotationConfigApplicationContext;


import applicationcontext.dao.UserDAO;

import applicationcontext.factory.DaoFactory;


public class UserDAOTest {

    public static void main(String[] args) {

        ApplicationContext context = new AnnotationConfigApplicationContext(DaoFactory.class);

        UserDAO dao = context.getBean("userDAO", UserDAO.class);

        System.out.println(dao.toString());

    }

}


=====> applicationcontext.dao.UserDAO@d08633 

 
context.getBean의 첫번째 파라미터 userDAO는 DaoFactory 클래스의 userDao라는 메소드의 이름이다. 
두번째 파라미터 UserDAO.class는 userDAO라는 메소드에서 리턴해주는 class 이다.

실행해보면 정상적으로 Bean을 가져오는 것을 확인해 볼 수 있다. 

스프링을 적용하긴 했지만 그냥 DaoFactory를 직접 사용한 것과 기능적으로 다를게 없다.
오히려 번거로운 준비작업과 코드가 필요하다.
그렇다면 굳이 스프링을 사용하지 않고 그냥 DaoFactory와 같은 오브젝트 팩토리를 만들어서 사용하면 되는게 아닐까?
(@Configure 없는 초기 버전의 Factory클래스 같은 클래스들을 오브젝트 팩토리라고 한다.)
스프링은 DaoFactory와 같은 오브젝트 팩토리만으로는 얻을 수 없는 많은 방법과 기능을 제공해 준다. 
앞으로 이러한 것에 대해 공부해 볼 것이다.


출처 - http://babtingdev.tistory.com/288


Posted by linuxism
,