프로젝트 패싯(facet)을 사용한 WTP 확장#
요약
플러그인 개발자는 Faceted Project Framework 덕분에 웹 개발도구 플랫폼(WTP)에서 생성된 프로젝트를 기능 별 단위가 조합된 것으로 다룰 수 있게 한다. WTP 프로젝트의 기능 별 단위는 패싯(facet)이라고 부르며 사용자에 의해 추가/삭제될 수 있다. 이 학습서는 기본적인 패싯 몇가지를 작성해보고, 그 과정에서 프레임워크의 확장점 대부분을 다루어 본다. 이 학습서는 WTP 1.5를 기준으로 작성되었다.
Konstantin Komissarchik
BEA Systems, Inc.
September 5, 2006
Translation: Seok-Ho, Yang <javanese (at) naver.com> http://cafe.naver.com/eclipseplugin
Faceted Project Framework는 WTP의 기능을 확장할수 있는 강력한 메카니즘을 제공한다. 일반적으로 프로젝트 패싯은 프로젝트에 기능을 추가하는 수단으로 사용된다. 패싯이 프로젝트에 추가될 때는 리소스 복사, 빌더 설치, 네이처 추가 등의 필요한 셋업 액션을 수행할 수 있다. 패싯은 사용자 인터페이스 요소를 활성화하기 위한 마커로도 사용될 수 있다.
어떤 독자는 이클립스 플랫폼에서 제공하는 프로젝트 네이처와 패싯이 어떻게 다른지 궁금할 것이다. 네이처는 사용자의 관점에서는 숨겨지도록 설계된 것이다. 네이처는 본질적으로 뒷단의 도구에 의해 다뤄지는 마커 역할을 한다. 프로젝트 패싯은 반면 최종 사용자가 다룰 수 있게 드러내지도록 설계된 것이다. Faceted Project Framework는 프로젝트의 패싯을 관리하기 위해 필요한 모든 사용자 인터페이스 요소를 제공하며, 패싯에는 관련 정보를 함께 기록해서 사용자가 잘못된 구성을 작성하는 것을 피하도록 한다. 최소한 새 맞춤 프로젝트 생성 마법사를 개발하거나 "기능 X 활성화" 메뉴 액션을 추가할 필요는 없다. 프로젝트에 어느 패싯을 설치할 것인지 관리하는 범용적인 수단이 제공됨으로써 플러그인 개발자의 부담이 줄어들고 더 나은 사용자 경험을 제공한다.
이 학습서는 프로젝트 패싯을 작성하는 데 필요한 확장점과 자바 API를 다룬다. 독자는 이미 이클립스 플러그인 개발에 익숙하며 WTP를 사용할 수 있는 것으로 가정한다.
학습서 시나리오#
당신은 FormGen이라 불리는 제품을 개발하는 회사의 개발자이다. FormGen은 기본적으로 XML 정의 파일을 기반으로한 HTML 폼을 생성하는 서블릿이다. 이 제품은 서블릿과 몇몇 기본 위짓을 포함하는 jar로 구성되어 있다. 별도 위짓을 제공하는 추가 jar도 존재한다. 사용자는 웹 프로젝트 내의 WEB-INF/lib 디렉토리에 jar를 직접 추가해왔으며 web.xml에 서블릿 정의를 직접 편집했다. 당신이 맡은 일은 이러한 액션을 자동으로 수행해주는 몇가지 프로젝트 패싯을 작성해서 사용자의 설정 과정을 편하게 만들어 주는 것이다.
Table of Contents#
1.시작하기#
이 학습서를 따라하려면, WTP 1.5를 설치해야 한다. 이 학습서는 1.5에서 추가된 다양한 확장점과 API를 사용하므로 WTP 1.0.x 버전에서는 사용할 수 없다. WTP 인스톨러와 이클립스 플랫폼 v3.2 등의 필수 구성요소는 다음 위치에서 다운로드할 수 있다.
필수 소프트웨어를 설치한 다음에는 새 작업공간을 생성해야 하고, 시작용 프로젝트를 추가해야 한다. 시작용 프로젝트는 이 학습서에서 사용되는 재료와 유틸리티 코드를 포함하고 있다. 어디선가 막히는 부분이 있다면 솔루션 프로젝트을 참고할 수 있다.
2. 기본 패싯 정의 생성#
프로젝트 패싯은 org.eclipse.wst.common.project.facet.core.facets 확장점을 통해서 선언된다. 이 확장점은 매우 많은 기능을 갖춘 거대한 확장점이다. 하지만 여기서는 작게 시작하고, 학습서 패싯을 구축하는 과정에서 점점 키워나갈 것이다. 다음은 처음에 작업할 스키마의 일부이다.
<extension point="org.eclipse.wst.common.project.facet.core.facets">
<project-facet id="{string}"> (0 or more)
<label>{string}</label>
<description>{string}</description> (optional)
</project-facet>
<project-facet-version facet="{string}" version="{string}"/> (0 or more)
</extension>
예제 코드를 보면, 확장점 선언에 두 개의 최상위 요소가 있음을 알 수 있다. <project-facet> 요소는 패싯 자체를 선언하기 위해 사용한다. <project-facet-version> 요소는 패싯의 버전을 선언하기 위해 사용한다. 모든 패싯 구현은 최소한 하나의 패싯 버전 선언을 제공해야 한다. 실제로, 이 튜토리얼 뒤에서 볼 수 있듯 <project-facet-version> 선언에서 상당히 많은 작업을 해야 한다. 지금 당장 기억해야할 것은 최소한 하나의 버전이 있어야만 패싯을 사용할수 있다는 것이다.
<extension point="org.eclipse.wst.common.project.facet.core.facets">
<project-facet id="formgen.core">
<label>FormGen Core</label>
<description>
Enables generation of HTML forms based on XML definition files.
</description>
</project-facet>
<project-facet-version facet="formgen.core" version="1.0"/>
<project-facet id="formgen.ext">
<label>FormGen Extensions</label>
<description>
Enables additional FormGen widgets.
</description>
</project-facet>
<project-facet-version facet="formgen.ext" version="1.0"/>
</extension>
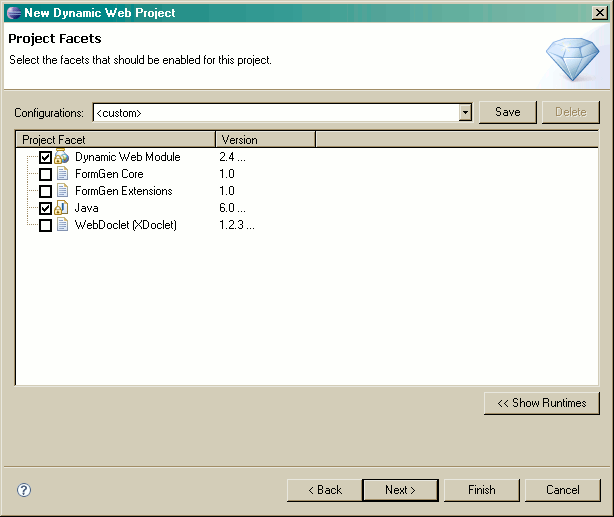
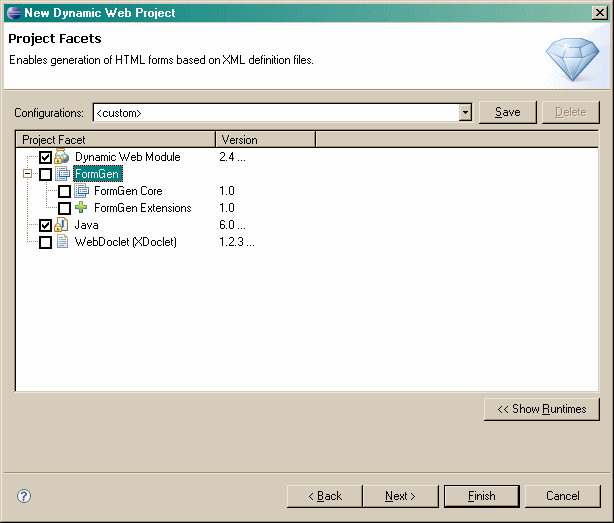
plugin.xml 파일에 위의 코드를 삽입하고 어떻게 동작하는지 보자. FormGen 플러그인을 포함시킨 이클립스를 실행하고 Dynamic Web Project 마법사를 열라. 첫 페이지에서 Target Runtime 필드에 <none>이 선택되어 있는지 확인하고 두번째 페이지로 넘어간다. 다음과 같은 화면을 보게 될 것이다. 방금 생성한 FormGen 패싯이 나타남을 유의하라.
지금까지 나타난 문제점 중 하나는 FormGen 패싯이 EJB Project 마법사와 같은 다른 모듈 프로젝트 마법사에도 나타난다는 것이다. 물론 FormGen은 서블릿 기반 기술이기 때문에 전혀 의미가 없으며 J2EE 웹 애플리케이션에만 적용할 수 었다. 이 문제를 해결하기 위해 종속성을 지정하는 제한조건(constraint) 메카니즘을 사용할 것이다.
다음은 확장점 스키마의 일부 예시이다.
- <extension point="org.eclipse.wst.common.project.facet.core.facets">
<project-facet-version>
<constraint> (optional)
[expr]
</constraint>
</project-facet-version>
</extension>
[expr] =
<requires facet="{string}" version="{version.expr}" soft="{boolean}"/> or
<conflicts facet="{string}" version="{version.expr}"/> or
<conflicts group="{string}"/> or
<and>
[expr] (1 or more)
</and> or
<or>
[expr] (1 or more)
</or>
예제에서 보듯, 제한조건은 연산식 트리이며 4개의 연산자를 사용할 수 있다. 연산자의 의미를 하나씩 살펴보자.
requires
The requires operator is the most frequently used of all the operators. It is used to specify a dependency on another facet. If the version attribute is not specified, any version of the referenced facet will satisfy the constraint. If only specific versions will do, the version attribute can contain a version expression.
The soft attribute is used to create a special kind of a dependency. Facet selection will not be prevented if the dependency is not met, but if the dependency is met, the facet is guaranteed to be installed after the referenced facet.
conflicts
The conflicts constraint is used to indicate that the declaring facet will not work correctly if installed into the same project as referenced facets. The conflicts constraint comes in two flavors. You can either specify a conflict with a single facet or with a group of facets.
What are groups of facets? Facet groups are a way to designate a conflict with a certain class of facets without having to list all of the facets explicitly. For instance, the WTP module facets all belong to the "modules" group. They also each declare a conflict with the "modules" group. This prevents two module facets from being installed into the same project. By declaring a conflict with a group whose membership can expand as necessary, third parties can add module facets on top of WTP and have the new facets interact correctly with the built-in module facets.
A facet group is created the first time a facet declares group membership. Here is the extension point schema for declaring group membership:
          <extension point="org.eclipse.wst.common.project.facet.core.facets">

            <project-facet-version>

              <group-member id="{string}"/> (0 or more)

            </project-facet-version>

          </extension>
and & or
The and & or constraints are used to perform logical conjunction and disjunction over their operands. Although it is legal for these operators to have only one operand, typically they will have two or more.
We can now specify the constraints for the FormGen facets. The facet id that marks a project as a J2EE web module isjst.web. We will setup a dependency on it from the formgen.core facet. The formgen.ext facet can then depend on theformgen.ext facet. That latter constraint will ensure that the FormGen Extensions are not installed without installing FormGen Core.
          <extension point="org.eclipse.wst.common.project.facet.core.facets">


            <project-facet-version id="formgen.core" version="1.0">

              <constraint>

                <requires facet="jst.web" version="2.2,2.3,2.4"/>

              </constraint>

            </project-facet>


            <project-facet-version id="formgen.ext" version="1.0">

              <constraint>

                <requires facet="formgen.core" version="1.0"/>

              </constraint>

            </project-facet>


          </extension>
Once the above code is added, the FormGen facets should only appear in the Dynamic Web Project wizard.
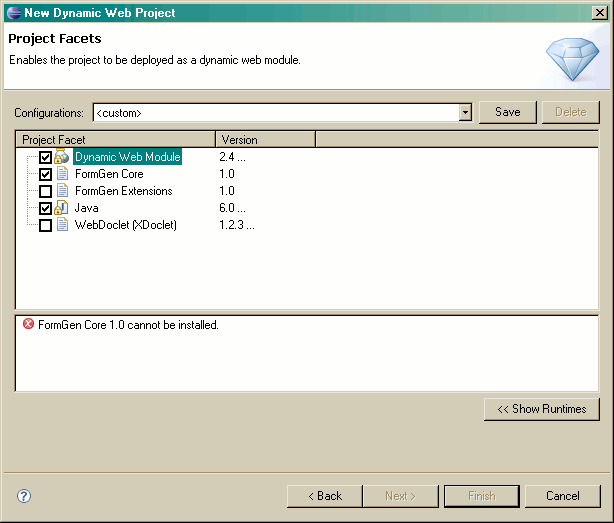
Let's now try selecting the FormGen Core facet on the facets selection page of the Dynamic Web Project wizard. If you do that, you should see the following error message appear.
This error message is displayed because the install action has not been implemented for this facet. What's an action? An action is an operation that a user can perform on a facet. There are three action types INSTALL, UNINSTALL, andVERSION_CHANGE. We will now implement the install actions for the FormGen facets.
Here is what that part of the extension point schema looks like:
          <extension point="org.eclipse.wst.common.project.facet.core.facets">

            <action id="{string}" facet="{string}" version="{version.expr}" type="INSTALL|UNINSTALL|VERSION_CHANGE">

              <delegate class="{class:org.eclipse.wst.common.project.facet.core.IDelegate}"/>

              <property name="{string}" value="{string}"/> (0 or more)

            </action>

          </extension>
The version attribute can contain a single version or a version expression. It can also be omitted if the action applies to all versions of the facet.
The id attribute is optional. If not specified, the framework will automatically generate one using the following pattern:
[facet-id]#[version-expression]#[action-type](#[prop-name]=[prop-value])*
As you can see, it is better to provide an explicit id rather than letting the framework generate it. Later in the tutorial we will cover extension points that make references to action ids.
The <action> element can also be embeded inside the <project-facet-version> element. In that case, the facet andversion attributes should be omitted. Note that if the same delegate implementation applies to multiple facet versions, it is better to provide a single action declaration externally. This allows the framework to perform certain kinds of optimizations
For the VERSION_CHANGE action, it is possible to restrict the applicability of the action definition with regards to the starting version. To do that, simply specify "from.versions" property in the action definition. The value is a version expression. If this property is not specified, the framework will assume that the delegate is capable of converting from any starting version.
package org.eclipse.wst.common.project.facet.core;
import org.eclipse.core.resources.IProject;
import org.eclipse.core.runtime.CoreException;
import org.eclipse.core.runtime.IProgressMonitor;
public interface IDelegate
{
void execute( IProject project,
IProjectFacetVersion fv,
Object config,
IProgressMonitor monitor )
throws CoreException;
}
Let's now dive in and implement the install delegates for the FormGen facets. The formgen.core facet should (a) copyformgen-core.jar into the project's WEB-INF/lib directory, and (b) register the FormGen servlet in web.xml. The formgen.extfacet should copy the formgen-ext.jar into the project's WEB-INF/lib directory.
          <extension point="org.eclipse.wst.common.project.facet.core.facets">


            <project-facet-version facet="formgen.core" version="1.0">

              <action type="INSTALL">

                <delegate class="com.formgen.eclipse.FormGenCoreFacetInstallDelegate"/>

              </action>

            </project-facet-version>


            <project-facet-version facet="formgen.ext" version="1.0">

              <action type="INSTALL">

                <delegate class="com.formgen.eclipse.FormGenExtFacetInstallDelegate"/>

              </action>

            </project-facet-version>


          </extension>
          package com.formgen.eclipse;


          import org.eclipse.core.resources.IFolder;

          import org.eclipse.core.resources.IProject;

          import org.eclipse.core.runtime.CoreException;

          import org.eclipse.core.runtime.IProgressMonitor;

          import org.eclipse.core.runtime.Path;

          import org.eclipse.wst.common.project.facet.core.IDelegate;

          import org.eclipse.wst.common.project.facet.core.IProjectFacetVersion;


          public final class FormGenCoreFacetInstallDelegate implements IDelegate

          {

              public void execute( final IProject pj,

                                   final IProjectFacetVersion fv,

                                   final Object config,

                                   final IProgressMonitor monitor )


                  throws CoreException


              {

                  monitor.beginTask( "", 2 );


                  try

                  {

                      final IFolder webInfLib = Utils.getWebInfLibDir( pj );


                      Utils.copyFromPlugin( new Path( "libs/formgen-core.jar" ),

                                            webInfLib.getFile( "formgen-core.jar" ) );


                      monitor.worked( 1 );


                      Utils.registerFormGenServlet( pj );


                      monitor.worked( 1 );

                  }

                  finally

                  {

                      monitor.done();

                  }

              }

          }
          package com.formgen.eclipse;


          import org.eclipse.core.resources.IFolder;

          import org.eclipse.core.resources.IProject;

          import org.eclipse.core.runtime.CoreException;

          import org.eclipse.core.runtime.IProgressMonitor;

          import org.eclipse.core.runtime.Path;

          import org.eclipse.wst.common.project.facet.core.IDelegate;

          import org.eclipse.wst.common.project.facet.core.IProjectFacetVersion;


          public final class FormGenExtFacetInstallDelegate implements IDelegate

          {

              public void execute( final IProject pj,

                                   final IProjectFacetVersion fv,

                                   final Object config,

                                   final IProgressMonitor monitor )


                  throws CoreException


              {

                  monitor.beginTask( "", 1 );


                  try

                  {

                      final IFolder webInfLib = Utils.getWebInfLibDir( pj );


                      Utils.copyFromPlugin( new Path( "libs/formgen-ext.jar" ),

                                            webInfLib.getFile( "formgen-ext.jar" ) );


                      monitor.worked( 1 );

                  }

                  finally

                  {

                      monitor.done();

                  }


              }

          }
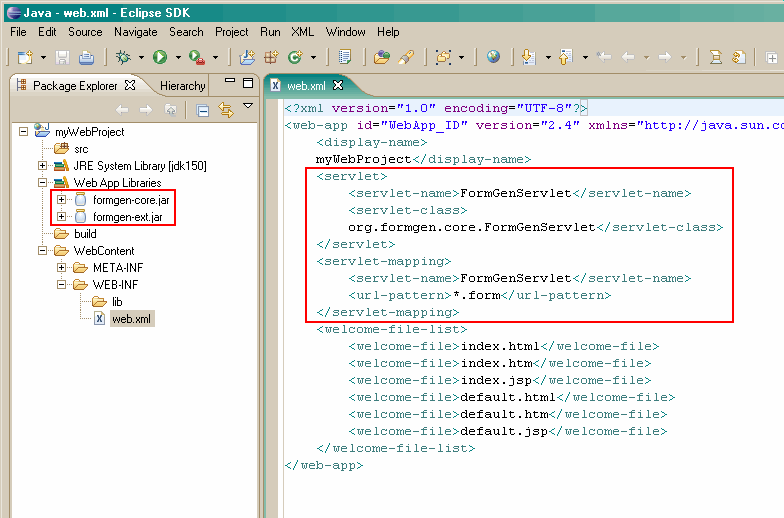
Once the install actions have been implemented, you should be able to select the FormGen facets on the Facets Selection Page of the Dynamic Web Project Wizard without getting any error messages. You should also be able to complete the project creation and see the following highlighted artifacts in the new project. These artifacts have been created by the FormGen facet install delegates.
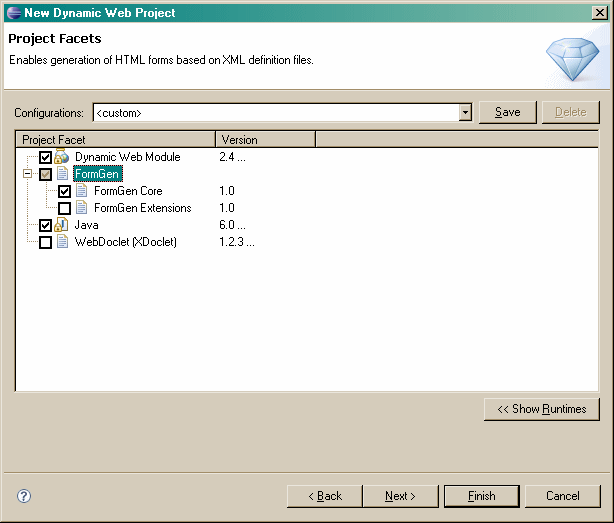
Project facets can be grouped into categories in order to provide the "one click" exprience for novice users and retain the fine-grained control for advanced users. You are told that most of FormGen users always add both of the jars to their web apps. These users would benefit from having the FormGen facets grouped into a category and so we will do just that.
Here is what that part of the extension point schema looks like:
          <extension point="org.eclipse.wst.common.project.facet.core.facets">

            <category id="{string}">

              <label>{string}</label>

              <description>{string}</description> (optional)

            </category>

            <project-facet>

              <category>{string}</category> (optional)

            </project-facet>

          </extension>
We can now create a category around the FormGen facets.
          <extension point="org.eclipse.wst.common.project.facet.core.facets">


            <category id="formgen.category">

              <label>FormGen</label>

              <description>Enables generation of HTML forms based on XML definition files.</description>

            </category>


            <project-facet id="formgen.core">

              <category>formgen.category</category>

            </project-facet>


            <project-facet id="formgen.ext">

              <category>formgen.category</category>

            </project-facet>


          </extension>
Once the above change has been put in place, the facets selection page should look like this:
Custom icons can be provided for facets and categories. If an icon is not provided, a default icon is used. The icons are helpful as a way to better differentiate facets and to make them stand out.
Here is what that extension point looks like:
          <extension point="org.eclipse.wst.common.project.facet.ui.images">

            <image facet="{string}" path="{string}"/> (0 or more)

            <image category="{string}" path="{string}"/> (0 or more)

          </extension>
Your starter project came with three icons in the icons folder. We will now associate them with the FormGen facets and the category.
          <extension point="org.eclipse.wst.common.project.facet.ui.images">

            <image facet="formgen.core" path="icons/formgen-core.gif"/>

            <image facet="formgen.ext" path="icons/formgen-ext.gif"/>

            <image category="formgen.category" path="icons/formgen-cat.gif"/>

          </extension>
Once the above snippet has been added to your plugin.xml file, the facets selection page should look like this:
It is often desirable to gather user input prior to installing a facet. The framework allows a sequence of wizard pages to be associated with facet actions. The supplied wizard pages are shown after the facets selection page. Based on user feedback, you known that FormGen users often customize the URL pattern of the FormGen servlet so you would like to give them the ability to do that in the wizard when the FormGen facets are being installed.
Here is what the relevant parts of the extension points look like:
          <extension point="org.eclipse.wst.common.project.facet.core.facets">

            <action>

              <config-factory class="class:org.eclipse.wst.common.project.facet.core.IActionConfigFactory"/>

            </action>

          </extension>


          <extension point="org.eclipse.wst.common.project.facet.ui.wizardPages">

            <wizard-pages action="{string}"> (0 or more)

              <page class="{class:org.eclipse.wst.common.project.facet.ui.IFacetWizardPage}"/> (1 or more)

            </wizard-pages>

          </extension>
One thing to note here is that in order to enable communication between the facet action delegate and the wizard pages, we go back to the action declaration and provide an action config factory. The object created by the factory is populated by the wizard pages and is read by the action delegate. No restrictions are placed on the shape of the config object. You may choose to implement a custom class or you can use a something generic like java.util.HashMap.
Another thing to note is that the wizardPages extension point refers to the actions by their ids, so it becomes more important to explicitly specify the id rather than letting the framework automatically generate one.
Here are the interfaces that are used in the above extension point schema:
package org.eclipse.wst.common.project.facet.core;
import org.eclipse.core.runtime.CoreException;
public interface IActionConfigFactory
{
Object create() throws CoreException;
}
package org.eclipse.wst.common.project.facet.ui;
import org.eclipse.jface.wizard.IWizardPage;
public interface IFacetWizardPage extends IWizardPage
{
void setWizardContext( IWizardContext context );
void setConfig( Object config );
void transferStateToConfig();
}
We will now implement a wizard page for the facet.core facet install action. The wizard page will allow the user to change the default servlet URL pattern for the FormGen servlet.
          <extension point="org.eclipse.wst.common.project.facet.core.facets">

            <project-facet-version facet="formgen.core" version="1.0">

              <action type="INSTALL" id="formgen.core.install">

                <config-factory class="com.formgen.eclipse.FormGenCoreFacetInstallConfig$Factory"/>

              </action>

            </project-facet-version>

          </extension>


          <extension point="org.eclipse.wst.common.project.facet.ui.wizardPages">

            <wizard-pages action="formgen.core.install">

              <page class="com.formgen.eclipse.FormGenCoreFacetInstallPage"/>

            </wizard-pages>

          </extension>
          package com.formgen.eclipse;


          import org.eclipse.wst.common.project.facet.core.IActionConfigFactory;


          public final class FormGenCoreFacetInstallConfig

          {

              private String urlPattern = "*.form";


              public String getUrlPattern()

              {

                  return this.urlPattern;

              }


              public void setUrlPattern( final String urlPattern )

              {

                  this.urlPattern = urlPattern;

              }


              public static final class Factory implements IActionConfigFactory

              {

                  public Object create()

                  {

                      return new FormGenCoreFacetInstallConfig();

                  }

              }

          }
          package com.formgen.eclipse;


          import org.eclipse.swt.SWT;

          import org.eclipse.swt.layout.GridData;

          import org.eclipse.swt.layout.GridLayout;

          import org.eclipse.swt.widgets.Composite;

          import org.eclipse.swt.widgets.Label;

          import org.eclipse.swt.widgets.Text;

          import org.eclipse.wst.common.project.facet.ui.AbstractFacetWizardPage;


          public final class FormGenCoreFacetInstallPage extends AbstractFacetWizardPage

          {

              private FormGenCoreFacetInstallConfig config;

              private Text urlPatternTextField;


              public FormGenCoreFacetInstallPage()

              {

                  super( "formgen.core.facet.install.page" );


                  setTitle( "FormGen Core" );

                  setDescription( "Configure the FormGen servlet." );

              }


              public void createControl( final Composite parent )

              {

                  final Composite composite = new Composite( parent, SWT.NONE );

                  composite.setLayout( new GridLayout( 1, false ) );


                  final Label label = new Label( composite, SWT.NONE );

                  label.setLayoutData( gdhfill() );

                  label.setText( "URL Pattern:" );


                  this.urlPatternTextField = new Text( composite, SWT.BORDER );

                  this.urlPatternTextField.setLayoutData( gdhfill() );

                  this.urlPatternTextField.setText( this.config.getUrlPattern() );


                  setControl( composite );

              }


              public void setConfig( final Object config )

              {

                  this.config = (FormGenCoreFacetInstallConfig) config;

              }


              public void transferStateToConfig()

              {

                  this.config.setUrlPattern( this.urlPatternTextField.getText() );

              }


              private static GridData gdhfill()

              {

                  return new GridData( GridData.FILL_HORIZONTAL );

              }

          }
          package com.formgen.eclipse;


          import org.eclipse.core.resources.IFolder;

          import org.eclipse.core.resources.IProject;

          import org.eclipse.core.runtime.CoreException;

          import org.eclipse.core.runtime.IProgressMonitor;

          import org.eclipse.core.runtime.Path;

          import org.eclipse.wst.common.project.facet.core.IDelegate;

          import org.eclipse.wst.common.project.facet.core.IProjectFacetVersion;


          public final class FormGenCoreFacetInstallDelegate implements IDelegate

          {

              public void execute( final IProject pj,

                                   final IProjectFacetVersion fv,

                                   final Object config,

                                   final IProgressMonitor monitor )


                  throws CoreException


              {

                  monitor.beginTask( "", 2 );


                  try

                  {

                      final FormGenCoreFacetInstallConfig cfg

                          = (FormGenCoreFacetInstallConfig) config;


                      final IFolder webInfLib = Utils.getWebInfLibDir( pj );


                      Utils.copyFromPlugin( new Path( "libs/formgen-core.jar" ),

                                            webInfLib.getFile( "formgen-core.jar" ) );


                      monitor.worked( 1 );


                      Utils.registerFormGenServlet( pj, cfg.getUrlPattern() );


                      monitor.worked( 1 );

                  }

                  finally

                  {

                      monitor.done();

                  }

              }

          }
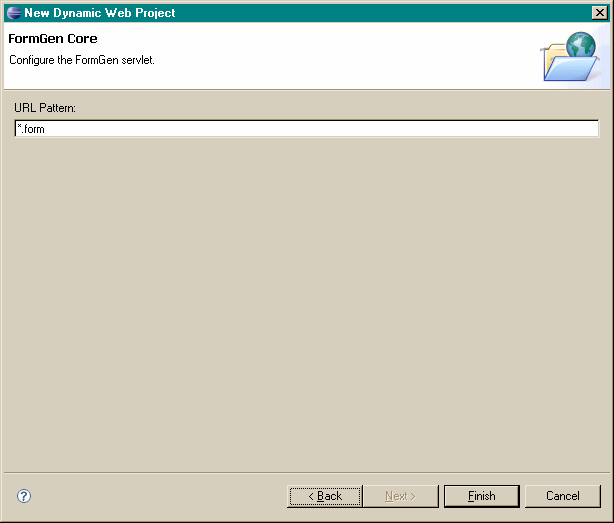
Once the above code changes have been made you should see another page appear in the Dynamic Web Project Wizard after the FormGen facets are selected. The new page will appear after the Web Module page, which is associated with thejst.web facet. That's because formgen.core facet depends on the jst.web facet. If this dependency relationship was not specified the relative order of these pages would be unspecified.
As the number of available facets grows, it becomes increasingly difficult for the user to figure out which combinations make sense. This is where presets come in. Presets (or Configurations, as they are referred to in the UI) are simply combinations of facets that someone has determined are useful in certain situations. Presets can be created by the user or supplied via an extension point.
Here is the extension point schema for declaring presets:
          <extension point="org.eclipse.wst.common.project.facet.core.facets">

            <preset id="{string}">

              <label>{string}</label>

              <description>{string}</description> (optional)

              <facet id="{string}" version="{string}"/> (1 or more)

            </preset>

          </extension>
Note that in order for a preset to apply to a given faceted project, the preset needs to include all of the project's "fixed facets". Fixed facets are the facets that are key to the proper operation of that project type and so cannot be removed. You can identify fixed facets by the lock icon.
Let's now create a preset that includes formgen facets.
          <extension point="org.eclipse.wst.common.project.facet.core.facets">

            <preset id="formgen.preset">

              <label>FormGen Web Project</label>

              <description>Creates a web project with FormGen functionality.</description>

              <facet id="jst.java" version="5.0"/>

              <facet id="jst.web" version="2.2"/>

              <facet id="formgen.core" version="1.0"/>

              <facet id="formgen.ext" version="1.0"/>

            </preset>

          </extension>
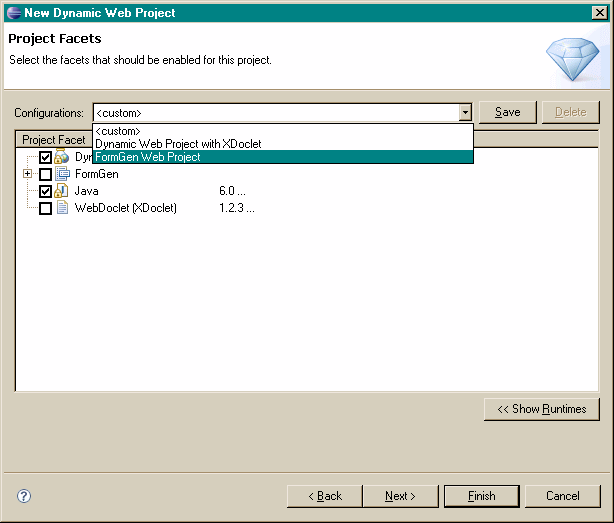
Here is how the preset shows up on the facets selection page:
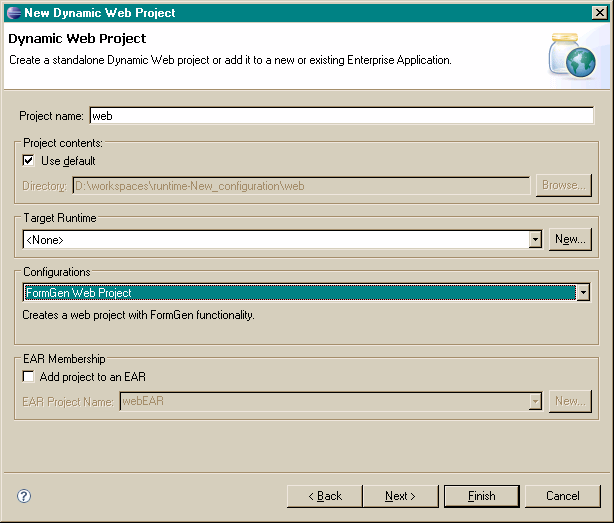
The preset can also be selected on the first page of all WTP project creation wizards. Here is how this looks in the Dynamic Web Project wizard:
One of the most important functions of the faceted project framework is to be able to accurately model whether a certain server runtime supports a given project. We do that by "mapping" project facets to runtime components that support them. If the artifacts created by a facet will run on any server that supports all of the facet's upstream dependencies, then the anywildcard can be used.
It's important to note that every facet needs to specify a support mapping of some kind. Facets that don't specify any support mappings are treated as not supported by any runtime, which is not very useful.
Here is the extension point that's used for specifying the support mappings:
          <extension point="org.eclipse.wst.common.project.facet.core.runtimes">

            <supported> (0 or more)

              <runtime-component any="{boolean}"/> (optional)

              <runtime-component id="{string}"/ version="{version.expr}"/> (0 or more)

              <facet id="{string}"/ version="{version.expr}"/> (1 or more)

            </supported>

          </extension>
The <supported> block can reference any number of runtime components as well as any number of facets. The semantics of that is to declare as supported every combination in the resulting cross-product.
The version attributes of the <runtime-component> and <facet> elements can be omitted to include all versions.
The FormGen facets don't have any special support requirements. They will run on any server that supports the j2ee servlet spec. We will use the any wildcard to designate that.
          <extension point="org.eclipse.wst.common.project.facet.core.runtimes">

            <supported>

              <runtime-component any="true"/>

              <facet id="formgen.core"/>

              <facet id="formgen.ext"/>

            </supported>

          </extension>
Alternative, if for some reason the FormGen functionality required a specific runtime, such as Tomcat, we would use something like the this instead:
          <extension point="org.eclipse.wst.common.project.facet.core.runtimes">

            <supported>

              <runtime-component id="org.eclipse.jst.server.tomcat" version="[5.0"/>

              <facet id="formgen.core"/>

              <facet id="formgen.ext"/>

            </supported>

          </extension>
The above more restrictive specification will prevent FormGen facets from being selected if the project is targetted to any runtime other than Apache Tomcat 5.0 or newer.
In this tutorial we created two fully-functional project facets by specifying constraints, implementing actions, grouping facets into categories, and creating wizard pages to allow users to parameterize facet installation. You should now be well prepared to create your own facets. Additional information not covered by this tutorial can be found in the following appendix sections.
The faceted project framework needs to be able to compare facet version strings. The framework supplies a default version comparator that can handle version strings encoded using the standard decimal notation (such as 1.2 or 5.66.5533), but if you want to use a different format you will need to supply a custom version comparator.
Here is how you plug in a custom version comparator:
          <extension point="org.eclipse.wst.common.project.facet.core.facets">

            <project-facet>

              <version-comparator class="{class:java.util.Comparator<String>}"/>

            </project-facet>

          </extension>
When implementing a version comparator you can either start from scratch or subclass the default version comparator (org.eclipse.wst.common.project.facet.core.DefaultVersionComparator). Subclassing the default version comparator makes sense if the version format differs only slightly from the default format, such as using separators other than dots or having non-numeric characters at certain positions. Here are the protected methods exposed by the DefaultVersionComparatorclass that are designed to be overridden:
protected String getSeparators();
protected Comparable parse( final String version,
final String segment,
final int position )
throws VersionFormatException;
A version expression is a syntax for specifying more than one version. The version expressions are used throughout the framework's extension points, but you will most likely first encounter them while specifying the requires constraint.
A version expression is composed of multiple segments separated by commas. The commas function as an OR operation. Each segment is either a single version, a range, or a wildcard. Ranges are represented by bracket and dash notation such as [x-y). A bracket means inclusive, while the parenthesis means exclusive. Open ended ranges are also supported. A wildcard (represented by '*' character) can be used to match any version. It is not possible to use the wildcard to match part of the version string.
Here are some examples:
          1.2

          1.2,1.5,3.2

          [1.2-3.2]

          [3.7-5.0)

          [3.7

          5.0)

          1.2,[3.0-4.5),[7.3

          *
It is possible to register listeners for certain events in the faceted project's life cycle. Here is the list of the available events:
          PRE_INSTALL

          POST_INSTALL

          PRE_UNINSTALL

          POST_UNINSTALL

          PRE_VERSION_CHANGE

          POST_VERSION_CHANGE

          RUNTIME_CHANGED
The way one declares event handlers is very similar to how actions are declared, however there are some key differences:
Unlike actions, events are not a direct result of something a user does. This means that it is not possible to associate wizard pages or provide a custom configuration object for event handlers.
Multiple event handlers can be declared for the same event. The relative order that they will be invoked in is not specified.
Here is the extension point schema for registering event handlers:
          <extension point="org.eclipse.wst.common.project.facet.core.facets">

            <event-handler facet="{string}" version="{version.expr}" type="{event.type}">

              <delegate class="{class:org.eclipse.wst.common.project.facet.core.IDelegate}"/>

            </action>

          </extension>
As you can see, just like with action definitions, the event handler has to implement the IDelegate interface. Also, just like with action definitions, the <event-handler> block can be embeded directly inside the <project-facet-version> element. In that case, the values for the facet and version attributes are implied and the attributes should be omitted.
The PRE_* and POST_* event handlers all get the same config object passed into their delegate's execute method as the corresponding action delegate. The RUNTIME_CHANGED event handlers get an instance of IRuntimeChangedEvent.
package org.eclipse.wst.common.project.facet.core;
import org.eclipse.wst.common.project.facet.core.runtime.IRuntime;
public interface IRuntimeChangedEvent
{
IRuntime getOldRuntime();
IRuntime getNewRuntime();
}
A property tester is provided by the Faceted Project Framework that allows the presence of the facet in a project to be tested by any extension point that works with org.eclipse.core.expressions package. The most common usage is to enable user interface elements (such as actions and project property pages). The property name isorg.eclipse.wst.common.project.facet.core.projectFacet and the value is either a facet id or a facet id followed by a colon and a version expression.
Here is an example of using facets property tester to control enablement of a project properties page:
          <extension point="org.eclipse.ui.propertyPages">

            <page

              adaptable="true"

              objectClass="org.eclipse.core.resources.IProject"

              name="FormGen Properties"

              class="com.formgen.eclipse.FormGenPropertiesPage"

              id="org.eclipse.jst.j2ee.internal.J2EEDependenciesPage">

              <enabledWhen>

                <test

                  forcePluginActivation="true"

                  property="org.eclipse.wst.common.project.facet.core.projectFacet"

                  value="formgen.core"/>

              </enabledWhen>

            </page>

          </extension>
Sometimes it desirable to be able to adjust the behavior of facet action wizard pages based on user input in the wizard pages of other facets. The IWizardContext interface can be used for this purpose. The wizard page gets a handle onIWizardContext interface when it's setWizardContext method is called. When writing code that relies on the wizard context, there are a couple of points you should keep in mind.
The facet whose value you wish to check may have already been installed in the past. In that case you will not find it's install configuration in the wizard context. You will need to write conditional logic that will consult the wizard context or looks at project state on disk.
You should make sure that a reasonable default is provided in your config object for the API-only scenario where your wizard page will not be involved.
Here is what the IWizardContext interface looks like:
package org.eclipse.wst.common.project.facet.ui;
import java.util.Set;
import org.eclipse.core.runtime.CoreException;
import org.eclipse.wst.common.project.facet.core.IProjectFacetVersion;
import org.eclipse.wst.common.project.facet.core.IFacetedProject.Action;
import org.eclipse.wst.common.project.facet.core.IFacetedProject.Action.Type;
public interface IWizardContext
{
String getProjectName();
Set getSelectedProjectFacets();
boolean isProjectFacetSelected( IProjectFacetVersion fv );
Set getActions();
Action getAction( Action.Type type,
IProjectFacetVersion fv );
}
