JOSSO

Java와 PHP를 위한 SSO 모듈인 JOSS(Java Open Single Sign-On)를 정리한다. JOSSO는 J2EE와 Spring 기반의 SSO 솔루션 이다.


목차

 [숨기기

설치 가이드 - JOSSO Gateway

Windows 환경에서 Apache Tomcat 6.0.16에 JOSSO Gateway(Idp)를 설치 한다. 사용자 인증을 위해서는 MySQL 5.0.51을 사용 한다.

설치전 사전 준비 사항


JOSSO용 Database 설정

  • MySQL에 JOSSO에서 사용할 Schmea를 등록한다.
  • MySQL Administrator에 root 관리자로 로그인 한다.
  • 좌측 상단 창에서 "Catalogs"를 선택한다.
  • 좌측 하단의 "Schemata" 창에서 우측 마우스를 누른다.
  • "Create New Schema" 메뉴를 선택하여 Schema를 생성한다.
  • Schema 생성화면에서 "Schema name"으로 "jossodb"를 입력한다.
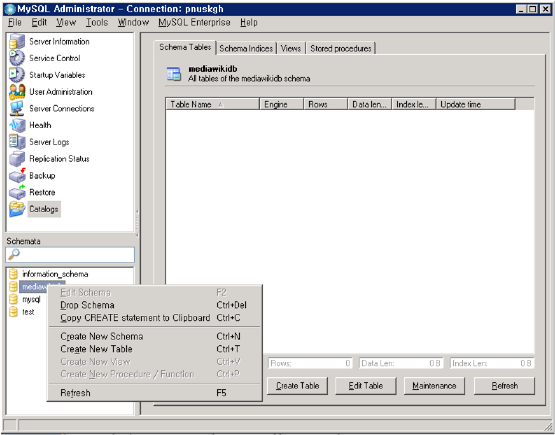
DB Schema 등록


  • MySQL에 JOSSO에서 사용할 사용자를 등록한다.
  • 좌측 상단 창에서 "User Administration"을 선택한다.
  • 좌측 하단의 "Users Accounts" 창에서 우측 마우스를 누른다.
  • "Add new user" 메뉴를 선택하여 사용자를 생성한다.
  • "User Information" 탭에서 "MySQL User"("josso"), "Password", "Confirm Password" 등을 등록한다.
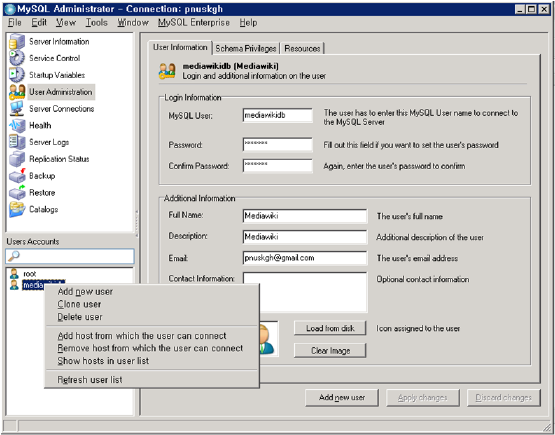
DB 사용자 등록


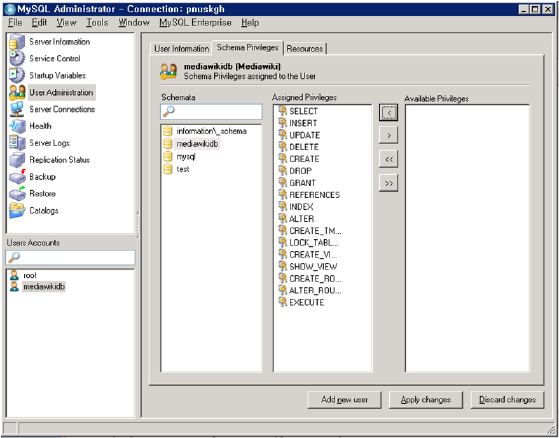
  • MySQL에 JOSSO에서 사용할 사용자의 권한을 설정한다.
  • "Schema Privileges" 탭에서 사용자가 사용할 Schema("jossodb")를 선택한다.
  • "Available Privileges"의 모든 권한을 "Assigned Privileges"로 이동한다.
  • "Apply changes" 버튼을 눌려 등록된 정보를 저장한다.
권한 부여


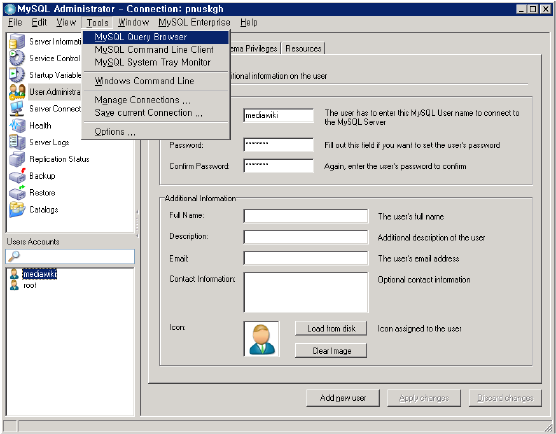
  • MySQL Query Browser에 접속한다.
  • 상단의 "Tools" 메뉴에서 "MySQL Query Browser" 메뉴를 선택한다.
Query Browser 접속


  • 사용자의 MySQL 데이터베이스 접속 정보를 추가한다.
  • 우측의 "Schemata" 탭에서 "mysql"을 더블 클릭하여 선택한다.
  • grant all privileges on jossodb.* to josso@localhost identified by '암호'; (사용자에게 Schmea에 대한 권한을 추가)
  • flush privileges; (위 명령을 통해 설정한 권한을 데이터베이스에 반영)
  • select host, user, password from user order by user, host; (사용자의 접속 정보 확인)
접속 정보 추가
  • MySQL Query Browser가 아니라 DOS 창에서 접속 정보를 추가하는 방법
mysql -uroot -pxxx mysql
    grant all privileges on jossodb.* 
        to josso@localhost identified by '암호';
    flush privileges;
    select host, user, password from user order by user, host;
    exit


  • MySQL Query Browser를 실행하여 jossodb에 josso 사용자로 로그인 한다.
  • 아래 SQL문을 실행하여 JOSSO에서 사용할 table을 생성 한다.
  • MySQL에서 password는 예약어이므로 password라는 항목명은 passwd로 변경 하여 테이블을 생성 하였다.
DROP TABLE IF EXISTS `JOSSO_ROLE`;
CREATE TABLE `JOSSO_ROLE` (
  `name` varchar(16) NOT NULL,
  `description` varchar(64) DEFAULT NULL,
  PRIMARY KEY (`name`)
) ENGINE=InnoDB DEFAULT CHARSET=utf8;

DROP TABLE IF EXISTS `JOSSO_USER`;
CREATE TABLE `JOSSO_USER` (
  `login` varchar(16) NOT NULL,
  `passwd` varchar(20) NOT NULL,
  `name` varchar(64) DEFAULT NULL,
  `description` varchar(64) DEFAULT NULL,
  PRIMARY KEY (`login`)
) ENGINE=InnoDB DEFAULT CHARSET=utf8;

DROP TABLE IF EXISTS `JOSSO_USER_PROPERTY`;
CREATE TABLE `JOSSO_USER_PROPERTY` (
  `login` varchar(16) NOT NULL,
  `name` varchar(255) NOT NULL,
  `value` varchar(255) NOT NULL,
  PRIMARY KEY (`login`,`name`), 
  CONSTRAINT `JOSSO_USER_PROPERTY_ibfk_1` 
    FOREIGN KEY (`login`) REFERENCES `JOSSO_USER` (`login`)
) ENGINE=InnoDB DEFAULT CHARSET=utf8; 

DROP TABLE IF EXISTS `JOSSO_USER_ROLE`;
CREATE TABLE `JOSSO_USER_ROLE` (
  `login` varchar(16) NOT NULL,
  `name` varchar(255) NOT NULL,
  PRIMARY KEY (`login`,`name`),
  KEY `name` (`name`),
  CONSTRAINT `JOSSO_USER_ROLE_ibfk_2` 
    FOREIGN KEY (`login`) REFERENCES `JOSSO_USER` (`login`),
  CONSTRAINT `JOSSO_USER_ROLE_ibfk_1` 
    FOREIGN KEY (`name`) REFERENCES `JOSSO_ROLE` (`name`)
) ENGINE=InnoDB DEFAULT CHARSET=utf8;
  • InnoDB를 사용하지 않을 경우에는 "ENGINE=InnoDB DEFAULT CHARSET=utf8;" 대신 "TYPE=MyISAM;"를 사용한다.


  • JOSSO가 정상 실행되는지 테스트를 원할 경우 다음 SQL문을 실행한다.
  • MySQL에서 password는 예약어이므로 password라는 항목명은 passwd로 변경 하여 SQL문을 작성 하였다.
INSERT INTO JOSSO_ROLE (NAME,DESCRIPTION) VALUES('role1','The Role1');
INSERT INTO JOSSO_ROLE (NAME,DESCRIPTION) VALUES('role2','The Role2');
INSERT INTO JOSSO_ROLE (NAME,DESCRIPTION) VALUES('role3','The Role3');

INSERT INTO JOSSO_USER (LOGIN,PASSWD,DESCRIPTION)VALUES('user1', 'user1pwd', 'The User1'); INSERT INTO JOSSO_USER_ROLE (LOGIN,NAME) VALUES('user1', 'role1'); INSERT INTO JOSSO_USER_ROLE (LOGIN,NAME) VALUES('user1', 'role2'); INSERT INTO JOSSO_USER_PROPERTY(LOGIN,NAME,VALUE)VALUES('user1', 'user.name', 'User1 Name'); INSERT INTO JOSSO_USER_PROPERTY(LOGIN,NAME,VALUE)VALUES('user1', 'user.lastName', 'User1 Last Name'); INSERT INTO JOSSO_USER_PROPERTY(LOGIN,NAME,VALUE)VALUES('user1', 'user.registrationDate', 'User1 Registration Date');
INSERT INTO JOSSO_USER (LOGIN,PASSWD,DESCRIPTION)VALUES('user2', 'user2pwd', 'The User2') ; INSERT INTO JOSSO_USER_ROLE (LOGIN,NAME)VALUES('user2', 'role3'); INSERT INTO JOSSO_USER_PROPERTY(LOGIN,NAME,VALUE)VALUES('user2', 'user.name', 'User2 Name'); INSERT INTO JOSSO_USER_PROPERTY(LOGIN,NAME,VALUE)VALUES('user2', 'user.lastName', 'User2 Last Name'); INSERT INTO JOSSO_USER_PROPERTY(LOGIN,NAME,VALUE)VALUES('user2', 'user.registrationDate', 'User2 Registration Date');


  • 참고 문헌


JOSSO Gateway 설치

  • 압축을 풀어 d:/josso 폴더에 복사한다.


  • DOS 창에서 JOSSO Agent를 다음과 같이 설치 한다.
  • Windows Vista의 경우, 관리자 권한으로 실행 한다.
cd d:/josso/bin
josso-gsh.bat
  gateway install --target "$TOMCAT_HOME" --platform tc60
  exit
  • $JAVA_HOME 변수에 공백이 들어 있어 "지정된 경로를 찾을 수 없습니다."라는 오류가 발생할 경우에는, PATH 환경 변수에 $JAVA_HOME/bin 폴더를 추가하고 josso-gsh.bat를 다음과 같이 수정 한다.
"%JAVACMD%" %JAVA_OPTS% -jar "%BOOTJAR%" %ARGS% 를 삭제하고 아래 라인을 추가
java %JAVA_OPTS% -jar "%BOOTJAR%" %ARGS%


  • 설치가 정상적으로 진행이 되면 $TOMCAT_HOME 아래에서 다음 사항을 확인할 수 있다.
  • $TOMCAT_HOME/lib/josso-* 파일 들
  • $TOMCAT_HOME/webapps/josso 폴더


  • 설치가 완료된 후 d:/josso 폴더를 삭제한다.


  • Ubnutu Server에서 JOSSO 설치
cd /usr/share/tomcat6
ln ln -s /etc/tomcat6 conf
cd ~/josso/josso-1.8.1/bin
./josso-gsh
    gateway install --target "/usr/share/tomcat6" --platform tc60
    exit

cd /var/lib/tomcat6/webapps
ln -s /usr/share/tomcat6/webapps/josso josso

JOSSO Gateway 환경 설정

  • MySQL용 JDBC Driver를 설정한다.
  • MySQL JDBC Driver 다운로드 사이트에 접속 한다.
  • "JDBC Driver for MySQL (Connector/J)" 아래에 있는 "Download" 링크를 선택한다.
  • Source and Binaries (zip) 옆에 있는 링크를 선택하여 mysql-connector-java-5.1.7.zip 파일을 다운로드 한다.
  • zip 파일의 압축을 풀어 안에 있는 mysql-connector-java-5.1.7-bin.jar 파일을 $TOMCAT_HOME/webapps/josso/WEB-INF/lib 아래에 복사하고 Tomcat을 재기동 한다.


  • $TOMCAT_HOME/lib/josso-gateway-config.xml 파일에 사용자 정보 저장소로 DB 설정 정보를 사용하도록 수정 한다.
<!-- Identity, Session and Assertion Stores configuration -->
<s:import resource="josso-gateway-db-stores.xml" />
<!--
<s:import resource="josso-gateway-memory-stores.xml" />
<s:import resource="josso-gateway-db-stores.xml" />
<s:import resource="josso-gateway-ldap-stores.xml" />
-->


  • $TOMCAT_HOME/lib/josso-gateway-db-stores.xml 파일에서 DB 정보를 설정 한다.
  • 기존에 있는 id="josso-identity-store" 에 해당하는 것을 삭제하고, 아래 사항을 추가 한다.
  • MySQL에서 password는 예약어이므로 password라는 항목명은 passwd로 변경 하여 테이블을 생성 하였으므로 SQL문도 그에 맞도록 수정 하였다.
<db-istore:jdbc-store
    id="josso-identity-store"
    driverName="com.mysql.jdbc.Driver"
    connectionURL="jdbc:mysql://localhost:3306/jossodb"
    connectionName="josso"
    connectionPassword="암호"
    userQueryString="SELECT LOGIN AS NAME FROM JOSSO_USER WHERE LOGIN = ?"
    rolesQueryString="SELECT NAME AS ROLE FROM JOSSO_USER_ROLE WHERE LOGIN = ?"
    credentialsQueryString="SELECT LOGIN AS USERNAME, PASSWD password FROM JOSSO_USER WHERE LOGIN = ?"
    userPropertiesQueryString="SELECT NAME, VALUE FROM JOSSO_USER_PROPERTY WHERE LOGIN = ?"
    resetCredentialDml="UPDATE JOSSO_USER SET PASSWD = ? WHERE LOGIN = ?"
    relayCredentialQueryString="SELECT LOGIN FROM JOSSO_USER WHERE #?# = ?"
    />


  • $TOMCAT_HOME/lib/josso-gateway-auth.xml 파일에서 기본 인증 정보를 수정한다.
  • hashAlgorithm, hashEncoding를 삭제하여 암호가 Plan Text로 저장되도록 한다.
   <basic-authscheme:basic-auth-scheme
           id="josso-basic-authentication"
           ignorePasswordCase="false"
           ignoreUserCase="false">

       <basic-authscheme:credentialStore>
           <s:ref bean="josso-identity-store"/>
       </basic-authscheme:credentialStore>

       <basic-authscheme:credentialStoreKeyAdapter>
           <s:ref bean="josso-simple-key-adapter"/>
       </basic-authscheme:credentialStoreKeyAdapter>

   </basic-authscheme:basic-auth-scheme>


설치 가이드 - PHP용 Agent

Windows 환경에서 PHP 5.2.5에 JOSSO Agent(SP)를 설치 한다.

설치전 사전 준비 사항


PHP용 JOSSO Agent 설치

  • 압축을 풀어 d:/josso 폴더에 복사한다.
  • d:/josso/dist/agents/src/josso-php-agent-1.8.0-.zip의 압축을 풀어 d:/josso_php 폴더에 복사한다.


  • Apache HTTP Server의 Document_root 아래에 d:/josso_php/josso-php-partnerapp 폴더를 통채로 복사한다.


  • PHP에 JOSSO Agent를 설정 한다.
mkdir c:/php/includes
c:/php/includes 아래에 d:/josso_php/josso-php-inc 폴더를 통채로 복사한다.
  • JOSSO Agent 설정 파일은 c:/php/includes/josso-php-inc/josso-cfg.inc 이다.
  • $PHP_HOME에 있는 php.ini 파일에서 다음과 같이 수정 한다.
include_path = ".;c:\php\includes"
auto_prepend_file = "josso-php-inc\josso.php"


  • 테스트를 위해 d/:/josso/dist/samples/apps/josso-partner-php-1.8.0-.zip 파일의 압축을 풀어 index.php 파일을 Apache HTTP Server의 Document Root에 index_josso.php로 이름을 바꾸어 저장 한다.


  • 설치가 완료된 후 d:/josso 폴더와 d:/joss_php 폴더를 삭제하고 Apache HTTP Server를 재기동 한다.


PHP용 JOSSO Agent 환경 설정

  • JOSSO Agent 설정 파일(c:/php/includes/josso-php-inc/josso-cfg.inc)에서 다음을 수정 한다.
  • JOSSO Gateway의 IP 또는 URL(예, www.josso.com)을 사용하여 설정한다.
  • josso_endpoint는 JOSSO Gateway의 IP를 사용하여 설정한다.
// Josso agent configuration
$josso_gatewayLoginUrl = 'http://Gateway_서버_IP_or_URL:8080/josso/signon/login.do';
$josso_gatewayLogoutUrl = 'http://Gateway_서버_IP_or_URL:8080/josso/signon/logout.do';

// WS client configuration :
$josso_endpoint = 'http://Gateway_서버_IP:8080';


  • JOSSO 설정 확인


설치 가이드 - Tomcat용 Agent

Windows 환경에서 Apache Tomcat 6.0.16에 JOSSO Agent(SP)를 설치 한다. 여기서는 JOSSO Gateway가 설치된 장비에 JOSSO Agent를 설치 한다.

설치전 사전 준비 사항


Tomcat용 JOSSO Agent 설치

  • 압축을 풀어 d:/josso 폴더에 복사한다.


  • 도스창을 띄워 Apache Tomcat 6.x용 Agent를 설치 한다.
cd d:/josso/bin
josso-gsh.bat
    agent install --target "$TOMCAT_HOME" --platform tc60
    exit


  • 설치 후 Tomcat이 정상적으로 기동되지 않을 경우 다음과 같이 조치 한다.
  • 새로 생성된 $TOMCAT_HOME/bin/setenv.bat과 setenv.sh를 삭제 한다.
  • Java 환경 변수에 "Djava.security.auth.login.config"을 추가 한다.
  • 화면 우측 하단의 "Apache Tomcat" 아이콘을 오른쪽 마우스로 선택 한다.
  • "Configure..." 메뉴를 선택 한다.
  • "Java" 탭에서 "Java Options"에 "-Djava.security.auth.login.config=%CATALINA_HOME%/conf/jaas.conf"을 추가 한다.


  • 기존 설치된 Web Application과 충돌이 발생할 경우 다음과 같이 조치 한다.
  • $TOMCAT_HOME/lib 에 새로 추가된 jar 파일을 기존 Web Application의 lib 파일과 버전을 비교하여 최신 버전을 사용한다.
  • Confluence의 경우, xbean-spring-3.4.3.jar 에서 충돌이 발생하여 Confluence의 Session ID를 가져오지 못한다. (java.lang.NullPointerException)


Tomcat용 JOSSO Agent 환경 설정

  • JOSSO Agent 설정 파일($TOMCAT_HOME/lib/josso-agent-config.xml)을 수정 한다.
  • JOSSO Gateway의 IP 또는 URL(예, www.josso.com)을 사용하여 설정한다.
  • josso_endpoint는 JOSSO Gateway의 IP를 사용하여 설정한다.
<gatewayLoginUrl>http://Gateway_서버_IP_or_URL:8080/josso/signon/login.do</gatewayLoginUrl>
<gatewayLogoutUrl>http://Gateway_서버_IP_or_URL:8080/josso/signon/logout.do</gatewayLogoutUrl>

<protocol:ws-service-locator endpoint="http://Gateway_서버_IP:8080" />

<agent:partner-app id="Confluence" context="/confluence"/>


Java Web Application용 Agent

위에서 정리한 Tomcat용 JOSSO Agent는 Tomcat에 설치된 모든 웹 애플리케이션에 적용(Agent는 전체에 적용이 되나 설정에 따라 필요한 프로그램만 SSO 처리가 가능)이 되므로 library 파일 등에서 충돌이 발생할 수 있다. 그러서 여기서는 하나의 Web Application에 Filter 기능을 사용하여 적용이 가능한 자체 개발한 JOSSO Web Application Agent를 소개 한다.

Tomcat용 JOSSO Agent을 참조하여 JOSSO Web Application Agent를 제작 하였으므로 관련 library는 Tomcat용 JOSSO Agent에 있는 것을 사용한다.

  • JOSSO와 Web Service를 위한 라이브러리 파일 설정
  • /WEB-INF/lib에 josso-ws-1.8.0.jar 파일 복사


  • Agent 적용을 위한 Filter 설정
  • /WEB-INF/web.xml 파일에 다음을 추가 한다.
<filter>
    <filter-name>jossoAgent</filter-name>
    <filter-class>pnus.josso.LoginFilter</filter-class> <! -- Filter class 명 -->
    <init-param>
        <param-name>jossoGatewayLoginUrl</param-name>
        <param-value>http://localhost/josso/signon/login.do</param-value> <! -- JOSSO 로그인 화면 -->
    </init-param>
    <init-param>
        <param-name>jossoGatewayLogoutUrl</param-name>
        <param-value>http://localhost/josso/signon/logout.do</param-value> <! -- JOSSO 로그아웃 화면 -->
    </init-param>
    <init-param>
        <param-name>jossoEndpoint</param-name>
        <param-value>http://localhost</param-value> <! -- JOSSO 웹 서비스 요청을 위한 시작 URL -->
    </init-param>
    <init-param>
        <param-name>flag_josso</param-name>
        <param-value>true</param-value>       <! -- true일 경우에만 JOSSO 적용 -->
    </init-param>
</filter>

<filter>
    <filter-name>login</filter-name>
    <filter-class>com.atlassian.seraph.filter.LoginFilter</filter-class>
</filter>

<filter-mapping>
    <filter-name>jossoAgent</filter-name>
    <url-pattern>*.action</url-pattern>   <! -- JOSSO 적용을 위한 filter mapping -->
</filter-mapping>                         <! -- 여기서는 *.action과 *.jsp만 하였으나 필요할 경우 추가할 것 -->

<filter-mapping>
    <filter-name>jossoAgent</filter-name>
    <url-pattern>*.jsp</url-pattern>
</filter-mapping>


  • 실제 JOSSO와 통신하여 SSO 처리를 하는 LoginFilter.java를 컴파일하여 /WEB-INF/classes/pnus/josso/LoginFilter.class 로 복사 한다.


  • Tomcat을 재기동하여 JOSSO Web Service Agent가 정상적으로 동작하는지 확인 한다.


사용자 가이드

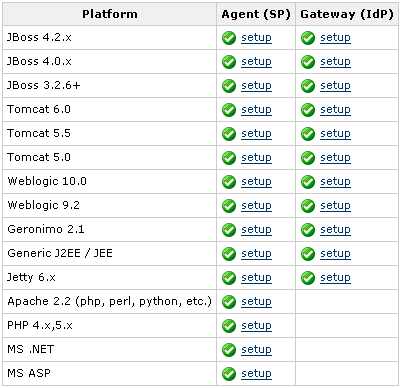
JOSSO 지원 플랫폼

  • JOSSO 지원 플랫폼
  • Gateway : JOSSO에서 Agent의 요청을 받아 사용자 인증을 처리하는 서비스
  • Agent : 사용자 프로그램이 수행되는 곳에 설치되어 Gateway와 통신하여 인증 처리를 하는 서비스

JOSSO 지원 플랫폼

PHP에 JOSSO 적용


  • JOSSO Agent가 PHP에 제공하는 정보 명세
$josso_agent  : JOSSO Agent
$ssoSessionId : JOSSO Session ID

$user = $josso_agent.getUserInSession() : 세션에 있는 사용자 정보 반환
$roles = $josso_agent->findRolesBySSOSessionId($sessionId) : Roles을 반환
$josso_agent.isUserInRole($rolename) : 해당 Role에 속하는지 여부 반환

$user->getName() : 사용자 명(사용자 아이디)을 반환
$user->getProperties() : 사용자의 모든 Properties를 반환
$user->getProperty('user.name') : 사용자의 해당 Property를 반환


  • JOSSO Agent가 PHP에 제공하는 함수 명세
jossoRequestLogin() : 로그인 페이지로 가고 싶을 때 호출
jossoCreateLoginUrl() : 로그인 URL을 반환
jossoRequestLoginForUrl($currentUrl) : 로그인 페이지 호출
    로그인 후 인수로 전달된 페이지 호출

jossoRequestLogout() : 로그아웃을 하고 싶을 때 호출
jossoCreateLogoutUrl() : 로그아웃 URL을 반환
jossoRequestLogoutForUrl($currentUrl) : 로그아웃 페이지 호출
    로그아웃 후 인수로 전달된 페이지 호출


Java에 JOSSO 적용

Tomcat용 JOSSO Agent 동작 원리

  • josso-tomcat60-agent-1.8.0.jar에서 다음 함수가 요청을 받아 처리함
  • public void invoke(Request request, Response response)

관리자 가이드

JOSSO 로그

  • 로그 설정
  • $JOSSO_HOME/WEB-INF/web.xml
<servlet-name>action</servlet-name> 에서
<init-param>
    <param-name>debug</param-name>
    <param-value>5</param-value> 이 값을 변경하여 로그를 남김
</init-param>
  • 로그 파일
  • $TOMCAT_HOME/logs/catalina.2009-03-20.log

Single Sign On 적용 방안

  • JOSSO의 SSO 적용 방안

SSO(Single-Sign-On)을 하기 위해서는 자동적으로 세션 정보가 생성되고 관리 되어야 한다. 다음과 같은 규칙을 SSO가 필요한 프로그램에 적용한다.

  • 주의 사항 : 아래 규칙은 프로그램에서 세션 정보를 초기화 시키기 전에 추가 하여야 한다.
  • JOSSO의 SSO 정보가 없을 경우
if (접속 시스템의 세션 정보가 있으면) {
    접속 시스템의 세션 정보를 삭제 한다.
}
if (로그인 또는 로그아웃 요청일 경우) {
    분기 화면 정보로 디폴트 페이지를 설정 한다.
} else {
    분기 화면 정보로 접속하려던 페이지를 설정 한다.
}
JOSSO 로그인 화면을 보여 준다.
JOSSO에 로그인이 되었을 경우 분기 화면을 보여 준다.
  • JOSSO의 SSO 정보가 있을 경우
if (로그인 요청일 경우) {
    디폴트 페이지를 호출 한다.
    exit;
}

if (로그아웃 요청일 경우) [
    접속 시스템의 세션 정보를 삭제 한다.
        반드시 접속 시스템에서 사용하는 세션 정보만 삭제 한다.
        모든 세션 정보를 삭제하면 JOSSO도 비정상 동작 한다.
    분기 화면 정보로 디폴트 페이지를 설정 한다.
    JOSSO에서 로그아웃을 한다.
    JOSSO 로그인 화면을 보여 준다.
    exit
}

if (접속 시스템의 세션 정보와 JOSSO의 세션 정보가 틀릴 경우) {
    접속 시스템의 세션 정보를 삭제 한다.
}
if (접속 시스템의 세션 정보가 없을 경우) {
    접속 시스템의 세션 정보를 생성 한다.
}
원래 페이지 코드를 계속 처리 한다.
  • 사용자 정보 동기화 방안
  • 사용자 등록, 수정, 삭제, 암호 변경 시 SSO가 필요한 모든 시스템의 사용자 정보의 관리 방안을 수립하여야 한다.
  • 1안. 각 시스템에서 별도 관리 (권장 방안)
  • JOSSO에서 사용자 등록, 수정, 삭제, 암호 변경 화면을 제공
  • JOSSO에서 작업 수행 시 SSO가 필요한 모든 시스템의 사용자 정보를 동기화 한다.
  • 권한 설정 등의 부가 작업은 각 시스템에서 진행 한다.
  • 2안. JOSSO에서 통합 관리
  • 각 시스템의 세션에 사용자 정보를 제공하는 것은 JOSSO에서 제공하는 사용자 정보로 대체 한다.
  • 각 시스템에서 사용자 정보를 사용하는 부분을 JOSSO에서 사용자 정보를 읽는 것으로 대체 한다.
  • 역할 정보 동기화 방안
  • 역할 및 권한 정보는 각 시스템에서 별도로 관리 한다.
  • JOSSO에서 통합 관리할 경우에는, 각 시스템의 권한 설정을 제거하고 JOSSO에서 권한 설정을 하여야 하므로 아주 복잡하다. JOSSO는 권한 관리를 위한 상세한 기능을 제공하고 있지 않다.

세션 Timeout 시간 설정

  • $TOMCAT_HOME/webapps/josso/WEB-INF/web.xml에서 세션 Timeout 시간을 분단위로 설정 한다.
<session-config>
    <session-timeout>30</session-timeout>
</session-config>


로그인 화면 디자인 변경

  • 아래 두개의 파일의 디자인을 변경 한다.
  • $TOMCAT_HOME/webapps/josso/josso_layout.jsp : 화면 레이아웃
  • $TOMCAT_HOME/webapps/josso/signon/usernamePasswordLogin.jsp : 로그인 화면 내용

JOSSO Gateway의 LDAP 설정

참고 문헌


출처 - http://www.jopenbusiness.com/mediawiki/index.php/JOSSO


'Security > SSO' 카테고리의 다른 글

sso - 인증 방식  (0) 2013.06.15
josso - 2.3.0 설치 in fedora  (0) 2013.06.14
sso - 구현 방법 모색  (0) 2013.06.10
sso - 구현 방법, 쿠키 연동  (0) 2013.06.10
josso - 관련 자료 소개  (0) 2013.06.10
Posted by linuxism
,


mongoTemplate query by DBRef

db.user.find()

{... , "department" : DBRef("department", ObjectId("51f941bb3580d5d8b1ae97f9"))}


Query q = new Query(where("department.$id").is(new ObjectId("51f941bb3580d5d8b1ae97f9")));


Handling DBRefs in MongoDB with Spring Data


Posted by Vijay Rawat on 

Recently I was watching a 


presentation titled Why I Chose MongoDB for guardian.co.uk by Mat Wall. I thought of giving a look to mongoDB. Those who dont know what is mongoDB, well, its a document oriented database with some advantages over other relational databases. For more info you can have a look at MongoDb website. While I was researching on how to access mongoDB easily and more efficiently I found out Spring Data. I also found some useful blogs explaining integration of both. But I was still not able to find a concrete working example which explains how to handle class relationship with MongoDB(DBRefs). So I thought of writing a complete working Spring MVC + Spring Data + MongoDB application handling DBRefs.

I have created a simple example with three domain classes User, Post and Comment. User can create Post and Post can have Comment(keeping it as simple as that). Below are the domain classes(of the example),

1
2
3
4
5
6
7
8
9
10
11
12
import org.springframework.data.annotation.Id;
import org.springframework.data.mongodb.core.mapping.Document;
 
@Document
public class User {
    @Id
    private String id;
    private String userName;
    private String password;
 
        //getters & setters
}
1
2
3
4
5
6
7
8
9
10
11
12
13
14
import org.springframework.data.annotation.Id;
 
@org.springframework.data.mongodb.core.mapping.Document
public class Post {
 
    @Id
    private String id;
    private String subject;
    private String content;
    @org.springframework.data.mongodb.core.mapping.DBRef
    private User user;
 
        //getters and setters
}
1
2
3
4
5
6
7
8
9
10
11
12
13
14
15
import org.springframework.data.annotation.Id;
 
@org.springframework.data.mongodb.core.mapping.Document
public class Comment {
 
    @Id
    private String id;
    private String content;
    @org.springframework.data.mongodb.core.mapping.DBRef
    private User user;
    @org.springframework.data.mongodb.core.mapping.DBRef
    private Post post;
 
        //getters and setters
}

You can see how the classes are linked with each other using @DBRef annotation. Now in order to access MongoDB and we need to create some DAO classes. Well thats a piece of cake with Spring Data's MongoRepository. Just extend MongoRepository<T, X> with you DAO where T is class name and X is class used for creating the key.

1
2
3
4
5
6
7
import in.xebia.mongodb.blog.domain.User;
import org.springframework.transaction.annotation.Transactional;
 
@Transactional
public interface UserDao extends org.springframework.data.mongodb.repository.MongoRepository<User, String> {
 
}
1
2
3
4
5
6
7
import in.xebia.mongodb.blog.domain.Post;
import org.springframework.transaction.annotation.Transactional;
 
@Transactional
public interface PostDao extends org.springframework.data.mongodb.repository.MongoRepository<Post, String> {
 
}
1
2
3
4
5
6
7
import in.xebia.mongodb.blog.domain.Comment;
import org.springframework.transaction.annotation.Transactional;
 
@Transactional
public interface CommentDao extends org.springframework.data.mongodb.repository.MongoRepository<Comment, String>{
 
}

MongoRepository provides basic CRUD operations like findOne(),findALL(),save(),delete(), etc. but in order to handle DBRefs we need to make custom use of MongoTemplate as shown below in the CommentService class:

1
2
3
4
5
6
7
8
9
10
11
12
13
14
15
16
17
18
19
20
21
22
23
24
25
26
27
28
29
30
31
32
33
34
35
36
37
38
39
40
41
42
43
44
45
46
47
48
49
50
51
52
import static org.springframework.data.mongodb.core.query.Criteria.where;
import in.xebia.mongodb.blog.api.CommentDao;
import in.xebia.mongodb.blog.api.CommentService;
import in.xebia.mongodb.blog.domain.Comment;
import in.xebia.mongodb.blog.domain.Post;
import in.xebia.mongodb.blog.domain.User;
import java.util.List;
import java.util.UUID;
import javax.annotation.Resource;
import org.springframework.data.mongodb.core.MongoTemplate;
import org.springframework.data.mongodb.core.query.Query;
import org.springframework.stereotype.Service;
import org.springframework.transaction.annotation.Transactional;
 
@Service("commentService")
@Transactional
public class CommentServiceImpl implements CommentService {
    @Resource
    private CommentDao commentDao;
    @Resource
    private MongoTemplate mongoTemplate;
    public List<Comment> getAll() {
        List<Comment> comments = commentDao.findAll();
        return comments;
    }
    public Comment get(String id) {
        Comment comment = commentDao.findOne(id);
        return comment;
    }
    public Boolean add(Comment comment) {
        try {
            if(comment.getId()==null || comment.getId().length()==0)
                comment.setId(UUID.randomUUID().toString());
           commentDao.save(comment);
           return true;
          } catch (Exception e) {
              e.printStackTrace();
              return false;
          }
    }
    public List<Comment> get(Post post) {
        Query query = new Query(where("post.$id").is(post.getId()));
        List<Comment> comments = mongoTemplate.find(query, Comment.class);
        return comments;
    }
    public List<Comment> get(User user) {
        Query query = new Query(where("user.$id").is(user.getId()));
        List<Comment> comments = mongoTemplate.find(query, Comment.class);
        return comments;
    }
 
}

Last but not the least here is the config file for mongo:

1
2
3
4
5
6
7
8
9
10
11
12
13
14
15
16
17
18
19
20
21
22
23
24
25
<?xml version="1.0" encoding="UTF-8"?>


<mongo:repositories base-package="in.xebia.mongodb.blog.api" />
 
<mongo:mongo host="localhost" port="27017"/>
<!--mongoTemplate is required as it is used by mongorepository -->
<bean id="mongoTemplate" class="org.springframework.data.mongodb.core.MongoTemplate">
<constructor-arg ref="mongo"/>
<constructor-arg name="databaseName" value="test"/>
</bean>
<bean id="populatorService" class="in.xebia.mongodb.blog.impl.PopulatorService" init-method="init"/>
</beans>

Thats all I have for this blog you can download the complete RESTful web-app from the following git repository: HandlingDBRefsInMongoDBWithSpringData. In order to use the web app you will require some tools like soapUI or Poster(mozilla addon) as there is no UI for application. Just publish the app and start making json requests(see example in readme.txt)


Have a nice day.


출처 - http://xebee.xebia.in/index.php/2011/09/20/handling-dbrefs-in-mongodb-with-spring-data/


Spring Data MongoDB cascade save on DBRef objects

Spring Data MongoDB by default does not support cascade operations on referenced objects with @DBRefannotations as reference says:

The mapping framework does not handle cascading saves. If you change an Account object that is referenced by a Person object, you must save the Account object separately. Calling save on the Person object will not automatically save the Account objects in the property accounts.

That’s quite problematic because in order to achieve saving child objects you need to override save method in repository in parent or create additional “service” methods like it is presented in here.

In this article I will show you how it can be achieved for all documents using generic implementation ofAbstractMongoEventListener.

@CascadeSave annotation

Because we can’t change @DBRef annotation by adding cascade property lets create new annotation @CascadeSave that will be used to mark which fields should be saved when parent object is saved.

1
2
3
4
5
6
7
8
9
10
11
12
package pl.maciejwalkowiak.springdata.mongodb;
 
import java.lang.annotation.ElementType;
import java.lang.annotation.Retention;
import java.lang.annotation.RetentionPolicy;
import java.lang.annotation.Target;
 
@Retention(RetentionPolicy.RUNTIME)
@Target({ ElementType.FIELD })
public @interface CascadeSave {
 
}

CascadingMongoEventListener

Next part is to implement handler for this annotation. We will use for that powerful Spring Application Event mechanism. In particular we will extend AbstractMongoEventListener to catch saved object before it is converted to Mongo’sDBOBject.

How does it work? When object MongoTemplate#save method is called, before object is actually saved it is being converted into DBObject from MongoDB api. CascadingMongoEventListener – implemented below – provides hook that catches object before its converted and:

  • goes through all its fields to check if there are fields annotated with @DBRef and @CascadeSave at once.
  • when field is found it checks if @Id annotation is present
  • child object is being saved
1
2
3
4
5
6
7
8
9
10
11
12
13
14
15
16
17
18
19
20
21
22
23
24
25
26
27
28
29
30
31
32
33
34
35
36
37
38
39
40
41
42
43
44
45
46
47
48
49
50
51
52
53
54
55
56
57
58
package pl.maciejwalkowiak.springdata.mongodb;
 
import org.bson.types.ObjectId;
import org.springframework.beans.factory.annotation.Autowired;
import org.springframework.data.annotation.Id;
import org.springframework.data.mapping.model.MappingException;
import org.springframework.data.mongodb.core.MongoOperations;
import org.springframework.data.mongodb.core.mapping.DBRef;
import org.springframework.data.mongodb.core.mapping.event.AbstractMongoEventListener;
import org.springframework.stereotype.Component;
import org.springframework.util.ReflectionUtils;
 
import java.lang.reflect.Field;
 
public class CascadingMongoEventListener extends AbstractMongoEventListener {
    @Autowired
    private MongoOperations mongoOperations;
 
    @Override
    public void onBeforeConvert(final Object source) {
        ReflectionUtils.doWithFields(source.getClass(), new ReflectionUtils.FieldCallback() {
 
            public void doWith(Field field) throws IllegalArgumentException, IllegalAccessException {
                ReflectionUtils.makeAccessible(field);
 
                if (field.isAnnotationPresent(DBRef.class) && field.isAnnotationPresent(CascadeSave.class)) {
                    final Object fieldValue = field.get(source);
 
                    DbRefFieldCallback callback = new DbRefFieldCallback();
 
                    ReflectionUtils.doWithFields(fieldValue.getClass(), callback);
 
                    if (!callback.isIdFound()) {
                        throw new MappingException("Cannot perform cascade save on child object without id set");
                    }
 
                    mongoOperations.save(fieldValue);
                }
            }
        });
    }
 
    private static class DbRefFieldCallback implements ReflectionUtils.FieldCallback {
        private boolean idFound;
 
        public void doWith(Field field) throws IllegalArgumentException, IllegalAccessException {
            ReflectionUtils.makeAccessible(field);
 
            if (field.isAnnotationPresent(Id.class)) {
                idFound = true;
            }
        }
 
        public boolean isIdFound() {
            return idFound;
        }
    }
}

Mapping requirements

As you can see in order to make thing work you need to follow some rules:

  • parent’s class child property has to be mapped with @DBRef and @CascadeSave
  • child class needs to have property annotated with @Id and if that id is supposed to be autogenerated it should by type of ObjectId

Usage

In order to use cascade saving in your project you need just to register CascadingMongoEventListener in Spring Context:

1
<bean class="pl.maciejwalkowiak.springdata.mongodb.CascadingMongoEventListener" />

Let’s test it

In order to show an example I made two document classes:

1
2
3
4
5
6
7
8
9
10
11
12
13
14
15
16
@Document
public class User {
    @Id
    private ObjectId id;
    private String name;
 
    @DBRef
    @CascadeSave
    private Address address;
 
    public User(String name) {
        this.name = name;
    }
 
    // ... getters, setters, equals hashcode
}
1
2
3
4
5
6
7
8
9
10
11
12
@Document
public class Address {
    @Id
    private ObjectId id;
    private String city;
 
    public Address(String city) {
        this.city = city;
    }
 
    // ... getters, setters, equals hashcode
}

In test there is one user with address created and then user is saved. Test will cover only positive scenario and its just meant to show that it actually works (applcationContext-tests.xml contains only default Spring Data MongoDB beans and CascadingMongoEventListener registered):

1
2
3
4
5
6
7
8
9
10
11
12
13
14
15
16
17
18
19
20
21
22
23
24
25
26
27
28
29
30
31
32
33
34
35
36
@RunWith(SpringJUnit4ClassRunner.class)
@ContextConfiguration(locations = {"classpath:applcationContext-tests.xml"})
public class CascadingMongoEventListenerTest {
 
    @Autowired
    private MongoOperations mongoOperations;
 
    /**
     * Clean collections before tests are executed
     */
    @Before
    public void cleanCollections() {
        mongoOperations.dropCollection(User.class);
        mongoOperations.dropCollection(Address.class);
    }
 
    @Test
    public void testCascadeSave() {
        // given
        User user = new User("John Smith");
        user.setAddress(new Address("London"));
 
        // when
        mongoOperations.save(user);
 
        // then
        List<User> users = mongoOperations.findAll(User.class);
        assertThat(users).hasSize(1).containsOnly(user);
 
        User savedUser = users.get(0);
        assertThat(savedUser.getAddress()).isNotNull().isEqualTo(user.getAddress());
 
        List<Address> addresses = mongoOperations.findAll(Address.class);
        assertThat(addresses).hasSize(1).containsOnly(user.getAddress());
    }
}

We can check that also in Mongo console:

> db.user.find()
{ "_id" : ObjectId("4f9d1bab1a8854250a5bf13e"), "_class" : "pl.maciejwalkowiak.springdata.mongodb.domain.User", "name" : "John Smith", "address" : { "$ref" : "address", "$id" : ObjectId("4f9d1ba41a8854250a5bf13d") } }
> db.address.find()
{ "_id" : ObjectId("4f9d1ba41a8854250a5bf13d"), "_class" : "pl.maciejwalkowiak.springdata.mongodb.domain.Address", "city" : "London" }

Summary

With this simple solution we can finally save child objects with one method call without implementing anything special for each document class.

I believe that we will find this functionality together with cascade delete as part Spring Data MongoDB release in the future. Solution presented here works but:

  • it requires to use additional annotation
  • uses reflection API to iterate through fields which is not the fastest way to do it (but feel free to implement caching if needed)

If that could be part of Spring Data MongoDB instead of additional annotation – @DBRef could have additional property “cascade”. Instead of reflection we could use MongoMappingContext together with MongoPersistentEntity. I’ve started already to prepare pull request with those changes. We will see if it will be accepted by Spring Source team.

Update: 2012-05-10

Idea presented here written in Spring way with added support for cascade delete has been proposed to Spring Data project in pull request


If you enjoyed this post, then make sure you subscribe to my RSS feed


출처 - http://maciejwalkowiak.pl/blog/2012/04/30/spring-data-mongodb-cascade-save-on-dbref-objects/


Spring MVC 3.1 - Implement CRUD with Spring Data MongoDB (Part 3)

Review

In the previous section, we have learned how to setup a MongoDB server in Windows and Ubuntu. In this section, we will discuss the project's structure, write the Java classes, and organize them in layers.


Project Structure

Our application is a Maven project and therefore follows Maven structure. As we create the classes, we've organized them in logical layers: domain, repository, service, and controller.

Here's a preview of our project's structure:

The Layers

Domain Layer

This layer contains two classes, User and Role. They represent our database collections, user and rolerespectively. We're using Spring Data MongoDB to simplify MongoDB access. And to optimize these classes for the framework, we've added the @Document annotation. If you're familiar with JPA, this is similar to the @Entity annotation.

Notice the User class has a reference to a Role property. In order to achieve that, we must annotate the field with @DBRef.

1234567891011121314151617181920212223
package org.krams.domain;
 
import org.springframework.data.annotation.Id;
import org.springframework.data.mongodb.core.mapping.DBRef;
import org.springframework.data.mongodb.core.mapping.Document;
 
@Document
public class User {
@Id
private String id;
private String firstName;
private String lastName;
private String username;
private String password;
@DBRef
private Role role;
 
...getters/setters
}
view rawUser.java hosted with ❤ by GitHub

123456789101112131415
package org.krams.domain;
 
import org.springframework.data.annotation.Id;
import org.springframework.data.mongodb.core.mapping.Document;
 
@Document
public class Role {
@Id
private String id;
private Integer role;
...getters/setters
}
view rawRole.java hosted with ❤ by GitHub

Mapping annotation overview
  • @Id - applied at the field level to mark the field used for identiy purpose.
  • @Document - applied at the class level to indicate this class is a candidate for mapping to the database. You can specify the name of the collection where the database will be stored.
  • @DBRef - applied at the field to indicate it is to be stored using a com.mongodb.DBRef.
Source: http://static.springsource.org/spring-data/data-document/docs/current/reference/html/

Controller Layer

This layer contains two controllers, MediatorController and UserController
  • MediatorController is responsible for redirecting requests to appropriate pages. This isn't really required but it's here for organizational purposes.
  • UserController is responsible for handling user-related requests such as adding and deleting of records

1234567891011121314
package org.krams.controller;
 
import org.springframework.stereotype.Controller;
import org.springframework.web.bind.annotation.RequestMapping;
 
@Controller
@RequestMapping("/")
public class MediatorController {
 
@RequestMapping
public String getHomePage() {
return "redirect:/users";
}
}

1234567891011121314151617181920212223242526272829303132333435363738394041424344454647484950515253545556575859606162636465666768697071727374757677787980818283848586878889
package org.krams.controller;
 
import org.krams.domain.Role;
import org.krams.domain.User;
import org.krams.dto.UserListDto;
import org.krams.service.UserService;
import org.springframework.beans.factory.annotation.Autowired;
import org.springframework.stereotype.Controller;
import org.springframework.web.bind.annotation.RequestBody;
import org.springframework.web.bind.annotation.RequestMapping;
import org.springframework.web.bind.annotation.RequestMethod;
import org.springframework.web.bind.annotation.RequestParam;
import org.springframework.web.bind.annotation.ResponseBody;
 
@Controller
@RequestMapping("/users")
public class UserController {
 
@Autowired
private UserService service;
@RequestMapping
public String getUsersPage() {
return "users";
}
@RequestMapping(value="/records")
public @ResponseBody UserListDto getUsers() {
UserListDto userListDto = new UserListDto();
userListDto.setUsers(service.readAll());
return userListDto;
}
@RequestMapping(value="/get")
public @ResponseBody User get(@RequestBody User user) {
return service.read(user);
}
 
@RequestMapping(value="/create", method=RequestMethod.POST)
public @ResponseBody User create(
@RequestParam String username,
@RequestParam String password,
@RequestParam String firstName,
@RequestParam String lastName,
@RequestParam Integer role) {
 
Role newRole = new Role();
newRole.setRole(role);
User newUser = new User();
newUser.setUsername(username);
newUser.setPassword(password);
newUser.setFirstName(firstName);
newUser.setLastName(lastName);
newUser.setRole(newRole);
return service.create(newUser);
}
@RequestMapping(value="/update", method=RequestMethod.POST)
public @ResponseBody User update(
@RequestParam String username,
@RequestParam String firstName,
@RequestParam String lastName,
@RequestParam Integer role) {
 
Role existingRole = new Role();
existingRole.setRole(role);
User existingUser = new User();
existingUser.setUsername(username);
existingUser.setFirstName(firstName);
existingUser.setLastName(lastName);
existingUser.setRole(existingRole);
return service.update(existingUser);
}
@RequestMapping(value="/delete", method=RequestMethod.POST)
public @ResponseBody Boolean delete(
@RequestParam String username) {
 
User existingUser = new User();
existingUser.setUsername(username);
return service.delete(existingUser);
}
}
view rawUserController.java hosted with ❤ by GitHub

Service Layer

This layer contains two services, UserService and InitMongoService
  • UserService is our CRUD service for the user collection. All data access is delegated to the repositories
  • InitMongoService is used for initiliazing our database with sample data. Notice we're using theMongoTemplate itself instead of the Spring Data MongoDB-based repository. There is no difference between the two. In fact, it's simpler if we used Spring Data instead. But I have chosen MongoTemplate to show an alternative way of interacting with the database
123456789101112131415161718192021222324252627282930313233343536373839404142434445464748495051525354555657585960616263646566676869
package org.krams.service;
 
import java.util.List;
import java.util.UUID;
 
import org.krams.domain.User;
import org.krams.repository.RoleRepository;
import org.krams.repository.UserRepository;
import org.springframework.beans.factory.annotation.Autowired;
import org.springframework.stereotype.Service;
 
@Service
public class UserService {
 
@Autowired
private UserRepository userRepository;
@Autowired
private RoleRepository roleRepository;
public User create(User user) {
user.setId(UUID.randomUUID().toString());
user.getRole().setId(UUID.randomUUID().toString());
// We must save both separately since there is no cascading feature
// in Spring Data MongoDB (for now)
roleRepository.save(user.getRole());
return userRepository.save(user);
}
public User read(User user) {
return user;
}
public List<User> readAll() {
return userRepository.findAll();
}
public User update(User user) {
User existingUser = userRepository.findByUsername(user.getUsername());
if (existingUser == null) {
return null;
}
existingUser.setFirstName(user.getFirstName());
existingUser.setLastName(user.getLastName());
existingUser.getRole().setRole(user.getRole().getRole());
// We must save both separately since there is no cascading feature
// in Spring Data MongoDB (for now)
roleRepository.save(existingUser.getRole());
return userRepository.save(existingUser);
}
public Boolean delete(User user) {
User existingUser = userRepository.findByUsername(user.getUsername());
if (existingUser == null) {
return false;
}
// We must delete both separately since there is no cascading feature
// in Spring Data MongoDB (for now)
roleRepository.delete(existingUser.getRole());
userRepository.delete(existingUser);
return true;
}
}
view rawUserService.java hosted with ❤ by GitHub

1234567891011121314151617181920212223242526272829303132333435363738394041424344454647484950515253
package org.krams.service;
 
import java.util.UUID;
import org.krams.domain.Role;
import org.krams.domain.User;
import org.springframework.beans.factory.annotation.Autowired;
import org.springframework.data.mongodb.core.MongoTemplate;
 
/**
* Service for initializing MongoDB with sample data using {@link MongoTemplate}
*/
public class InitMongoService {
@Autowired
private MongoTemplate mongoTemplate;
 
public void init() {
// Drop existing collections
mongoTemplate.dropCollection("role");
mongoTemplate.dropCollection("user");
 
// Create new records
Role adminRole = new Role();
adminRole.setId(UUID.randomUUID().toString());
adminRole.setRole(1);
Role userRole = new Role();
userRole.setId(UUID.randomUUID().toString());
userRole.setRole(2);
User john = new User();
john.setId(UUID.randomUUID().toString());
john.setFirstName("John");
john.setLastName("Smith");
john.setPassword("21232f297a57a5a743894a0e4a801fc3");
john.setRole(adminRole);
john.setUsername("john");
User jane = new User();
jane.setId(UUID.randomUUID().toString());
jane.setFirstName("Jane");
jane.setLastName("Adams");
jane.setPassword("ee11cbb19052e40b07aac0ca060c23ee");
jane.setRole(userRole);
jane.setUsername("jane");
// Insert to db
mongoTemplate.insert(john, "user");
mongoTemplate.insert(jane, "user");
mongoTemplate.insert(adminRole, "role");
mongoTemplate.insert(userRole, "role");
}
}

Note
The mapping framework does not handle cascading saves. If you change an Account object that is referenced by a Person object, you must save the Account object separately. Calling save on the Person object will not automatically save the Account objects in the property accounts.

Source: Spring Data MongoDB Reference (7.3.3. Using DBRefs)

Repository Layer

This layer contains two repositories, UserRepository and RoleRepository. These are our data access objects (DAO). With the help of Spring Data MongoDB, Spring will automatically provide the actual implementation. Notice for custom methods we just have to add the method signature.

What is Spring Data MongoDB?
Spring Data for MongoDB is part of the umbrella Spring Data project which aims to provide a familiar and consistent Spring-based programming model for for new datastores while retaining store-specific features and capabilities. The Spring Data MongoDB project provides integration with the MongoDB document database. Key functional areas of Spring Data MongoDB are a POJO centric model for interacting with a MongoDB DBCollection and easily writing a Repository style data access layer

Source: http://www.springsource.org/spring-data/mongodb

123456789
package org.krams.repository;
 
import org.krams.domain.User;
import org.springframework.data.mongodb.repository.MongoRepository;
 
public interface UserRepository extends MongoRepository<User, String> {
User findByUsername(String username);
}
view rawUserRepository.java hosted with ❤ by GitHub

1234567
package org.krams.repository;
 
import org.krams.domain.Role;
import org.springframework.data.mongodb.repository.MongoRepository;
 
public interface RoleRepository extends MongoRepository<Role, String> {
}
view rawRoleRepository.java hosted with ❤ by GitHub


Utility classes

TraceInterceptor class is an AOP-based utility class to help us debug our application. This is a subclass of CustomizableTraceInterceptor (see Spring Data JPA FAQ)

1234567891011121314151617181920212223242526272829
package org.krams.aop;
 
import org.aopalliance.intercept.MethodInvocation;
import org.apache.commons.logging.Log;
import org.apache.log4j.Logger;
import org.springframework.aop.interceptor.CustomizableTraceInterceptor;
 
/**
* Extends {@link CustomizableTraceInterceptor} to provide custom logging levels
*/
public class TraceInterceptor extends CustomizableTraceInterceptor {
 
private static final long serialVersionUID = 287162721460370957L;
protected static Logger logger4J = Logger.getLogger("aop");
 
@Override
protected void writeToLog(Log logger, String message, Throwable ex) {
if (ex != null) {
logger4J.debug(message, ex);
} else {
logger4J.debug(message);
}
}
 
@Override
protected boolean isInterceptorEnabled(MethodInvocation invocation, Log logger) {
return true;
}
}


Next

In the next section, we will focus on the configuration files for enabling Spring MVC. Click here to proceed.


site - http://krams915.blogspot.kr/2012/01/spring-mvc-31-implement-crud-with_7897.html


Posted by linuxism
,


Example of @EnableTransactionManagement in Spring

March 21, 2013
In spring , when we are using @Configuration i.e XML free configuration and need to connect to database with hibernate. We need to use @EnableTransactionManagement. This is applied on class level.
@Configuration
@EnableTransactionManagement
public class AppConfig {}
 
We need to create bean for HibernateTemplate and sessionFactory and HibernateTransactionManager. Find the example below. 

AppConfig.java
package com.concretepage;

import org.hibernate.SessionFactory;
import org.hibernate.cfg.AnnotationConfiguration;
import org.springframework.context.annotation.Bean;
import org.springframework.context.annotation.Configuration;
import org.springframework.orm.hibernate3.HibernateTemplate;
import org.springframework.orm.hibernate3.HibernateTransactionManager;
import org.springframework.transaction.annotation.EnableTransactionManagement;

import com.concretepage.persistence.User;

@Configuration
@EnableTransactionManagement
public class AppConfig {
	@Bean
	public User user() {
		return new User();
	}

	@Bean
	public HibernateTemplate hibTemp() {
		return new HibernateTemplate(sessionFactory(), true);
	}

	@Bean
	public SessionFactory sessionFactory() {
		SessionFactory sf = new AnnotationConfiguration().configure()
				.buildSessionFactory();
		return sf;
	}
	@Bean
	public HibernateTransactionManager hibTransMan(){
		return new HibernateTransactionManager(sessionFactory());
	}
}


AppTest.java
package com.concretepage;

import org.springframework.context.annotation.AnnotationConfigApplicationContext;
import org.springframework.orm.hibernate3.HibernateTemplate;

import com.concretepage.persistence.User;

public class AppTest {
	public static void main(String[] args) {
		AnnotationConfigApplicationContext ctx = new AnnotationConfigApplicationContext();
 
		ctx.register(AppConfig.class);
		ctx.refresh();

		HibernateTemplate hibtemp= ctx.getBean(HibernateTemplate.class);
		User u1= new User(1,"Ankita");
		hibtemp.persist(u1);
	        
	    User u2= new User(2,"Renu");
	    hibtemp.save(u2);
			
	}
}


User.java
package com.concretepage.persistence;

import java.io.Serializable;

import javax.persistence.Entity;
import javax.persistence.Id;

@Entity
public class User implements Serializable {
  private static final long serialVersionUID = 1L;
  @Id
  private int id;
  private String name;   
  public User(){	  
  }
  public User(int id,String name){
	  this.id=id;
	  this.name=name;
  }
  public int getId() {
		return id;
  }
  public void setId(int id) {
		this.id = id;
  }
  public String getName() {
		return name;
  }
  public void setName(String name) {
		this.name = name;
  } 
} 


Posted by linuxism
,