import java.io.*;
import org.apache.poi.hssf.usermodel.*;
/**
* 틀고정, 나누기
*/
public class SplitAndFreezePanes
{
public static void main(String[] args)
{
FileOutputStream out = null;
HSSFWorkbook workbook;
HSSFSheet sheet1;
HSSFSheet sheet2;
HSSFSheet sheet3;
HSSFSheet sheet4;
try
{
// workbook 생성
workbook = new HSSFWorkbook();
// sheet1 생성
sheet1 = workbook.createSheet("sheet1");
// sheet2 생성
sheet2 = workbook.createSheet("sheet2");
// sheet3 생성
sheet3 = workbook.createSheet("sheet3");
// sheet4 생성
sheet4 = workbook.createSheet("sheet4");
// 첫번째 row 틀고정
// 6번째 row 부터 보임
// (int colSplit, int rowSplit, int leftmostColumn, int topRow)
// colSplit - Horizonatal position of split.
// rowSplit - Vertical position of split.
// leftmostColumn - Left column visible in right pane.
// topRow - Top row visible in bottom pane
sheet1.createFreezePane(0, 1, 0, 5);
// 첫번째 column 틀고정
// F column 부터 보임
sheet2.createFreezePane(1, 0, 5, 0);
// C3 에서 틀고정
// (int colSplit, int rowSplit)
// colSplit - Horizonatal position of split.
// rowSplit - Vertical position of split.
sheet3.createFreezePane(2, 2);
// 나누기
// (int xSplitPos, int ySplitPos, int leftmostColumn, int topRow, int activePane)
// xSplitPos - Horizonatal position of split (in 1/20th of a point).
// ySplitPos - Vertical position of split (in 1/20th of a point).
// leftmostColumn - Left column visible in right pane.
// topRow - Top row visible in bottom pane
// activePane - Active pane. One of: PANE_LOWER_RIGHT,
// PANE_UPPER_RIGHT, PANE_LOWER_LEFT, PANE_UPPER_LEFT
sheet4.createSplitPane(5000, 5000, 0, 0, HSSFSheet.PANE_LOWER_LEFT);
out = new FileOutputStream("SplitAndFreezePanes.xls");
workbook.write(out);
}
catch (IOException e)
{
e.printStackTrace();
}
finally
{
closeOutputStream(out);
}
}
/**
* close OutputStream.
*
* @param con
*/
public static void closeOutputStream(OutputStream out)
{
try
{
if (out != null)
{
out.close();
}
}
catch (IOException e)
{
// ignore
}
}
}
[출처] [POI] 틀고정, 나누기|작성자 소토로
출처 - http://blog.naver.com/PostView.nhn?blogId=ssari93&logNo=120007182716
Reading/writing excel files in java : POI tutorial
If you are building a software for HR or finance domain, there is usually requirement for generating excel reports which are usually across management levels. Apart from reports, you can expect input data for application coming in form of excel sheets and application is expected to support it. These are many open source APIs to handle such scenarios.
Apache POI is one of them and is well trusted over time. In short, you can read and write MS Excel files using Java. In addition, you can read and write MS Word and MS PowerPoint files using Java.
In this post, I am discussing some common activities required to do in real life application.
Sections in this post:

Apache POI runtime dependencies
Some useful common classes
Writing an excel file
Reading an excel file
Using formulas in excel sheet
Formatting the cells
Sourcecode download
Apache POI runtime dependencies
If you are working on a maven project, you can include the POI dependency in pom.xml file using this:
1 2 3 4 5 | <dependency> <groupId>org.apache.poi</groupId> <artifactId>poi</artifactId> <version>3.9</version></dependency> |
If you are not using maven, then you can download maven jar files from POI download page. Include following jar files minimum to run the sample code:
- dom4j-1.6.1.jar
- poi-3.9-20121203.jar
- poi-ooxml-3.9-20121203.jar
- poi-ooxml-schemas-3.9-20121203.jar
- xmlbeans-2.3.0.jar
Some useful POI classes
Apache POI main classes usually start with either HSSF, XSSF or SXSSF.
- HSSF is the POI Project’s pure Java implementation of the Excel ’97(-2007) file format. e.g. HSSFWorkbook, HSSFSheet.
- XSSF is the POI Project’s pure Java implementation of the Excel 2007 OOXML (.xlsx) file format. e.g. XSSFWorkbook, XSSFSheet.
- SXSSF (since 3.8-beta3) is an API-compatible streaming extension of XSSF to be used when very large spreadsheets have to be produced, and heap space is limited. e.g. SXSSFWorkbook, SXSSFSheet. SXSSF achieves its low memory footprint by limiting access to the rows that are within a sliding window, while XSSF gives access to all rows in the document.
Apart from above classes, Row and Cell are used to interact with a particular row and a particular cell in excel sheet.
Another useful class FormulaEvaluator is used to evaluate the formula cells in excel sheet.
A wide range of classes like CellStyle, BuiltinFormats, ComparisonOperator, ConditionalFormattingRule, FontFormatting,IndexedColors, PatternFormatting, SheetConditionalFormatting etc. are used when you have to add formatting in a sheet, mostly based on some rules.
We will see the usage of above classes in coming examples.
Writing an excel file
I am taking this example first so that we can reuse the excel sheet created by this code to read back in next example.
Writing a file using POI is very simple and involve following steps:
- Create a workbook
- Create a sheet in workbook
- Create a row in sheet
- Add cells in sheet
- Repeat step 3 and 4 to write more data
It seems very simple, right? Lets have a look at the code doing these steps:
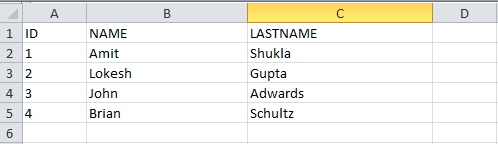
1 2 3 4 5 6 7 8 9 10 11 12 13 14 15 16 17 18 19 20 21 22 23 24 25 26 27 28 29 30 31 32 33 34 35 36 37 38 39 40 41 42 43 44 45 46 47 48 49 50 51 | package com.howtodoinjava.demo.poi;//import statementspublic class WriteExcelDemo { public static void main(String[] args) { //Blank workbook XSSFWorkbook workbook = new XSSFWorkbook(); //Create a blank sheet XSSFSheet sheet = workbook.createSheet("Employee Data"); //This data needs to be written (Object[]) Map<String, Object[]> data = new TreeMap<String, Object[]>(); data.put("1", new Object[] {"ID", "NAME", "LASTNAME"}); data.put("2", new Object[] {1, "Amit", "Shukla"}); data.put("3", new Object[] {2, "Lokesh", "Gupta"}); data.put("4", new Object[] {3, "John", "Adwards"}); data.put("5", new Object[] {4, "Brian", "Schultz"}); //Iterate over data and write to sheet Set<String> keyset = data.keySet(); int rownum = 0; for (String key : keyset) { Row row = sheet.createRow(rownum++); Object [] objArr = data.get(key); int cellnum = 0; for (Object obj : objArr) { Cell cell = row.createCell(cellnum++); if(obj instanceof String) cell.setCellValue((String)obj); else if(obj instanceof Integer) cell.setCellValue((Integer)obj); } } try { //Write the workbook in file system FileOutputStream out = new FileOutputStream(new File("howtodoinjava_demo.xlsx")); workbook.write(out); out.close(); System.out.println("howtodoinjava_demo.xlsx written successfully on disk."); } catch (Exception e) { e.printStackTrace(); } }} |
Reading an excel file
Reading an excel file is also very simple if we divide this in steps.
- Create workbook instance from excel sheet
- Get to the desired sheet
- Increment row number
- iterate over all cells in a row
- repeat step 3 and 4 until all data is read
Lets see all above steps in code. I am writing the code to read the excel file created in above example.
1 2 3 4 5 6 7 8 9 10 11 12 13 14 15 16 17 18 19 20 21 22 23 24 25 26 27 28 29 30 31 32 33 34 35 36 37 38 39 40 41 42 43 44 45 46 47 48 49 50 51 52 53 54 55 56 | package com.howtodoinjava.demo.poi;//import statementspublic class ReadExcelDemo { public static void main(String[] args) { try { FileInputStream file = new FileInputStream(new File("howtodoinjava_demo.xlsx")); //Create Workbook instance holding reference to .xlsx file XSSFWorkbook workbook = new XSSFWorkbook(file); //Get first/desired sheet from the workbook XSSFSheet sheet = workbook.getSheetAt(0); //Iterate through each rows one by one Iterator<Row> rowIterator = sheet.iterator(); while (rowIterator.hasNext()) { Row row = rowIterator.next(); //For each row, iterate through all the columns Iterator<Cell> cellIterator = row.cellIterator(); while (cellIterator.hasNext()) { Cell cell = cellIterator.next(); //Check the cell type and format accordingly switch (cell.getCellType()) { case Cell.CELL_TYPE_NUMERIC: System.out.print(cell.getNumericCellValue() + "\t"); break; case Cell.CELL_TYPE_STRING: System.out.print(cell.getStringCellValue() + "\t"); break; } } System.out.println(""); } file.close(); } catch (Exception e) { e.printStackTrace(); } }}Output:ID NAME LASTNAME1.0 Amit Shukla 2.0 Lokesh Gupta 3.0 John Adwards 4.0 Brian Schultz |
Using formulas in excel sheet
When working on complex excel sheets, we encounter many cells which have formula to calculate their values. These are formula cells. Apache POI has excellent support for adding formula cells and evaluating already present formula cells also.
Les see one example of how to set formula cells in excel?
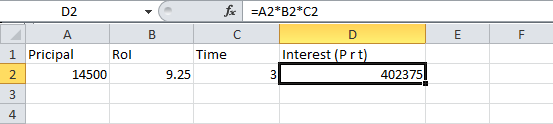
In this code, there are four cells in a row and fourth one in multiplication of all previous 3 rows. So the formula will be : A2*B2*C2 (in second row)
1 2 3 4 5 6 7 8 9 10 11 12 13 14 15 16 17 18 19 20 21 22 23 24 25 26 27 28 29 | public static void main(String[] args) { XSSFWorkbook workbook = new XSSFWorkbook(); XSSFSheet sheet = workbook.createSheet("Calculate Simple Interest"); Row header = sheet.createRow(0); header.createCell(0).setCellValue("Pricipal"); header.createCell(1).setCellValue("RoI"); header.createCell(2).setCellValue("T"); header.createCell(3).setCellValue("Interest (P r t)"); Row dataRow = sheet.createRow(1); dataRow.createCell(0).setCellValue(14500d); dataRow.createCell(1).setCellValue(9.25); dataRow.createCell(2).setCellValue(3d); dataRow.createCell(3).setCellFormula("A2*B2*C2"); try { FileOutputStream out = new FileOutputStream(new File("formulaDemo.xlsx")); workbook.write(out); out.close(); System.out.println("Excel with foumula cells written successfully"); } catch (FileNotFoundException e) { e.printStackTrace(); } catch (IOException e) { e.printStackTrace(); }} |
Similarly, I you want to read a file which have formula cells in it, use following logic to evaluate the formula cells.
1 2 3 4 5 6 7 8 9 10 11 12 13 14 15 16 17 18 19 20 21 22 23 24 25 26 27 28 29 30 31 32 33 34 35 36 37 38 39 40 41 42 43 44 45 46 47 48 49 50 51 52 53 54 | public static void readSheetWithFormula(){ try { FileInputStream file = new FileInputStream(new File("formulaDemo.xlsx")); //Create Workbook instance holding reference to .xlsx file XSSFWorkbook workbook = new XSSFWorkbook(file); FormulaEvaluator evaluator = workbook.getCreationHelper().createFormulaEvaluator(); //Get first/desired sheet from the workbook XSSFSheet sheet = workbook.getSheetAt(0); //Iterate through each rows one by one Iterator<Row> rowIterator = sheet.iterator(); while (rowIterator.hasNext()) { Row row = rowIterator.next(); //For each row, iterate through all the columns Iterator<Cell> cellIterator = row.cellIterator(); while (cellIterator.hasNext()) { Cell cell = cellIterator.next(); //Check the cell type after eveluating formulae //If it is formula cell, it will be evaluated otherwise no change will happen switch (evaluator.evaluateInCell(cell).getCellType()) { case Cell.CELL_TYPE_NUMERIC: System.out.print(cell.getNumericCellValue() + "\t\t"); break; case Cell.CELL_TYPE_STRING: System.out.print(cell.getStringCellValue() + "\t\t"); break; case Cell.CELL_TYPE_FORMULA: //Not again break; } } System.out.println(""); } file.close(); } catch (Exception e) { e.printStackTrace(); }}Output:Pricipal RoI T Interest (P r t) 14500.0 9.25 3.0 402375.0 |
Formatting the cells
So for we have seen the examples of reading/ writing and excel file using apache POI. But, when we are creating a report in excel file and it becomes utmost important to add formatting on cells which fit into any per-determined criteria. This formatting can be a different coloring based on certain value range, based on expiry date limit etc.
In below examples, I am taking couple of such formatting examples for various purposes.
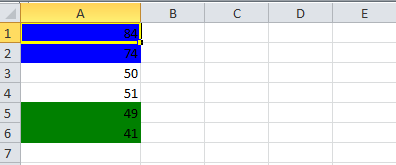
1) Cell value is in between a certain range
This piece of code will color any cell in range whose value is between a configured range. [e.g. between 50 and 70]
1 2 3 4 5 6 7 8 9 10 11 12 13 14 15 16 17 18 19 20 21 22 23 24 25 26 27 28 29 30 | static void basedOnValue(Sheet sheet) { //Creating some random values sheet.createRow(0).createCell(0).setCellValue(84); sheet.createRow(1).createCell(0).setCellValue(74); sheet.createRow(2).createCell(0).setCellValue(50); sheet.createRow(3).createCell(0).setCellValue(51); sheet.createRow(4).createCell(0).setCellValue(49); sheet.createRow(5).createCell(0).setCellValue(41); SheetConditionalFormatting sheetCF = sheet.getSheetConditionalFormatting(); //Condition 1: Cell Value Is greater than 70 (Blue Fill) ConditionalFormattingRule rule1 = sheetCF.createConditionalFormattingRule(ComparisonOperator.GT, "70"); PatternFormatting fill1 = rule1.createPatternFormatting(); fill1.setFillBackgroundColor(IndexedColors.BLUE.index); fill1.setFillPattern(PatternFormatting.SOLID_FOREGROUND); //Condition 2: Cell Value Is less than 50 (Green Fill) ConditionalFormattingRule rule2 = sheetCF.createConditionalFormattingRule(ComparisonOperator.LT, "50"); PatternFormatting fill2 = rule2.createPatternFormatting(); fill2.setFillBackgroundColor(IndexedColors.GREEN.index); fill2.setFillPattern(PatternFormatting.SOLID_FOREGROUND); CellRangeAddress[] regions = { CellRangeAddress.valueOf("A1:A6") }; sheetCF.addConditionalFormatting(regions, rule1, rule2);} |
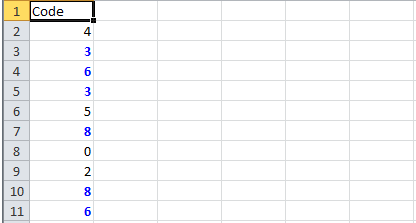
2) Highlight duplicate values
Highlight all cells which have duplicate values in observed cells
1 2 3 4 5 6 7 8 9 10 11 12 13 14 15 16 17 18 19 20 21 22 23 24 25 26 27 28 29 30 | static void formatDuplicates(Sheet sheet) { sheet.createRow(0).createCell(0).setCellValue("Code"); sheet.createRow(1).createCell(0).setCellValue(4); sheet.createRow(2).createCell(0).setCellValue(3); sheet.createRow(3).createCell(0).setCellValue(6); sheet.createRow(4).createCell(0).setCellValue(3); sheet.createRow(5).createCell(0).setCellValue(5); sheet.createRow(6).createCell(0).setCellValue(8); sheet.createRow(7).createCell(0).setCellValue(0); sheet.createRow(8).createCell(0).setCellValue(2); sheet.createRow(9).createCell(0).setCellValue(8); sheet.createRow(10).createCell(0).setCellValue(6); SheetConditionalFormatting sheetCF = sheet.getSheetConditionalFormatting(); // Condition 1: Formula Is =A2=A1 (White Font) ConditionalFormattingRule rule1 = sheetCF.createConditionalFormattingRule("COUNTIF($A$2:$A$11,A2)>1"); FontFormatting font = rule1.createFontFormatting(); font.setFontStyle(false, true); font.setFontColorIndex(IndexedColors.BLUE.index); CellRangeAddress[] regions = { CellRangeAddress.valueOf("A2:A11") }; sheetCF.addConditionalFormatting(regions, rule1); sheet.getRow(2).createCell(1).setCellValue("<== Duplicates numbers in the column are highlighted. " + "Condition: Formula Is =COUNTIF($A$2:$A$11,A2)>1 (Blue Font)");} |
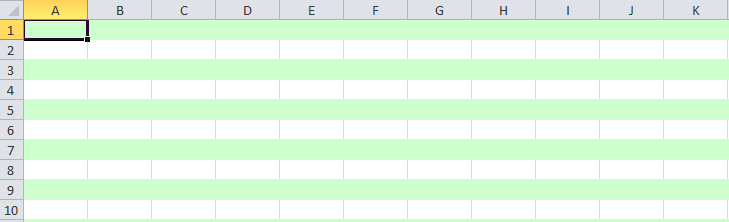
3) Color alternate rows in different colors
A simple code to color each alternate row in a different color
1 2 3 4 5 6 7 8 9 10 11 12 13 14 15 16 17 18 | static void shadeAlt(Sheet sheet) { SheetConditionalFormatting sheetCF = sheet.getSheetConditionalFormatting(); // Condition 1: Formula Is =A2=A1 (White Font) ConditionalFormattingRule rule1 = sheetCF.createConditionalFormattingRule("MOD(ROW(),2)"); PatternFormatting fill1 = rule1.createPatternFormatting(); fill1.setFillBackgroundColor(IndexedColors.LIGHT_GREEN.index); fill1.setFillPattern(PatternFormatting.SOLID_FOREGROUND); CellRangeAddress[] regions = { CellRangeAddress.valueOf("A1:Z100") }; sheetCF.addConditionalFormatting(regions, rule1); sheet.createRow(0).createCell(1).setCellValue("Shade Alternating Rows"); sheet.createRow(1).createCell(1).setCellValue("Condition: Formula Is =MOD(ROW(),2) (Light Green Fill)");} |
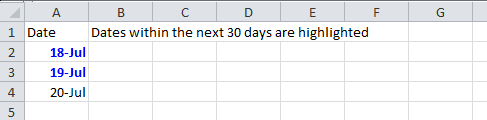
4) Color amounts which are going to expire in next 30 days
A very useful code for financial projects which keep track of dead lines.
1 2 3 4 5 6 7 8 9 10 11 12 13 14 15 16 17 18 19 20 21 22 23 24 25 26 27 28 | static void expiryInNext30Days(Sheet sheet) { CellStyle style = sheet.getWorkbook().createCellStyle(); style.setDataFormat((short)BuiltinFormats.getBuiltinFormat("d-mmm")); sheet.createRow(0).createCell(0).setCellValue("Date"); sheet.createRow(1).createCell(0).setCellFormula("TODAY()+29"); sheet.createRow(2).createCell(0).setCellFormula("A2+1"); sheet.createRow(3).createCell(0).setCellFormula("A3+1"); for(int rownum = 1; rownum <= 3; rownum++) sheet.getRow(rownum).getCell(0).setCellStyle(style); SheetConditionalFormatting sheetCF = sheet.getSheetConditionalFormatting(); // Condition 1: Formula Is =A2=A1 (White Font) ConditionalFormattingRule rule1 = sheetCF.createConditionalFormattingRule("AND(A2-TODAY()>=0,A2-TODAY()<=30)"); FontFormatting font = rule1.createFontFormatting(); font.setFontStyle(false, true); font.setFontColorIndex(IndexedColors.BLUE.index); CellRangeAddress[] regions = { CellRangeAddress.valueOf("A2:A4") }; sheetCF.addConditionalFormatting(regions, rule1); sheet.getRow(0).createCell(1).setCellValue("Dates within the next 30 days are highlighted");} |
I am ending this post here for keeping the post in limit. I will post some useful code samples in coming posts.
Sourcecode download
Click on below given link to download the source code of above examples.
Download Sourcecode
Happy Learning !!
References
http://poi.apache.org/spreadsheet/quick-guide.html
출처 - http://howtodoinjava.com/2013/06/19/readingwriting-excel-files-in-java-poi-tutorial/
Spring 3 - Apache POI - Hibernate: Creating an Excel Report Tutorial
This tutorial is part of the following reporting tutorial series that uses Jasper, DynamicJasper, and Apache POI:
Spring 3 - Apache POI - Hibernate: Creating an Excel Report Tutorial
Spring 3 - DynamicJasper - Hibernate Tutorial: Concatenating a DynamicReport
Spring 3 - DynamicJasper - Hibernate Tutorial: Concatenating a Subreport
Spring 3 - DynamicJasper - Hibernate Tutorial: Using Plain List
Spring 3 - DynamicJasper - Hibernate Tutorial: Using JRDataSource
Spring 3 - DynamicJasper - Hibernate Tutorial: Using HQL Query
All of these tutorials produce the same document, and all of them demonstrate different ways of creating the same report.
What is Apache POI?
The Apache POI Project's mission is to create and maintain Java APIs for manipulating various file formats based upon the Office Open XML standards (OOXML) and Microsoft's OLE 2 Compound Document format (OLE2). In short, you can read and write MS Excel files using Java. In addition, you can read and write MS Word and MS PowerPoint files using Java. Apache POI is your Java Excel solution (for Excel 97-2008).
Source: http://poi.apache.org/
Background
Before we start our application, let's preview first the final print document:
Our document is a simple Excel document. It's a Sales Report for a list of power supplies. The data is retrieved from a MySQL database.

Domain
Notice that for each Power Supply entry there's a common set of properties:id brand model maximum power price efficiency
Development
Domain
We'll start our application by declaring the domain object PowerSupplyPowerSupply.java
1 2 3 4 5 6 7 8 9 10 11 12 13 14 15 16 17 18 19 20 21 22 23 24 25 26 27 28 29 30 31 32 33 34 35 36 37 38 39 40 41 42 43 44 45 46 47 48 49 50 51 52 53 54 55 56 57 58 59 60 61 62 63 64 65 66 67 68 69 70 71 72 73 74 75 76 77 78 79 80 81 82 83 84 85 86 87 88 89 90 91 | package org.krams.tutorial.domain;import java.io.Serializable;import javax.persistence.Column;import javax.persistence.Entity;import javax.persistence.GeneratedValue;import javax.persistence.Id;import javax.persistence.Table;/** * A simple POJO containing the common properties of a Power Supply * This is an annotated Hibernate entity. * * @author Krams at {@link http://krams915@blogspot.com} */@Entity@Table(name = "POWER_SUPPLY")public class PowerSupply implements Serializable { private static final long serialVersionUID = 8634209606034270882L; @Id @Column(name = "ID") @GeneratedValue private Long id; @Column(name = "BRAND") private String brand; @Column(name = "MODEL") private String model; @Column(name = "MAXIMUM_POWER") private String maximumPower; @Column(name = "PRICE") private Double price; @Column(name = "EFFICIENCY") private Double efficiency; public Long getId() { return id; } public void setId(Long id) { this.id = id; } public String getBrand() { return brand; } public void setBrand(String brand) { this.brand = brand; } public String getModel() { return model; } public void setModel(String model) { this.model = model; } public String getMaximumPower() { return maximumPower; } public void setMaximumPower(String maximumPower) { this.maximumPower = maximumPower; } public Double getPrice() { return price; } public void setPrice(Double price) { this.price = price; } public Double getEfficiency() { return efficiency; } public void setEfficiency(Double efficiency) { this.efficiency = efficiency; } } |
ID
BRAND
MODEL
MAXIMUM_POWER
PRICE
EFFICIENCY
Service
We'll be declaring a single service named DownloadService. This service is the heart of the application that will process and retrieve the report document.The service will run the following steps:
1. Create new workbook
2. Create new worksheet
3. Define starting indices for rows and columns
4. Build layout
5. Fill report
6. Set the HttpServletResponse properties
7. Write to the output stream
DownloadService.java
1 2 3 4 5 6 7 8 9 10 11 12 13 14 15 16 17 18 19 20 21 22 23 24 25 26 27 28 29 30 31 32 33 34 35 36 37 38 39 40 41 42 43 44 45 46 47 48 49 50 51 52 53 54 55 56 57 58 59 60 61 62 63 64 65 66 67 68 69 70 71 72 73 74 75 76 77 78 79 80 81 82 83 84 85 86 87 88 89 90 91 92 93 94 95 | package org.krams.tutorial.service;import java.util.List;import javax.servlet.http.HttpServletResponse;import org.apache.log4j.Logger;import org.apache.poi.hssf.usermodel.HSSFSheet;import org.apache.poi.hssf.usermodel.HSSFWorkbook;import org.hibernate.Query;import org.hibernate.Session;import org.hibernate.SessionFactory;import org.krams.tutorial.domain.PowerSupply;import org.krams.tutorial.report.FillManager;import org.krams.tutorial.report.Layouter;import org.krams.tutorial.report.Writer;import org.springframework.stereotype.Service;import org.springframework.transaction.annotation.Transactional;import javax.annotation.Resource;/** * Service for processing Apache POI-based reports * * @author Krams at {@link http://krams915@blogspot.com} */@Service("downloadService")@Transactionalpublic class DownloadService { private static Logger logger = Logger.getLogger("service"); @Resource(name="sessionFactory") private SessionFactory sessionFactory; /** * Processes the download for Excel format. * It does the following steps: * <pre>1. Create new workbook * 2. Create new worksheet * 3. Define starting indices for rows and columns * 4. Build layout * 5. Fill report * 6. Set the HttpServletResponse properties * 7. Write to the output stream * </pre> */ @SuppressWarnings("unchecked") public void downloadXLS(HttpServletResponse response) throws ClassNotFoundException { logger.debug("Downloading Excel report"); // 1. Create new workbook HSSFWorkbook workbook = new HSSFWorkbook(); // 2. Create new worksheet HSSFSheet worksheet = workbook.createSheet("POI Worksheet"); // 3. Define starting indices for rows and columns int startRowIndex = 0; int startColIndex = 0; // 4. Build layout // Build title, date, and column headers Layouter.buildReport(worksheet, startRowIndex, startColIndex); // 5. Fill report FillManager.fillReport(worksheet, startRowIndex, startColIndex, getDatasource()); // 6. Set the response properties String fileName = "SalesReport.xls"; response.setHeader("Content-Disposition", "inline; filename=" + fileName); // Make sure to set the correct content type response.setContentType("application/vnd.ms-excel"); //7. Write to the output stream Writer.write(response, worksheet); } /** * Retrieves the datasource as as simple Java List. * The datasource is retrieved from a Hibernate HQL query. */ @SuppressWarnings("unchecked") private List<PowerSupply> getDatasource() { // Retrieve session Session session = sessionFactory.getCurrentSession(); // Create query for retrieving products Query query = session.createQuery("FROM PowerSupply"); // Execute query List<PowerSupply> result = query.list(); // Return the datasource return result; }} |
The service has been divided into separate classes to encapsulate specific jobs.
The Layouter
The purpose of the Layouter is to layout the design of the report. Here's where we declare the dynamic columns and special properties of the document.Layouter.java
1 2 3 4 5 6 7 8 9 10 11 12 13 14 15 16 17 18 19 20 21 22 23 24 25 26 27 28 29 30 31 32 33 34 35 36 37 38 39 40 41 42 43 44 45 46 47 48 49 50 51 52 53 54 55 56 57 58 59 60 61 62 63 64 65 66 67 68 69 70 71 72 73 74 75 76 77 78 79 80 81 82 83 84 85 86 87 88 89 90 91 92 93 94 95 96 97 98 99 100 101 102 103 104 105 106 107 108 109 110 111 112 113 114 115 116 117 118 119 120 121 122 123 124 125 126 127 128 | package org.krams.tutorial.report;import java.util.Date;import org.apache.log4j.Logger;import org.apache.poi.hssf.usermodel.HSSFCell;import org.apache.poi.hssf.usermodel.HSSFCellStyle;import org.apache.poi.hssf.usermodel.HSSFRow;import org.apache.poi.hssf.usermodel.HSSFSheet;import org.apache.poi.hssf.util.CellRangeAddress;import org.apache.poi.hssf.util.HSSFColor;import org.apache.poi.ss.usermodel.CellStyle;import org.apache.poi.ss.usermodel.Font;/** * Builds the report layout, the template, the design, the pattern or whatever synonym you may want to call it. * * @author Krams at {@link http://krams915@blogspot.com} */public class Layouter { private static Logger logger = Logger.getLogger("service"); /** * Builds the report layout. * <p> * This doesn't have any data yet. This is your template. */ public static void buildReport(HSSFSheet worksheet, int startRowIndex, int startColIndex) { // Set column widths worksheet.setColumnWidth(0, 5000); worksheet.setColumnWidth(1, 5000); worksheet.setColumnWidth(2, 5000); worksheet.setColumnWidth(3, 5000); worksheet.setColumnWidth(4, 5000); worksheet.setColumnWidth(5, 5000); // Build the title and date headers buildTitle(worksheet, startRowIndex, startColIndex); // Build the column headers buildHeaders(worksheet, startRowIndex, startColIndex); } /** * Builds the report title and the date header * * @param worksheet * @param startRowIndex starting row offset * @param startColIndex starting column offset */ public static void buildTitle(HSSFSheet worksheet, int startRowIndex, int startColIndex) { // Create font style for the report title Font fontTitle = worksheet.getWorkbook().createFont(); fontTitle.setBoldweight(Font.BOLDWEIGHT_BOLD); fontTitle.setFontHeight((short) 280); // Create cell style for the report title HSSFCellStyle cellStyleTitle = worksheet.getWorkbook().createCellStyle(); cellStyleTitle.setAlignment(CellStyle.ALIGN_CENTER); cellStyleTitle.setWrapText(true); cellStyleTitle.setFont(fontTitle); // Create report title HSSFRow rowTitle = worksheet.createRow((short) startRowIndex); rowTitle.setHeight((short) 500); HSSFCell cellTitle = rowTitle.createCell(startColIndex); cellTitle.setCellValue("Sales Report"); cellTitle.setCellStyle(cellStyleTitle); // Create merged region for the report title worksheet.addMergedRegion(new CellRangeAddress(0,0,0,5)); // Create date header HSSFRow dateTitle = worksheet.createRow((short) startRowIndex +1); HSSFCell cellDate = dateTitle.createCell(startColIndex); cellDate.setCellValue("This report was generated at " + new Date()); } /** * Builds the column headers * * @param worksheet * @param startRowIndex starting row offset * @param startColIndex starting column offset */ public static void buildHeaders(HSSFSheet worksheet, int startRowIndex, int startColIndex) { // Create font style for the headers Font font = worksheet.getWorkbook().createFont(); font.setBoldweight(Font.BOLDWEIGHT_BOLD); // Create cell style for the headers HSSFCellStyle headerCellStyle = worksheet.getWorkbook().createCellStyle(); headerCellStyle.setFillBackgroundColor(HSSFColor.GREY_25_PERCENT.index); headerCellStyle.setFillPattern(CellStyle.FINE_DOTS); headerCellStyle.setAlignment(CellStyle.ALIGN_CENTER); headerCellStyle.setVerticalAlignment(CellStyle.VERTICAL_CENTER); headerCellStyle.setWrapText(true); headerCellStyle.setFont(font); headerCellStyle.setBorderBottom(CellStyle.BORDER_THIN); // Create the column headers HSSFRow rowHeader = worksheet.createRow((short) startRowIndex +2); rowHeader.setHeight((short) 500); HSSFCell cell1 = rowHeader.createCell(startColIndex+0); cell1.setCellValue("Id"); cell1.setCellStyle(headerCellStyle); HSSFCell cell2 = rowHeader.createCell(startColIndex+1); cell2.setCellValue("Brand"); cell2.setCellStyle(headerCellStyle); HSSFCell cell3 = rowHeader.createCell(startColIndex+2); cell3.setCellValue("Model"); cell3.setCellStyle(headerCellStyle); HSSFCell cell4 = rowHeader.createCell(startColIndex+3); cell4.setCellValue("Max Power"); cell4.setCellStyle(headerCellStyle); HSSFCell cell5 = rowHeader.createCell(startColIndex+4); cell5.setCellValue("Price"); cell5.setCellStyle(headerCellStyle); HSSFCell cell6 = rowHeader.createCell(startColIndex+5); cell6.setCellValue("Efficiency"); cell6.setCellStyle(headerCellStyle); }} |
The FillManager
The purpose of the FillManager is to fill the Excel report with data from the data source.FillManager.java
1 2 3 4 5 6 7 8 9 10 11 12 13 14 15 16 17 18 19 20 21 22 23 24 25 26 27 28 29 30 31 32 33 34 35 36 37 38 39 40 41 42 43 44 45 46 47 48 49 50 51 52 53 54 55 56 57 58 59 60 61 62 63 64 65 66 67 | package org.krams.tutorial.report;import java.util.List;import org.apache.poi.hssf.usermodel.HSSFCell;import org.apache.poi.hssf.usermodel.HSSFCellStyle;import org.apache.poi.hssf.usermodel.HSSFRow;import org.apache.poi.hssf.usermodel.HSSFSheet;import org.apache.poi.ss.usermodel.CellStyle;import org.krams.tutorial.domain.PowerSupply;public class FillManager { /** * Fills the report with content * * @param worksheet * @param startRowIndex starting row offset * @param startColIndex starting column offset * @param datasource the data source */ public static void fillReport(HSSFSheet worksheet, int startRowIndex, int startColIndex, List<PowerSupply> datasource) { // Row offset startRowIndex += 2; // Create cell style for the body HSSFCellStyle bodyCellStyle = worksheet.getWorkbook().createCellStyle(); bodyCellStyle.setAlignment(CellStyle.ALIGN_CENTER); bodyCellStyle.setWrapText(true); // Create body for (int i=startRowIndex; i+startRowIndex-2< datasource.size()+2; i++) { // Create a new row HSSFRow row = worksheet.createRow((short) i+1); // Retrieve the id value HSSFCell cell1 = row.createCell(startColIndex+0); cell1.setCellValue(datasource.get(i-2).getId()); cell1.setCellStyle(bodyCellStyle); // Retrieve the brand value HSSFCell cell2 = row.createCell(startColIndex+1); cell2.setCellValue(datasource.get(i-2).getBrand()); cell2.setCellStyle(bodyCellStyle); // Retrieve the model value HSSFCell cell3 = row.createCell(startColIndex+2); cell3.setCellValue(datasource.get(i-2).getModel()); cell3.setCellStyle(bodyCellStyle); // Retrieve the maximum power value HSSFCell cell4 = row.createCell(startColIndex+3); cell4.setCellValue(datasource.get(i-2).getMaximumPower()); cell4.setCellStyle(bodyCellStyle); // Retrieve the price value HSSFCell cell5 = row.createCell(startColIndex+4); cell5.setCellValue(datasource.get(i-2).getPrice()); cell5.setCellStyle(bodyCellStyle); // Retrieve the efficiency value HSSFCell cell6 = row.createCell(startColIndex+5); cell6.setCellValue(datasource.get(i-2).getEfficiency()); cell6.setCellStyle(bodyCellStyle); } }} |
The Writer
The purpose of the Writer is to write the "exported" worksheet to the output stream. Once the document has been written to the stream, the user will receive the document ready to be downloaded.Writer.java
1 2 3 4 5 6 7 8 9 10 11 12 13 14 15 16 17 18 19 20 21 22 23 24 25 26 27 28 29 30 31 32 33 34 35 | package org.krams.tutorial.report;import javax.servlet.ServletOutputStream;import javax.servlet.http.HttpServletResponse;import org.apache.log4j.Logger;import org.apache.poi.hssf.usermodel.HSSFSheet;/** * Writes the report to the output stream * * @author Krams at {@link http://krams915@blogspot.com} */public class Writer { private static Logger logger = Logger.getLogger("service"); /** * Writes the report to the output stream */ public static void write(HttpServletResponse response, HSSFSheet worksheet) { logger.debug("Writing report to the stream"); try { // Retrieve the output stream ServletOutputStream outputStream = response.getOutputStream(); // Write to the output stream worksheet.getWorkbook().write(outputStream); // Flush the stream outputStream.flush(); } catch (Exception e) { logger.error("Unable to write report to the output stream"); } }} |
Controller
We've completed the domain and service layer of the application. Since we're developing a Spring MVC web application, we're required to declare a controller that will handle the user's request.DownloadController.java
1 2 3 4 5 6 7 8 9 10 11 12 13 14 15 16 17 18 19 20 21 22 23 24 25 26 27 28 29 30 31 32 33 34 35 36 37 38 39 | package org.krams.tutorial.controller;import javax.annotation.Resource;import javax.servlet.http.HttpServletResponse;import org.apache.log4j.Logger;import org.krams.tutorial.service.DownloadService;import org.springframework.stereotype.Controller;import org.springframework.ui.Model;import org.springframework.web.bind.annotation.RequestMapping;import org.springframework.web.bind.annotation.RequestMethod;/** * Handles download requests * * @author Krams at {@link http://krams915@blogspot.com} */@Controller@RequestMapping("/download")public class DownloadController { private static Logger logger = Logger.getLogger("controller"); @Resource(name="downloadService") private DownloadService downloadService; /** * Downloads the report as an Excel format. * <p> * Make sure this method doesn't return any model. Otherwise, you'll get * an "IllegalStateException: getOutputStream() has already been called for this response" */ @RequestMapping(value = "/xls", method = RequestMethod.GET) public void getXLS(HttpServletResponse response, Model model) throws ClassNotFoundException { logger.debug("Received request to download report as an XLS"); // Delegate to downloadService. Make sure to pass an instance of HttpServletResponse downloadService.downloadXLS(response); }} |
Database Configuration
We've completed the MVC module of the application. However we haven't created yet the Hibernate configuration and the MySQL database.Our first task is to create an empty MySQL database.
Here are the steps:
1. Run MySQL
2. Open MySQL admin
3. Create a new database mydb

In this tutorial I've setup a local MySQL database and used phpmyadmin to administer it.
Next, we'll be declaring a hibernate-context.xml configuration file. Its purpose is to contain all of Spring-related configuration for Hibernate.
hibernate-context.xml
1 2 3 4 5 6 7 8 9 10 11 12 13 14 15 16 17 18 19 20 21 22 23 24 25 26 27 28 29 30 31 32 33 34 35 36 37 38 39 40 41 42 43 44 45 46 | <?xml version="1.0" encoding="UTF-8"?> xsi:schemaLocation=" "> <context:property-placeholder location="/WEB-INF/spring.properties" /> <!-- Declare a pooled datasource --> <bean id="dataSource" class="com.mchange.v2.c3p0.ComboPooledDataSource" destroy-method="close" p:driverClass="${app.jdbc.driverClassName}" p:jdbcUrl="${app.jdbc.url}" p:user="${app.jdbc.username}" p:password="${app.jdbc.password}" p:acquireIncrement="5" p:idleConnectionTestPeriod="60" p:maxPoolSize="100" p:maxStatements="50" p:minPoolSize="10" /> <!-- Declare the Hibernate SessionFactory for retrieving Hibernate sessions --> <!-- See http://docs.jboss.org/hibernate/stable/core/api/index.html?org/hibernate/SessionFactory.html --> <bean id="sessionFactory" class="org.springframework.orm.hibernate3.annotation.AnnotationSessionFactoryBean" p:dataSource-ref="dataSource" p:configLocation="${hibernate.config}" p:packagesToScan="org.krams.tutorial"/> <!-- Declare a transaction manager--> <bean id="transactionManager" class="org.springframework.orm.hibernate3.HibernateTransactionManager" p:sessionFactory-ref="sessionFactory" /> <!-- Enable annotation style of managing transactions --> <tx:annotation-driven transaction-manager="transactionManager" /> </beans> |
This configuration requires two external configurations further:
spring.properties
1 2 3 4 5 6 7 8 | # database propertiesapp.jdbc.driverClassName=com.mysql.jdbc.Driverapp.jdbc.url=jdbc:mysql://localhost/mydbapp.jdbc.username=rootapp.jdbc.password=#hibernate propertieshibernate.config=/WEB-INF/hibernate.cfg.xml |
hibernate.cfg.xml
1 2 3 4 5 6 7 8 9 10 11 12 13 14 15 16 17 18 19 | <?xml version="1.0" encoding="UTF-8"?><!DOCTYPE hibernate-configuration PUBLIC "-//Hibernate/Hibernate Configuration DTD 3.0//EN" <hibernate-configuration> <session-factory> <!-- We're using a MySQL database so the dialect needs to be MySQL as well --> <!-- Also we want to use MySQL's InnoDB engine --> <property name="hibernate.dialect">org.hibernate.dialect.MySQL5InnoDBDialect</property> <!-- Enable this to see the Hibernate generated SQL statements in the logs --> <property name="show_sql">false</property> <!-- Setting this to 'create' will drop our existing database and re-create a new one. This is only good for testing. In production, this is a bad idea! --> <property name="hbm2ddl.auto">create</property> </session-factory></hibernate-configuration> |
The Import.SQL
After declaring all the Hibernate-related configuration, let's now declare a SQL script that will populate our database with a sample data automatically.import.sql
1 2 3 4 5 6 | insert into POWER_SUPPLY (ID, BRAND, MODEL, MAXIMUM_POWER, PRICE, EFFICIENCY) values (null, 'Corsair', 'CMPSU-750TX', '750W', '109.99', '0.80')insert into POWER_SUPPLY (ID, BRAND, MODEL, MAXIMUM_POWER, PRICE, EFFICIENCY) values (null, 'Antec', 'NEO ECO 620C', '620W', '69.99', '0.80')insert into POWER_SUPPLY (ID, BRAND, MODEL, MAXIMUM_POWER, PRICE, EFFICIENCY) values (null, 'OCZ', 'OCZ700MXSP', '700W', '89.99', '0.86')insert into POWER_SUPPLY (ID, BRAND, MODEL, MAXIMUM_POWER, PRICE, EFFICIENCY) values (null, 'Thermaltake', 'W0070RUC', '430W', '43.99', '0.65')insert into POWER_SUPPLY (ID, BRAND, MODEL, MAXIMUM_POWER, PRICE, EFFICIENCY) values (null, 'COOLER MASTER', 'RS-460-PSAR-J3', '460W', '29.99', '0.70')insert into POWER_SUPPLY (ID, BRAND, MODEL, MAXIMUM_POWER, PRICE, EFFICIENCY) values (null, 'Rosewill', 'RG530-S12', '530W', '54.99', '0.80') |
We're not required to create this import.sql file. We could of course create a MySQL SQL script and import it directly to the database, or add the data manually in the database. I just believe this is convenient for development purposes.
Spring MVC Configuration
We've declared all the necessary classes and Hibernate-related configuration of the application. However, we haven't created yet the required Spring MVC configuration.Let's begin with the web.xml
web.xml
1 2 3 4 5 6 7 8 9 10 11 12 13 14 | <servlet> <servlet-name>spring</servlet-name> <servlet-class>org.springframework.web.servlet.DispatcherServlet</servlet-class> <load-on-startup>1</load-on-startup> </servlet> <servlet-mapping> <servlet-name>spring</servlet-name> <url-pattern>/krams/*</url-pattern> </servlet-mapping> <listener> <listener-class>org.springframework.web.context.ContextLoaderListener</listener-class> </listener> |
/kramsIn the web.xml we declared a servlet-name spring. By convention, we must declare a spring-servlet.xml.
spring-servlet.xml
1 2 3 | <!-- Declare a view resolver for resolving JSPs --> <bean id="viewResolver" class="org.springframework.web.servlet.view.InternalResourceViewResolver" p:prefix="/WEB-INF/jsp/" p:suffix=".jsp" /> |
applicationContext.xml
1 2 3 4 5 6 7 8 9 10 11 12 13 | <!-- Activates various annotations to be detected in bean classes --> <context:annotation-config /> <!-- Scans the classpath for annotated components that will be auto-registered as Spring beans. For example @Controller and @Service. Make sure to set the correct base-package--> <context:component-scan base-package="org.krams.tutorial" /> <!-- Configures the annotation-driven Spring MVC Controller programming model. Note that, with Spring 3.0, this tag works in Servlet MVC only! --> <mvc:annotation-driven /> <!-- Loads Hibernate related configuration --> <import resource="hibernate-context.xml" /> |
Run the Application
We've completed the application. Our last task is to run the application and download the report.To run the application, open your browser and enter the following URL:
http://localhost:8080/spring-poi-hibernate/krams/download/xlsThis will automatically download the report document. Again, here's the final screenshot of the document:
Conclusion
That's it. We've managed to build a simple Spring MVC 3 application with reporting capabilities. We usedApache POI to generate the dynamic Excel reports and Hibernate for the ORM framework. Lastly, we used a plain Java List as the data source where the data is retrieved from a MySQL database.Download the project
You can access the project site at Google's Project Hosting at http://code.google.com/p/spring-poi-integration-tutorial/
You can download the project as a Maven build. Look for the spring-poi-hibernate.zip in the Download sections.
You can run the project directly using an embedded server via Maven.
For Tomcat: mvn tomcat:run
For Jetty: mvn jetty:run
If you want to learn more about Spring MVC and integration with other technologies, feel free to read my other tutorials in the Tutorials section.
출처 - http://krams915.blogspot.kr/2011/02/spring-3-apache-poi-hibernate-creating.html
/* ====================================================================
   Licensed to the Apache Software Foundation (ASF) under one or more
   contributor license agreements.  See the NOTICE file distributed with
   this work for additional information regarding copyright ownership.
   The ASF licenses this file to You under the Apache License, Version 2.0
   (the "License"); you may not use this file except in compliance with
   the License.  You may obtain a copy of the License at

       http://www.apache.org/licenses/LICENSE-2.0

   Unless required by applicable law or agreed to in writing, software
   distributed under the License is distributed on an "AS IS" BASIS,
   WITHOUT WARRANTIES OR CONDITIONS OF ANY KIND, either express or implied.
   See the License for the specific language governing permissions and
   limitations under the License.
==================================================================== */

package org.apache.poi.ss.examples;

import org.apache.poi.xssf.usermodel.*;
import org.apache.poi.ss.util.CellRangeAddress;
import org.apache.poi.ss.usermodel.*;
import org.apache.poi.hssf.usermodel.HSSFWorkbook;

import java.util.Map;
import java.util.HashMap;
import java.io.FileOutputStream;

/**
 * A weekly timesheet created using Apache POI.
 * Usage:
 *  TimesheetDemo -xls|xlsx
 *
 * @author Yegor Kozlov
 */
public class TimesheetDemo {
    private static final String[] titles = {
            "Person",	"ID", "Mon", "Tue", "Wed", "Thu", "Fri", "Sat", "Sun",
            "Total\nHrs", "Overtime\nHrs", "Regular\nHrs"
    };

    private static Object[][] sample_data = {
            {"Yegor Kozlov", "YK", 5.0, 8.0, 10.0, 5.0, 5.0, 7.0, 6.0},
            {"Gisella Bronzetti", "GB", 4.0, 3.0, 1.0, 3.5, null, null, 4.0},
    };

    public static void main(String[] args) throws Exception {
        Workbook wb;

        if(args.length > 0 && args[0].equals("-xls")) wb = new HSSFWorkbook();
        else wb = new XSSFWorkbook();

        Map<String, CellStyle> styles = createStyles(wb);

        Sheet sheet = wb.createSheet("Timesheet");
        PrintSetup printSetup = sheet.getPrintSetup();
        printSetup.setLandscape(true);
        sheet.setFitToPage(true);
        sheet.setHorizontallyCenter(true);

        //title row
        Row titleRow = sheet.createRow(0);
        titleRow.setHeightInPoints(45);
        Cell titleCell = titleRow.createCell(0);
        titleCell.setCellValue("Weekly Timesheet");
        titleCell.setCellStyle(styles.get("title"));
        sheet.addMergedRegion(CellRangeAddress.valueOf("$A$1:$L$1"));

        //header row
        Row headerRow = sheet.createRow(1);
        headerRow.setHeightInPoints(40);
        Cell headerCell;
        for (int i = 0; i < titles.length; i++) {
            headerCell = headerRow.createCell(i);
            headerCell.setCellValue(titles[i]);
            headerCell.setCellStyle(styles.get("header"));
        }

        int rownum = 2;
        for (int i = 0; i < 10; i++) {
            Row row = sheet.createRow(rownum++);
            for (int j = 0; j < titles.length; j++) {
                Cell cell = row.createCell(j);
                if(j == 9){
                    //the 10th cell contains sum over week days, e.g. SUM(C3:I3)
                    String ref = "C" +rownum+ ":I" + rownum;
                    cell.setCellFormula("SUM("+ref+")");
                    cell.setCellStyle(styles.get("formula"));
                } else if (j == 11){
                    cell.setCellFormula("J" +rownum+ "-K" + rownum);
                    cell.setCellStyle(styles.get("formula"));
                } else {
                    cell.setCellStyle(styles.get("cell"));
                }
            }
        }

        //row with totals below
        Row sumRow = sheet.createRow(rownum++);
        sumRow.setHeightInPoints(35);
        Cell cell;
        cell = sumRow.createCell(0);
        cell.setCellStyle(styles.get("formula"));
        cell = sumRow.createCell(1);
        cell.setCellValue("Total Hrs:");
        cell.setCellStyle(styles.get("formula"));

        for (int j = 2; j < 12; j++) {
            cell = sumRow.createCell(j);
            String ref = (char)('A' + j) + "3:" + (char)('A' + j) + "12";
            cell.setCellFormula("SUM(" + ref + ")");
            if(j >= 9) cell.setCellStyle(styles.get("formula_2"));
            else cell.setCellStyle(styles.get("formula"));
        }
        rownum++;
        sumRow = sheet.createRow(rownum++);
        sumRow.setHeightInPoints(25);
        cell = sumRow.createCell(0);
        cell.setCellValue("Total Regular Hours");
        cell.setCellStyle(styles.get("formula"));
        cell = sumRow.createCell(1);
        cell.setCellFormula("L13");
        cell.setCellStyle(styles.get("formula_2"));
        sumRow = sheet.createRow(rownum++);
        sumRow.setHeightInPoints(25);
        cell = sumRow.createCell(0);
        cell.setCellValue("Total Overtime Hours");
        cell.setCellStyle(styles.get("formula"));
        cell = sumRow.createCell(1);
        cell.setCellFormula("K13");
        cell.setCellStyle(styles.get("formula_2"));

        //set sample data
        for (int i = 0; i < sample_data.length; i++) {
            Row row = sheet.getRow(2 + i);
            for (int j = 0; j < sample_data[i].length; j++) {
                if(sample_data[i][j] == null) continue;

                if(sample_data[i][j] instanceof String) {
                    row.getCell(j).setCellValue((String)sample_data[i][j]);
                } else {
                    row.getCell(j).setCellValue((Double)sample_data[i][j]);
                }
            }
        }

        //finally set column widths, the width is measured in units of 1/256th of a character width
        sheet.setColumnWidth(0, 30*256); //30 characters wide
        for (int i = 2; i < 9; i++) {
            sheet.setColumnWidth(i, 6*256);  //6 characters wide
        }
        sheet.setColumnWidth(10, 10*256); //10 characters wide

        // Write the output to a file
        String file = "timesheet.xls";
        if(wb instanceof XSSFWorkbook) file += "x";
        FileOutputStream out = new FileOutputStream(file);
        wb.write(out);
        out.close();
    }

    /**
     * Create a library of cell styles
     */
    private static Map<String, CellStyle> createStyles(Workbook wb){
        Map<String, CellStyle> styles = new HashMap<String, CellStyle>();
        CellStyle style;
        Font titleFont = wb.createFont();
        titleFont.setFontHeightInPoints((short)18);
        titleFont.setBoldweight(Font.BOLDWEIGHT_BOLD);
        style = wb.createCellStyle();
        style.setAlignment(CellStyle.ALIGN_CENTER);
        style.setVerticalAlignment(CellStyle.VERTICAL_CENTER);
        style.setFont(titleFont);
        styles.put("title", style);

        Font monthFont = wb.createFont();
        monthFont.setFontHeightInPoints((short)11);
        monthFont.setColor(IndexedColors.WHITE.getIndex());
        style = wb.createCellStyle();
        style.setAlignment(CellStyle.ALIGN_CENTER);
        style.setVerticalAlignment(CellStyle.VERTICAL_CENTER);
        style.setFillForegroundColor(IndexedColors.GREY_50_PERCENT.getIndex());
        style.setFillPattern(CellStyle.SOLID_FOREGROUND);
        style.setFont(monthFont);
        style.setWrapText(true);
        styles.put("header", style);

        style = wb.createCellStyle();
        style.setAlignment(CellStyle.ALIGN_CENTER);
        style.setWrapText(true);
        style.setBorderRight(CellStyle.BORDER_THIN);
        style.setRightBorderColor(IndexedColors.BLACK.getIndex());
        style.setBorderLeft(CellStyle.BORDER_THIN);
        style.setLeftBorderColor(IndexedColors.BLACK.getIndex());
        style.setBorderTop(CellStyle.BORDER_THIN);
        style.setTopBorderColor(IndexedColors.BLACK.getIndex());
        style.setBorderBottom(CellStyle.BORDER_THIN);
        style.setBottomBorderColor(IndexedColors.BLACK.getIndex());
        styles.put("cell", style);

        style = wb.createCellStyle();
        style.setAlignment(CellStyle.ALIGN_CENTER);
        style.setVerticalAlignment(CellStyle.VERTICAL_CENTER);
        style.setFillForegroundColor(IndexedColors.GREY_25_PERCENT.getIndex());
        style.setFillPattern(CellStyle.SOLID_FOREGROUND);
        style.setDataFormat(wb.createDataFormat().getFormat("0.00"));
        styles.put("formula", style);

        style = wb.createCellStyle();
        style.setAlignment(CellStyle.ALIGN_CENTER);
        style.setVerticalAlignment(CellStyle.VERTICAL_CENTER);
        style.setFillForegroundColor(IndexedColors.GREY_40_PERCENT.getIndex());
        style.setFillPattern(CellStyle.SOLID_FOREGROUND);
        style.setDataFormat(wb.createDataFormat().getFormat("0.00"));
        styles.put("formula_2", style);

        return styles;
    }
}Spring MVC And Excel File Via AbstractExcelView
Posted on , Last modified : July 28, 2011 By mkyong
Spring MVC comes with AbstractExcelView class to export data to Excel file via Apache POI library. In this tutorial, it show the use of AbstractExcelView class in Spring MVC application to export data to Excel file for download.
1. Apache POI
Get the Apache POI library to create the excel file.
   <!-- Excel library -->
   <dependency>
	<groupId>org.apache.poi</groupId>
	<artifactId>poi</artifactId>
	<version>3.6</version>
   </dependency>
2. Controller
A controller class, generate dummy data for demonstration, and get the request parameter to determine which view to return. If the request parameter is equal to “EXCEL”, then return an Excel view (AbstractExcelView).
File : RevenueReportController.java
package com.mkyong.common.controller;

import java.util.HashMap;
import java.util.Map;
import javax.servlet.http.HttpServletRequest;
import javax.servlet.http.HttpServletResponse;
import org.springframework.web.bind.ServletRequestUtils;
import org.springframework.web.servlet.ModelAndView;
import org.springframework.web.servlet.mvc.AbstractController;

public class RevenueReportController extends AbstractController{

	@Override
	protected ModelAndView handleRequestInternal(HttpServletRequest request,
		HttpServletResponse response) throws Exception {

		String output =
			ServletRequestUtils.getStringParameter(request, "output");

		//dummy data
		Map<String,String> revenueData = new HashMap<String,String>();
		revenueData.put("Jan-2010", "$100,000,000");
		revenueData.put("Feb-2010", "$110,000,000");
		revenueData.put("Mar-2010", "$130,000,000");
		revenueData.put("Apr-2010", "$140,000,000");
		revenueData.put("May-2010", "$200,000,000");

		if(output ==null || "".equals(output)){
			//return normal view
			return new ModelAndView("RevenueSummary","revenueData",revenueData);

		}else if("EXCEL".equals(output.toUpperCase())){
			//return excel view
			return new ModelAndView("ExcelRevenueSummary","revenueData",revenueData);

		}else{
			//return normal view
			return new ModelAndView("RevenueSummary","revenueData",revenueData);

		}
	}
}
3. AbstractExcelView
Create an Excel view by extends the AbstractExcelView class, and override the buildExcelDocument() method to populate the data to Excel file. The AbstractExcelView is using the Apache POI API to create the Excel file detail.
For detail about how to use the Apache POI , please refer to Apache POI documentation
File : ExcelRevenueReportView.java
package com.mkyong.common.view;

import java.util.Map;
import javax.servlet.http.HttpServletRequest;
import javax.servlet.http.HttpServletResponse;
import org.apache.poi.hssf.usermodel.HSSFRow;
import org.apache.poi.hssf.usermodel.HSSFSheet;
import org.apache.poi.hssf.usermodel.HSSFWorkbook;
import org.springframework.web.servlet.view.document.AbstractExcelView;

public class ExcelRevenueReportView extends AbstractExcelView{

	@Override
	protected void buildExcelDocument(Map model, HSSFWorkbook workbook,
		HttpServletRequest request, HttpServletResponse response)
		throws Exception {

		Map<String,String> revenueData = (Map<String,String>) model.get("revenueData");
		//create a wordsheet
		HSSFSheet sheet = workbook.createSheet("Revenue Report");

		HSSFRow header = sheet.createRow(0);
		header.createCell(0).setCellValue("Month");
		header.createCell(1).setCellValue("Revenue");

		int rowNum = 1;
		for (Map.Entry<String, String> entry : revenueData.entrySet()) {
			//create the row data
			HSSFRow row = sheet.createRow(rowNum++);
			row.createCell(0).setCellValue(entry.getKey());
			row.createCell(1).setCellValue(entry.getValue());
                }
	}
}
Alternatively, you can use the AbstractJExcelView, which is using the JExcelAPI to create the same Excel view, see this AbstractJExcelView example.
4. Spring Configuration
Create a XmlViewResolver for the Excel view.
<beans ...>

  <bean
  class="org.springframework.web.servlet.mvc.support.ControllerClassNameHandlerMapping" />

	<bean class="com.mkyong.common.controller.RevenueReportController" />

	<bean class="org.springframework.web.servlet.view.XmlViewResolver">
		<property name="location">
			<value>/WEB-INF/spring-excel-views.xml</value>
		</property>
	</bean>

</beans>
File : spring-excel-views.xml
   <bean id="ExcelRevenueSummary"
   	class="com.mkyong.common.view.ExcelRevenueReportView">
   </bean>
5. Demo
URL : http://localhost:8080/SpringMVC/revenuereport.htm?output=excel
It generates an Excel file for user to download.

Download Source Code
References
- Apache POI
- AbstractExcelView Javadoc
- Spring MVC export data to Excel file via AbstractJExcelView
- Spring MVC XmlViewResolver example
출처 - http://www.mkyong.com/spring-mvc/spring-mvc-export-data-to-excel-file-via-abstractexcelview/
Jakarta POI
IX. Cell을 좀더 유연하게!
1. Date타입 셀 만들기
① 소스
② 결과

③ HSSFDateFormat이 지원하는 날짜 포맷
cellStyle.setDataFormat(HSSFDataFormat.getBuiltinFormat("m/d/yy h:mm")); 에서 다음과 같이 포맷을 정할 수 있다 (현재시간은 2005년 3월 14일 0시 52분 17초.. 헛 화이트데이 --;)

2. Cell의 Align속성
① 소스
② 결과

3. Cell의 Border 속성
① 소스
② 결과

③ HSSFCellStyle
HSSFCellStyle에는 다음과 같은 static 멤버변수가 존재합니다
| ALIGN_CENTER | center horizontal alignment |
| ALIGN_CENTER_SELECTION | center-selection? horizontal alignment |
| ALIGN_FILL | fill? horizontal alignment |
| ALIGN_GENERAL | general (normal) horizontal alignment |
| ALIGN_JUSTIFY | justified horizontal alignment |
| ALIGN_LEFT | left-justified horizontal alignment |
| ALIGN_RIGHT | right-justified horizontal alignment |
| ALT_BARS | Wide dots |
| BIG_SPOTS | Large spots |
| BORDER_DASH_DOT | dash-dot border |
| BORDER_DASH_DOT_DOT | dash-dot-dot border |
| BORDER_DASHED | dash border |
| BORDER_DOTTED | hair-line border |
| BORDER_DOUBLE | double-line border |
| BORDER_HAIR | dot border |
| BORDER_MEDIUM | Medium border |
| BORDER_MEDIUM_DASH_DOT | medium dash-dot border |
| BORDER_MEDIUM_DASH_DOT_DOT | medium dash-dot-dot border |
| BORDER_MEDIUM_DASHED | Medium dashed border |
| BORDER_NONE | No border |
| BORDER_SLANTED_DASH_DOT | slanted dash-dot border |
| BORDER_THICK | Thick border |
| BORDER_THIN | Thin border |
| BRICKS | Brick-like layout |
| DIAMONDS | Diamonds |
| FINE_DOTS | Small fine dots |
| NO_FILL | No background |
| SOLID_FOREGROUND | Solidly filled |
| SPARSE_DOTS | Sparse dots |
| SQUARES | Squares |
| THICK_BACKWARD_DIAG | Thick backward facing diagonals |
| THICK_FORWARD_DIAG | Thick forward facing diagonals |
| THICK_HORZ_BANDS | Thick horizontal bands |
| THICK_VERT_BANDS | Thick vertical bands |
| THIN_BACKWARD_DIAG | Thin backward diagonal |
| THIN_FORWARD_DIAG | Thin forward diagonal |
| THIN_HORZ_BANDS | Thin horizontal bands |
| THIN_VERT_BANDS | Thin vertical bands |
| VERTICAL_BOTTOM | bottom-aligned vertical alignment |
| VERTICAL_CENTER | center-aligned vertical alignment |
| VERTICAL_JUSTIFY | vertically justified vertical alignment |
| VERTICAL_TOP | top-aligned vertical alignment |
4. Cell의 색갈 채우기
① 소스
② 결과

③ HSSFColor 정리!

5. Cell 병합
① 소스
② 결과

③ Region
특정셀을 합칠 때는 HSSFSheet의 addMergedRegion(Region region)와
합칠 셀의 영역을 나타내는 Region을 사용한다.
Region region = new (int 시작ROW, short 시작COL, int 종료ROW, short 종료COL);
6. Cell에 폰트 설정하기
① 소스
② 결과

=============================================
본문서는 자유롭게 배포/복사 할수 있지만
이문서의 저자에 대한 언급을 삭제하시면 안됩니다
저자 : GoodBug (unicorn@jakartaproject.com)
최초 : http://www.jakartaproject.com
=============================================
출처 - http://sinope.tistory.com/28
This example shows you Excel cell fills and colors using Apache POI.
In our example i have used all the possible colors and set it as Fills background colors of cells.
Below is the example code.
package com.java.connect.poi;

import java.io.FileOutputStream;
import java.io.IOException;

import org.apache.poi.ss.usermodel.Cell;
import org.apache.poi.ss.usermodel.CellStyle;
import org.apache.poi.ss.usermodel.IndexedColors;
import org.apache.poi.ss.usermodel.Row;
import org.apache.poi.ss.usermodel.Sheet;
import org.apache.poi.ss.usermodel.Workbook;
import org.apache.poi.xssf.usermodel.XSSFWorkbook;

public class POIFillAndColorExample {
	public static void main(String[] args) throws IOException {
		// Create a workbook object
		Workbook workbook = new XSSFWorkbook();
		// Create sheet
		Sheet sheet = workbook.createSheet();

		// Create a row and put some cells in it.
		Row row = sheet.createRow((short) 1);

		// Aqua background
		CellStyle style = workbook.createCellStyle();
		style.setFillForegroundColor(IndexedColors.AQUA.getIndex());
		style.setFillPattern(CellStyle.SOLID_FOREGROUND);
		Cell cell = row.createCell((short) 1);
		cell.setCellValue("X1");
		cell.setCellStyle(style);

		// Orange "foreground", foreground being the fill foreground not the
		// font color.
		style = workbook.createCellStyle();
		style.setFillForegroundColor(IndexedColors.AUTOMATIC.getIndex());
		style.setFillPattern(CellStyle.SOLID_FOREGROUND);
		cell = row.createCell((short) 2);
		cell.setCellValue("X2");
		cell.setCellStyle(style);

		style = workbook.createCellStyle();
		style.setFillForegroundColor(IndexedColors.BLUE.getIndex());
		style.setFillPattern(CellStyle.SOLID_FOREGROUND);
		cell = row.createCell((short) 3);
		cell.setCellValue("X3");
		cell.setCellStyle(style);

		style = workbook.createCellStyle();
		style.setFillForegroundColor(IndexedColors.BLUE_GREY.getIndex());
		style.setFillPattern(CellStyle.SOLID_FOREGROUND);
		cell = row.createCell((short) 4);
		cell.setCellValue("X4");
		cell.setCellStyle(style);

		style = workbook.createCellStyle();
		style.setFillForegroundColor(IndexedColors.BRIGHT_GREEN.getIndex());
		style.setFillPattern(CellStyle.SOLID_FOREGROUND);
		cell = row.createCell((short) 5);
		cell.setCellValue("X5");
		cell.setCellStyle(style);

		// Create a row and put some cells in it.
		Row row2 = sheet.createRow((short) 2);

		style = workbook.createCellStyle();
		style.setFillForegroundColor(IndexedColors.BROWN.getIndex());
		style.setFillPattern(CellStyle.SOLID_FOREGROUND);
		cell = row2.createCell((short) 1);
		cell.setCellValue("X6");
		cell.setCellStyle(style);

		style = workbook.createCellStyle();
		style.setFillForegroundColor(IndexedColors.CORAL.getIndex());
		style.setFillPattern(CellStyle.SOLID_FOREGROUND);
		cell = row2.createCell((short) 2);
		cell.setCellValue("X7");
		cell.setCellStyle(style);

		style = workbook.createCellStyle();
		style.setFillForegroundColor(IndexedColors.CORNFLOWER_BLUE.getIndex());
		style.setFillPattern(CellStyle.SOLID_FOREGROUND);
		cell = row2.createCell((short) 3);
		cell.setCellValue("X8");
		cell.setCellStyle(style);

		style = workbook.createCellStyle();
		style.setFillForegroundColor(IndexedColors.DARK_BLUE.getIndex());
		style.setFillPattern(CellStyle.SOLID_FOREGROUND);
		cell = row2.createCell((short) 4);
		cell.setCellValue("X9");
		cell.setCellStyle(style);
		style = workbook.createCellStyle();
		style.setFillForegroundColor(IndexedColors.DARK_GREEN.getIndex());
		style.setFillPattern(CellStyle.SOLID_FOREGROUND);
		cell = row2.createCell((short) 5);
		cell.setCellValue("X10");
		cell.setCellStyle(style);

		// Create a row and put some cells in it.
		Row row3 = sheet.createRow((short) 3);

		style = workbook.createCellStyle();
		style.setFillForegroundColor(IndexedColors.DARK_RED.getIndex());
		style.setFillPattern(CellStyle.SOLID_FOREGROUND);
		cell = row3.createCell((short) 1);
		cell.setCellValue("X11");
		cell.setCellStyle(style);
		style = workbook.createCellStyle();
		style.setFillForegroundColor(IndexedColors.DARK_TEAL.getIndex());
		style.setFillPattern(CellStyle.SOLID_FOREGROUND);
		cell = row3.createCell((short) 2);
		cell.setCellValue("X12");
		cell.setCellStyle(style);

		style = workbook.createCellStyle();
		style.setFillForegroundColor(IndexedColors.DARK_YELLOW.getIndex());
		style.setFillPattern(CellStyle.SOLID_FOREGROUND);
		cell = row3.createCell((short) 3);
		cell.setCellValue("X13");
		cell.setCellStyle(style);
		style = workbook.createCellStyle();
		style.setFillForegroundColor(IndexedColors.GOLD.getIndex());
		style.setFillPattern(CellStyle.SOLID_FOREGROUND);
		cell = row3.createCell((short) 4);
		cell.setCellValue("X14");
		cell.setCellStyle(style);

		style = workbook.createCellStyle();
		style.setFillForegroundColor(IndexedColors.GREEN.getIndex());
		style.setFillPattern(CellStyle.SOLID_FOREGROUND);
		cell = row3.createCell((short) 5);
		cell.setCellValue("X15");
		cell.setCellStyle(style);

		// Create a row and put some cells in it.
		Row row4 = sheet.createRow((short) 4);
		style = workbook.createCellStyle();
		style.setFillForegroundColor(IndexedColors.GREY_25_PERCENT.getIndex());
		style.setFillPattern(CellStyle.SOLID_FOREGROUND);
		cell = row4.createCell((short) 1);
		cell.setCellValue("X16");
		cell.setCellStyle(style);

		style = workbook.createCellStyle();
		style.setFillForegroundColor(IndexedColors.GREY_40_PERCENT.getIndex());
		style.setFillPattern(CellStyle.SOLID_FOREGROUND);
		cell = row4.createCell((short) 2);
		cell.setCellValue("X17");
		cell.setCellStyle(style);
		style = workbook.createCellStyle();
		style.setFillForegroundColor(IndexedColors.GREY_50_PERCENT.getIndex());
		style.setFillPattern(CellStyle.SOLID_FOREGROUND);
		cell = row4.createCell((short) 3);
		cell.setCellValue("X18");
		cell.setCellStyle(style);

		style = workbook.createCellStyle();
		style.setFillForegroundColor(IndexedColors.GREY_80_PERCENT.getIndex());
		style.setFillPattern(CellStyle.SOLID_FOREGROUND);
		cell = row4.createCell((short) 4);
		cell.setCellValue("X19");
		cell.setCellStyle(style);
		style = workbook.createCellStyle();
		style.setFillForegroundColor(IndexedColors.INDIGO.getIndex());
		style.setFillPattern(CellStyle.SOLID_FOREGROUND);
		cell = row4.createCell((short) 5);
		cell.setCellValue("X20");
		cell.setCellStyle(style);

		// Create a row and put some cells in it.
		Row row5 = sheet.createRow((short) 5);

		style = workbook.createCellStyle();
		style.setFillForegroundColor(IndexedColors.LAVENDER.getIndex());
		style.setFillPattern(CellStyle.SOLID_FOREGROUND);
		cell = row5.createCell((short) 1);
		cell.setCellValue("X21");
		cell.setCellStyle(style);

		style = workbook.createCellStyle();
		style.setFillForegroundColor(IndexedColors.LEMON_CHIFFON.getIndex());
		style.setFillPattern(CellStyle.SOLID_FOREGROUND);
		cell = row5.createCell((short) 2);
		cell.setCellValue("X22");
		cell.setCellStyle(style);

		style = workbook.createCellStyle();
		style.setFillForegroundColor(IndexedColors.LIGHT_BLUE.getIndex());
		style.setFillPattern(CellStyle.SOLID_FOREGROUND);
		cell = row5.createCell((short) 3);
		cell.setCellValue("X23");
		cell.setCellStyle(style);
		style = workbook.createCellStyle();
		style.setFillForegroundColor(IndexedColors.LEMON_CHIFFON.getIndex());
		style.setFillPattern(CellStyle.SOLID_FOREGROUND);
		cell = row5.createCell((short) 4);
		cell.setCellValue("X24");
		cell.setCellStyle(style);

		style = workbook.createCellStyle();
		style.setFillForegroundColor(IndexedColors.LIGHT_BLUE.getIndex());
		style.setFillPattern(CellStyle.SOLID_FOREGROUND);
		cell = row5.createCell((short) 5);
		cell.setCellValue("X25");
		cell.setCellStyle(style);

		// Create a row and put some cells in it.
		Row row6 = sheet.createRow((short) 6);
		style = workbook.createCellStyle();
		style.setFillForegroundColor(IndexedColors.LIGHT_CORNFLOWER_BLUE
				.getIndex());
		style.setFillPattern(CellStyle.SOLID_FOREGROUND);
		cell = row6.createCell((short) 1);
		cell.setCellValue("X26");
		cell.setCellStyle(style);

		style = workbook.createCellStyle();
		style.setFillForegroundColor(IndexedColors.LIGHT_GREEN.getIndex());
		style.setFillPattern(CellStyle.SOLID_FOREGROUND);
		cell = row6.createCell((short) 2);
		cell.setCellValue("X27");
		cell.setCellStyle(style);
		style = workbook.createCellStyle();
		style.setFillForegroundColor(IndexedColors.LIGHT_ORANGE.getIndex());
		style.setFillPattern(CellStyle.SOLID_FOREGROUND);
		cell = row6.createCell((short) 3);
		cell.setCellValue("X28");
		cell.setCellStyle(style);

		style = workbook.createCellStyle();
		style.setFillForegroundColor(IndexedColors.LIGHT_TURQUOISE.getIndex());
		style.setFillPattern(CellStyle.SOLID_FOREGROUND);
		cell = row6.createCell((short) 4);
		cell.setCellValue("X29");
		cell.setCellStyle(style);

		style = workbook.createCellStyle();
		style.setFillForegroundColor(IndexedColors.LIGHT_YELLOW.getIndex());
		style.setFillPattern(CellStyle.SOLID_FOREGROUND);
		cell = row6.createCell((short) 5);
		cell.setCellValue("X30");
		cell.setCellStyle(style);

		// Create a row and put some cells in it.
		Row row7 = sheet.createRow((short) 7);
		style = workbook.createCellStyle();
		style.setFillForegroundColor(IndexedColors.LIME.getIndex());
		style.setFillPattern(CellStyle.SOLID_FOREGROUND);
		cell = row7.createCell((short) 1);
		cell.setCellValue("X31");
		cell.setCellStyle(style);
		style = workbook.createCellStyle();
		style.setFillForegroundColor(IndexedColors.MAROON.getIndex());
		style.setFillPattern(CellStyle.SOLID_FOREGROUND);
		cell = row7.createCell((short) 2);
		cell.setCellValue("X32");
		cell.setCellStyle(style);

		style = workbook.createCellStyle();
		style.setFillForegroundColor(IndexedColors.OLIVE_GREEN.getIndex());
		style.setFillPattern(CellStyle.SOLID_FOREGROUND);
		cell = row7.createCell((short) 3);
		cell.setCellValue("X33");
		cell.setCellStyle(style);
		style = workbook.createCellStyle();
		style.setFillForegroundColor(IndexedColors.ORANGE.getIndex());
		style.setFillPattern(CellStyle.SOLID_FOREGROUND);
		cell = row7.createCell((short) 4);
		cell.setCellValue("X34");
		cell.setCellStyle(style);

		style = workbook.createCellStyle();
		style.setFillForegroundColor(IndexedColors.ORCHID.getIndex());
		style.setFillPattern(CellStyle.SOLID_FOREGROUND);
		cell = row7.createCell((short) 5);
		cell.setCellValue("X35");
		cell.setCellStyle(style);

		// Create a row and put some cells in it.
		Row row8 = sheet.createRow((short) 8);

		style = workbook.createCellStyle();
		style.setFillForegroundColor(IndexedColors.PALE_BLUE.getIndex());
		style.setFillPattern(CellStyle.SOLID_FOREGROUND);
		cell = row8.createCell((short) 1);
		cell.setCellValue("X36");
		cell.setCellStyle(style);

		style = workbook.createCellStyle();
		style.setFillForegroundColor(IndexedColors.PINK.getIndex());
		style.setFillPattern(CellStyle.SOLID_FOREGROUND);
		cell = row8.createCell((short) 2);
		cell.setCellValue("X37");
		cell.setCellStyle(style);
		style = workbook.createCellStyle();
		style.setFillForegroundColor(IndexedColors.PLUM.getIndex());
		style.setFillPattern(CellStyle.SOLID_FOREGROUND);
		cell = row8.createCell((short) 3);
		cell.setCellValue("X38");
		cell.setCellStyle(style);

		style = workbook.createCellStyle();
		style.setFillForegroundColor(IndexedColors.RED.getIndex());
		style.setFillPattern(CellStyle.SOLID_FOREGROUND);
		cell = row8.createCell((short) 4);
		cell.setCellValue("X39");
		cell.setCellStyle(style);
		style = workbook.createCellStyle();
		style.setFillForegroundColor(IndexedColors.ROSE.getIndex());
		style.setFillPattern(CellStyle.SOLID_FOREGROUND);
		cell = row8.createCell((short) 5);
		cell.setCellValue("X40");
		cell.setCellStyle(style);

		// Create a row and put some cells in it.
		Row row9 = sheet.createRow((short) 9);

		style = workbook.createCellStyle();
		style.setFillForegroundColor(IndexedColors.ROYAL_BLUE.getIndex());
		style.setFillPattern(CellStyle.SOLID_FOREGROUND);
		cell = row9.createCell((short) 1);
		cell.setCellValue("X41");
		cell.setCellStyle(style);
		style = workbook.createCellStyle();
		style.setFillForegroundColor(IndexedColors.SEA_GREEN.getIndex());
		style.setFillPattern(CellStyle.SOLID_FOREGROUND);
		cell = row9.createCell((short) 2);
		cell.setCellValue("X42");
		cell.setCellStyle(style);

		style = workbook.createCellStyle();
		style.setFillForegroundColor(IndexedColors.SKY_BLUE.getIndex());
		style.setFillPattern(CellStyle.SOLID_FOREGROUND);
		cell = row9.createCell((short) 3);
		cell.setCellValue("X43");
		cell.setCellStyle(style);
		style = workbook.createCellStyle();
		style.setFillForegroundColor(IndexedColors.TAN.getIndex());
		style.setFillPattern(CellStyle.SOLID_FOREGROUND);
		cell = row9.createCell((short) 4);
		cell.setCellValue("X44");
		cell.setCellStyle(style);

		style = workbook.createCellStyle();
		style.setFillForegroundColor(IndexedColors.TEAL.getIndex());
		style.setFillPattern(CellStyle.SOLID_FOREGROUND);
		cell = row9.createCell((short) 5);
		cell.setCellValue("X45");
		cell.setCellStyle(style);

		// Create a row and put some cells in it.
		Row row10 = sheet.createRow((short) 10);

		style = workbook.createCellStyle();
		style.setFillForegroundColor(IndexedColors.TURQUOISE.getIndex());
		style.setFillPattern(CellStyle.SOLID_FOREGROUND);
		cell = row10.createCell((short) 1);
		cell.setCellValue("X46");
		cell.setCellStyle(style);

		style = workbook.createCellStyle();
		style.setFillForegroundColor(IndexedColors.VIOLET.getIndex());
		style.setFillPattern(CellStyle.SOLID_FOREGROUND);
		cell = row10.createCell((short) 2);
		cell.setCellValue("X47");
		cell.setCellStyle(style);
		style = workbook.createCellStyle();
		style.setFillForegroundColor(IndexedColors.WHITE.getIndex());
		style.setFillPattern(CellStyle.SOLID_FOREGROUND);
		cell = row10.createCell((short) 3);
		cell.setCellValue("X48");
		cell.setCellStyle(style);

		style = workbook.createCellStyle();
		style.setFillForegroundColor(IndexedColors.YELLOW.getIndex());
		style.setFillPattern(CellStyle.SOLID_FOREGROUND);
		cell = row10.createCell((short) 3);
		cell.setCellValue("X49");
		cell.setCellStyle(style);

		// Write the output to a file
		FileOutputStream fileOut = new FileOutputStream(
				"POIFillAndColorExample.xlsx");
		workbook.write(fileOut);
		fileOut.close();

	}
}
The generated excel files looks like below images.

출처 - http://xiaohewoai.iteye.com/blog/1300817
'Framework & Platform > Spring' 카테고리의 다른 글
| spring security - How to have spring security context as child context (0) | 2014.01.09 |
|---|---|
| spring security - javaConfig (0) | 2013.12.31 |
| spring - util (0) | 2013.09.05 |
| spring - JavaConfig Example (0) | 2013.08.11 |
| spring - 자바메일(javamail) 예제 (0) | 2013.08.11 |


